Ideal Home |
- Home repairs you can DIY – easy fixes from dripping taps to squeaky floorboards
- How to change a tap washer – stop the dripping in minutes
- The cheapest times of year to make home improvements – from garden clearing to fitting a bathroom
- The Aldi pizza oven is back in stock this weekend - £500 cheaper than professional models
- How to panel a wall using gutter pipes – try this easy DIY step-by-step
- The reasons why good grout is key when it comes to perfecting a tiling scheme
- Best air purifier – improve your indoor air quality and reduce allergens
- 42 Easy DIY projects and fun makes to do this weekend for every room in the house
- May Bank holiday opening times for all your favourite DIY retailer and supermarkets
- How to dress a bay window – ways to overcome awkward layout with blinds, curtains and shutters
- DIY headboard ideas to create a stunning backdrop for your bed on a budget
- See how a DIYer saved £330 by transforming her hallway with paint and stickers
- Simba mattress deals – 35% off orders over £300
| Home repairs you can DIY – easy fixes from dripping taps to squeaky floorboards Posted: 28 May 2021 09:54 AM PDT Look around and you can probably spot at least a handful of home repairs that need doing. And equally, there could be countless reasons why you’re putting them off. Maybe you can’t afford to hire a tradesperson – or maybe your usual contacts are booked up. Or perhaps you’d like to have a go at fixing yourself, but don’t think you have the right skills or tools to do so. That’s where our guide to home repairs comes in. We’ve compiled guides to DIY and decorating tasks you can tackle yourself, with step-by-step instructions for how to get them right. Most will need a few basic tools, but we’re confident even novice DIYer should be able to get them done with minimal hassle, saving a fortune in the process. 12 toolbox essentials for home repairsBefore you get stuck into your DIY repair jobs, we suggest you check your toolbox is stocked with these essentials:
Home repairs you can DIY1. Repair squeaky floorboards Image credit: Robert Sanderson Fix squeaky floorboards and it’s not just that pesky noise you’re eliminating. Maintaining your old floor will also eliminate draughts, so your room will feel warmer. And, of course, there are aesthetic benefits. Start by using a claw hammer to remove any nails. Then use more secure screws to fix back into place, using the same hole that the nail was pulled from. If that doesn’t do the job, you may need to replace the board using our guide to how to fix squeaky floorboards. 2. Bleed a radiator Image credit: James French/Future PLC Learn how to bleed a radiator to remove any air that’s trapped inside. This trapped air could mean your radiator pumps out less heat, and leads to damage to your boiler in the long term. Our step by step will explain more. But you’ll simply need to locate the valve in the top corner of the radiator, and slowly turn a bleed key anti-clockwise to release the air. It’s a good idea to put towels down to protect the floor from leaking water. 3. Change your tap Image credit: Malcolm Menzies/Future PLC If you’re sick of the drip, drip, drip from your old tap, and it’s looking tired, forget changing the washer and replace the tap completely. Even DIY beginners can learn how to change a tap, although you’ll need quite a few tools for the job. These include a screwdriver, adjustable wrench and box spanner, as well as plumber’s pliers and tape. You may be able to borrow what you need from a friend or neighbour, but it may be worth investing in your own. Either way, once you have the tools, it’s a relatively straightforward job. 4. Replace the washer on individual taps Image credit: William Goddard This won’t apply to monobloc mixer taps (where to and cold water come out of one spout). But if you have old-school pillar taps, you’ll be able to fix any drips yourself by replacing the washer. You’ll need a wrench to unscrew the tap, a screwdriver to release the washer and the replacement washer. Pop the plug in the sink so you won’t lose any small parts down the plughole, and have towels to hand to mop up any water. Oh, and make sure you turn the mains off first, as explained in our how to change a tap washer guide. We’ll continue to update this guide with more jobs, and more step by steps, so you can tackle more DIY with confidence. The post Home repairs you can DIY – easy fixes from dripping taps to squeaky floorboards appeared first on Ideal Home. |
| How to change a tap washer – stop the dripping in minutes Posted: 28 May 2021 09:00 AM PDT Learning how to change a tap washer will save you from that annoying drip, drip, drip forever more, and save you the cost of calling a plumber. All it required is a few basic tools and a bit of concentration. Before you start this home repair, however, there’s one important thing to check, and that whether you have a monobloc mixer tap (as seen below) or regular pillar tap. Does my tap have a washer? Image credit: Future PLC Found in both kitchens and bathrooms, monobloc mixer taps have a single spout and one or two handles. The water is mixed in the tap, then released through the spout. A key thing to note is that they do not have washers. Instead, they have ceramic discs, which are very hard wearing. To replace a ceramic disc you would need to get a replacement cartridge from your tap manufacturer. Changing a tap washer – the tools you’ll needDon’t start the job before you’ve got the following to hand:
Image credit: William Goddard How to change a tap washer1. Locate your stopcock and switch off the waterTo start, turn off the mains water supply by turning the main stopcock off – a valve normally located under your kitchen sink – until your tap runs dry. If you are changing the washer on hot taps, you must also turn the immersion heater and boiler off. 2. Plug up the sinkPut the plug into the plug-hole of the sink to prevent losing the washer or any tap components when dismantling it. Next, unscrew the top plate of the tap. If you can’t do this by hand, use a wrench and protect the tap with a cloth first. 3. Take off the body coverSome taps have a body cover, which you will need to remove before you can unscrew the top section (or stem) of the tap to access the washer underneath. Secure the tap with another wrench while you remove this section. 4. Release the washer and replaceThe washer is underneath this and it will either be pressed into place or held in position with a nut. Use a screwdriver to release it then clean the stem before fitting the new washer. 5. Put the tap back together and testReassemble the tap, take the plug out of the sink and turn on the water supply to test the tap.
I’ve replaced the washer and my tap still drips. What should I do?If your tap continues to drip, its valve seating might be eroded. You can repair this using a washing and seating set, which you can buy from a plumber’s merchant. Alternatively you may need to replace the tap completely, with our guide to how to change a tap. We hope our guide will save you not just money, but the headache that comes from a dripping tap! The post How to change a tap washer – stop the dripping in minutes appeared first on Ideal Home. |
| The cheapest times of year to make home improvements – from garden clearing to fitting a bathroom Posted: 28 May 2021 06:00 AM PDT There’s no avoiding the regular maintenance our homes and gardens need, but you can at least do something about the cost. And no, we’re not talking about you donning your overalls and attempting to do all the work yourself. Or getting caught out by cowboy workmen with their knockdown prices. Instead, with some help from experts in their field, we’ve come up with a helpful property advice timetable, detailing the cheapest times of year to make home improvements. Whether you’re looking to clear you garden of weeds, insulate the loft or sweeps chimney, picking the right moment could mean you have a larger selection of tradespeople. And you’ll avoid paying over the odds for services that are in big demand at certain times of year. Cheapest times of year to make home improvements Image credit: Colin Poole 1. January is the cheapest time to clear the gardenUsually done: March Don’t wait until the warmer months to have your garden cleared – it’s far easier in winter because the foliage has died back. Less work (and potentially, a smaller skip) means a smaller bill for you. We estimate that a clearance job in winter would cost around £150 less than it would in the spring. 2. February is the cheapest time to fit a new kitchen Image credit: David Giles Usually done: May/June February is especially quiet for kitchen fitters, since most people want to get their kitchens revamped in time for Christmas, or don’t want the disruption when they have their kids at home in the school holidays. Negotiate, and you should be able to get at least a 10 per cent reduction on a fitter’s rates at this time. This also applies to kitchen extensions. 3. March is the cheapest time to replace or repair windows Image credit: Nick Pope Usually done: September/October From March onwards is an ideal time to get your glazing and/or frames replaced. Lots of people will leave it to the autumn, when they begin to feel a chill, but you might find a longer wait for your first-choice contractor. The better weather means you won’t have to deal with issues caused by damp and condensation, either. 4. April is the cheapest time to sweep the chimney Image credit: Simon Whitmore Usually done: October/November Generally, chimney sweeps are run off their feet between September and March. Appointments are more readily available in the quieter summer months and there’s more of an opportunity to negotiate rates. Also, lighter, warmer and drier conditions help when your sweep is examining the exterior chimney conditions. 5. May is the cheapest time to clear gutteringUsually done: October Contrary to popular belief, you should clear your gutters at the end of spring when you can be sure that the worst of the weather has passed. May is the best time of year – though we’d recommend that a professional cleans your gutters twice a year to prevent the build up of leaves and rubbish.  Image credit: David Giles 6. June is the cheapest time to fit a new floorUsually done: September to December Demand for flooring trades steps up from September as we move our focus from outdoor projects back indoors. June is therefore a great time to have new floorboards and carpets installed as everyone else will be more preoccupied with their gardens. At the very least you’ll be able to cherry-pick who will fit your flooring and when, and you might be able to wangle a discount, to boot. 7. July is the cheapest time to fit security systemsUsually done: October/November It’s only human nature to start thinking about security lighting and alarms as the nights get longer. But at that time of year several factors – including bad weather – make installing systems harder and therefore more expensive. As such, it’s generally cheaper to have the work done in the summer. Choose from one of our best smart home security systems for the greatest protection from thieves.  Image credit: Lizzie Orme 8. August is the cheapest time to replace the boilerUsually done: October/November During the summer, when our boilers aren’t working as hard and are therefore less likely to need running repairs. So if you’re looking to fix or replace a boiler you’ll find it far easier to get the appointment slot you want. Also, we’d estimate that you can make a 10-15 per cent saving when the market is less competitive. 9. September is the cheapest time to fit a new bathroomUsually done: January/June/July Booking a bathroom fitter in a quieter month could save you around 10 per cent in costs. September is a good time as the kids are back at school and people have just returned from their holidays, so they might not have the cash for a big project.  Image credit: Jamie Mason 10. October is the cheapest time to put up new fencingUsually done: June/July/August Looking to realise your garden fence ideas? During the summer, your garden is looking its best, so having fencers coming in and trampling down your borders and lawn isn’t ideal. Get hard landscaping jobs done later on when all the plants are dormant, and you might also find availability is higher and costs are lower. 11. November is the cheapest time to paint roomsUsually done: June Summer isn’t a great time to get hold of a decorator, because they are usually busy, particularly with exterior painting jobs. You might think it’s a hassle to get the painters in just before Christmas, but a quick prep and two coats should take two days at most.  Image credit: Polly Eltes 12. December is the cheapest time to insulate the loftUsually done: September It’s tempting to get this done at the first signs of cold weather. But if you can hold out, it’s worth it. At Christmas, your loft will be clear of decorations – and an emptier space means a quicker and less expensive job! The post The cheapest times of year to make home improvements – from garden clearing to fitting a bathroom appeared first on Ideal Home. |
| The Aldi pizza oven is back in stock this weekend - £500 cheaper than professional models Posted: 28 May 2021 06:00 AM PDT The mighty, professional Aldi pizza oven is returning to stores this weekend. Aldi has announced that its top-quality Large Stainless Steel Pizza Oven will be back in stores this Sunday due to customer demand – perfect for those looking to invest. The trendy new pizza oven is available online exclusively from Sunday 30th May, while stocks last. It’s time to strike while the, er, oven’s hot on this one folks.
Last year the Aldi pizza oven proved a sellout success, so you had better act fast on Sunday. Here’s your chance to grab a slice of the action, and cook like a pro. This year’s Aldi pizza oven
On Sale 30th May: Large Stainless Steel Pizza Oven, £499.99 Equipped with everything shoppers need to create restaurant-quality pizzas, the oven features a built-in door, chimney, a large peel – ideal for transporting the pizza from the oven to the plate. Along with a set of tools including a pizza wheel and mini spatula, perfect for sharing a slice with the whole family! Although the price doesn’t feel ‘cheap’ it’s a small price for the style of oven. In a price comparison, this quality stainless steel oven is £500.01 less than professional Roma Wood Fired Pizza Oven stainless Steel Extra Large, which will set shoppers back £1000!. Aldi BBQ Pizza Oven
Priced at just £39.99 the new barbecue pizza oven at Aldi is set to save a fortune on pizza deliveries, as chiefs of all levels can master the craft of fine pizza making from home. The pizza oven is currently out of stock, but Aldi promises it will be returning to stores soon. Boasting all the cooking credentials you could need for making award-winning pizza from home, at such a low price tag, it’s easy to see why this oven is already selling out fast. This supermarket model is portable, with 2 carry handles, for easy use. You can use this smart pizza oven on both gas and charcoal barbecues, to cook hearty pizzas of up to 12 inches – in only 10 minutes. This nifty little BBQ accessories is made of a ceramic stone with an easy-to-clean stainless steel interior. Available for just £39.99, it offered the perfect way to bring a touch of Italian alfresco cooking to the back garden, without breaking the bank.
The handy temperature gauge will indicate when the ceramic pizza plate is hot enough to cook the pizza to perfection. The durable steel construction comes with a pizza stone to create the perfect crispy restaurant-worthy pizza. The easy to use design is also easy to clean, making it an all-round winner for cooking great pizzas with minimal fuss. During these times of lockdown making homemade pizza has never been more welcome. It’s fun for all the family to join in and gives a great sense of achievement for a meal you’ve made from scratch – using all fresh ingredients.
As with all Specialbuys, once it's gone, it's gone. So if you don’t want to be left cheesed off by missing out again, get online and order yours pronto. The post The Aldi pizza oven is back in stock this weekend - £500 cheaper than professional models appeared first on Ideal Home. |
| How to panel a wall using gutter pipes – try this easy DIY step-by-step Posted: 28 May 2021 05:00 AM PDT Right now, you can’t turn a page in a magazine or scroll on Pinterest without spotting wall panelling. This nostalgic style is making a comeback thanks to hit Netflix series, Bridgerton – think grand drawing rooms with ornate wooden alcoves. Looking for modern wall panelling ideas? Don’t worry, there are lots of contemporary takes on the trend and easy hacks on how to panel a wall using DIY store essentials. Interior stylist and blogger, Luke Arthur Wells, has teamed up with COAT Paints to create two limited edition paint colours – Well Grounded and Humble. He’s showcasing these new shades with this step-by-step DIY. Are you ready to get your DIY on this bank holiday weekend? We're celebrating all things DIY with Ideal Home's Let's DIY This weekender, sponsored by Saint-Gobain Weber. You'll find everything you need to know to turn your dream DIY projects into a reality, including inspiring ideas, how to project advice and loads of expert tips. Happy DIYing! Panelling a wall – what you’ll need Image credit: COAT Paints
How to panel a wall – step-by-step1. Construct the backboardStart by constructing your backboard to the required size. Make a simple frame using wood battens to the height of the MDF boards. 2. Attach the MDF boardsFix the MDF boards to the front of the frame using a hammer and nails or nail gun. Leave the board flat to make it easier to attach the pipes. 3. Cut the gutter pipesUse a circular saw to cut the gutter pipes to the same height as your board. Try to buy a length of pipe that minimises waste when cutting.  Image credit: COAT Paints 4. Sand the gutter pipesOnce you’ve cut the required number of pieces, use 180 grit sandpaper to key the outside of the pipes. This will help the paint grip to the surface later on. 5. Glue the cut pipesApply PVC adhesive to the board using an applicator. Fix the cut pipes one by one. Apply pressure to ensure the pipes stick and allow to dry and cure before the next step.  Image credit: COAT Paints 6. Paint the panellingPaint the pipes using an eggshell paint. If you prefer, prime the surface first. Otherwise, the pipes will require three or four light coats to ensure complete coverage. Buy now: COAT Paints x Luke Arthur Wells paint in Well Grounded, £25 for 1L, coatpaints.com 7. Fix the panel to the wallOnce the paint is dry, fix the whole panel to the wall. If you have space on the board to drill, you can use screws and rawl plugs. Alternatively, use a flush mount plate fixing on the board and wall.  Image credit: COAT Paints And you’re done. It’s one of many easy DIY projects you can do in a weekend. ‘There’s always been this perception that beige is boring, but just like any colour, there’s a lot of variety in tone to play around with. Humble and Well Grounded are a duo of rich yet energetic beige and taupe. There’s a certain playful quality to these colours that I think brings a lot of character to the room,’ says Luke. ‘This super-sized 3D feature wall is another take on the panelling trend. I made it using PVC gutters, from the local DIY store, cut to size and mounted onto a backboard. It’s super dramatic and adds an amazing texture to the space.’ The post How to panel a wall using gutter pipes – try this easy DIY step-by-step appeared first on Ideal Home. |
| The reasons why good grout is key when it comes to perfecting a tiling scheme Posted: 28 May 2021 04:14 AM PDT When it comes to creating fabulous tiling, it’s as much about the grouting as it is about the tiles themselves. An essential for all tiling projects – be it a colourful solution to make a statement with a kitchen splashback or a subtle bonding for durable floor tiles in a hallway – grout is so much more than mere filler. As the bond that holds the whole tiling scheme together, tile grout can not only ensure your tiling withstands the test of time, it can also add colour to enhance the look of your bathroom, kitchen or hallway. For a masterclass in good grouting we asked the experts at Weber for the things to consider when grouting your tiles. What should home owners look for in a good grout?One of the most important considerations when sourcing grout is determining what purpose it stands to serve. In bathrooms and kitchens water and heat resistance is key – because if the grout isn’t up to the job it won’t last. Will it stand the test of time or will it need to be replaced? The simple answers is yes, a good quality grout is highly-durable and therefore will last for years to come, meaning it won’t require replacing. How will grout hold up against spillages and mould? ‘The weberjoint premium wall and floor tile grout with PURE CLEAN Anti-Stain Technology contains special additives that repels dirt from the surface,’ explain the experts. This quality makes it ideal for a kitchen scheme as this unique feature reduces the appearance of patchiness and greatly improves resistance to staining and discolouration. Mould Stop Technology offers lasting protection from mould growth, making it a great choice for rooms with lots of moisture such as bathrooms, kitchens, boot rooms and porches.  Image credit: Saint-Gobain Weber When considering the colour, look for a grout that offers versatility. The weberjoint premium grout is available in 18 colours, including browns and greys that have been specifically chosen to complement wood effect flooring tiles. Together with matching Weber silicones they achieve a consistent finish and a smart aesthetic. Using an alternative coloured grout to that of your tiles can help to make a style statement. In this bathroom (above), classic white Metro tiles are given a contemporary edge thanks to the addition of weberjoint premium grout in black. The result is an effortlessly chic monochrome vibe. What happens if you get grout wrong?‘Leaky tiles can occur anywhere where water is used, whether it's a shower, a wet room or a kitchen splashback,’ warn the experts at Weber. ‘Leaky tiles often cause damp and mould within surfaces behind tiles which damages the tile adhesive and can even threaten the structural integrity of walls.’ If your existing grout is visibly cracked or crumbling, it’s likely water is getting behind the tiles and causing unseen damage, that by the time it becomes apparent could be costly to repair. Once there’s water damage the chance of tiles becoming loose is much more likely, and it’s possible they might fall off the wall altogether. ‘As a last resort you may need to remove the tiles in order to fix any leaks. To give your walls (and your tiles) the correct protection, it's a good idea to use an under tile tanking kit. This is a waterproofing system specifically designed for use in bathrooms and wet rooms.’  Image credit: Saint-Gobain Weber Weber expert tips for applying grout:
 Image credit: Saint-Gobain Weber This slate-style tiled bathroom uses weberjoint premium grey grout to match the highlighted tones running through the tile design. The result is a subtle yet effective contrast to add depth to the look. Top tips for choosing grout tiling colours
See for yourself the amazing benefits of PURE CLEAN Anti-Stain Technology in weberjoint premium grout: Now you’re all set to start your own DIY tiling project. Are you ready to get your DIY on this bank holiday weekend? We're celebrating all things DIY with Ideal Home's Let's DIY This weekender, sponsored by Saint-Gobain Weber. You'll find everything you need to know to turn your dream DIY projects into a reality, including inspiring ideas, how to project advice and loads of expert tips. Happy DIYing! The post The reasons why good grout is key when it comes to perfecting a tiling scheme appeared first on Ideal Home. |
| Best air purifier – improve your indoor air quality and reduce allergens Posted: 28 May 2021 03:30 AM PDT Many people are waking up to the fact that the air quality in our homes can be very poor. This not only opens up to extreme symptoms during allergy season, but also to ill-effects from excess dust and pollution that enters our space. Having an air purifier in the home can therefore make a massive difference. Research has shown that the air we breathe every day is often worse than that outdoors on all but the most polluted streets. Particles from traffic fumes, pollen and more are pulled in as we enter the front door or open a window and there often isn't enough ventilation to remove them. The chemicals in cleaning products, fresh paint, new furniture, cooking fumes, dust and other nasties only add to the problem. You may think regular cleaning and vacuuming keeps the problem of bad air at bay, but this alone can't deal with anything smaller than dust particles. A dedicated air purifier will thoroughly clean the air and, if you pick a good one that's the right size for the room, you'll really notice the difference. Read on to find out how to choose the best air purifier for your space.
The best rated air purifiers 20211. Blueair Blue 3210Best home air purifier overall  Credit: Blueair Room size: 17m2 Reasons to buy: Lovely, small design; Interchangeable coloured pre-filter sleeves; Quiet Blueair has become a true leader in the air purifier space, and the Blue 3210 has a lot of the same great features but with a serious upgrade in terms of style. Simpler than other high-tech air purifiers with a 'plug and go' system, it's also whisper-quiet and whirs into action as soon as unwanted particles enter the space. Without an app, you can control the purifier with a single touch control on the top of the device. Modes include Auto (which we used the most), Night, Everyday and Boost. The Night mode turns the fan speed down to its lowest setting, but in our experience it is quiet enough on Auto to sleep through. The Blueair Blue 3210 comes with a choice of sleeves that serve the dual purpose of pre-filter and a way to fit your device to your personal style. The colours include dark grey, light grey, pink, green and blue. We tested with the pink (Archipelago Sand) and green (Aurora Light) variations, and they look as lovely in real life as they do in images. Ideal Home rating: 4.5 out of 5 stars 2. Levoit Core 300 Air Purifier Credit: Levoit Room size: 40m2 Reasons to buy: Very quiet on lowest settings, eco-friendly, sleep mode An affordable but high-performing option, the Levoit Core 300 is a low-maintenance device that is capable of cleaning a room up to 40m2. The HEPA H13 filter does a brilliant job of clearing 99.97% of pollutants from the air, from dust to smells and pet hair, and it does it without making a huge amount of noise. It’s true that the Dimplex DXAPV3N listed below is even cheaper than the Levoit offering, it can still be considered a budget option for those who just want something that will clear their living area or kitchen. It’s easy to use, too, with user-friendly controls on the top of the machine and a simple design that makes checking the filter (and replacing it) a doddle. We also really like how the Levoit Core 300 looks, combining the white cylinder design that’s common in the air purifier world with a more design-friendly minimalism. The size also makes it easy to tuck away in a corner or under a desk if you don’t want it to be a focal point. Ideal Home rating: 4 out of 5 stars 3. Dyson Pure Cool MeBest purifying fan
Weight: 2.8kg Reasons to buy: Dyson’s engineering ensures clean, filtered air The industrial design is similar to Dyson's larger Air Multiplier fans, but they don't filter all the air: air that passes through the machine's fan is filtered but then the clever design multiplies that air by pulling more (unfiltered) air along with it. The design is cute. It measures 401 x 254 x 274mm. You choose the angle of airflow up and down manually with your hand but there's a small remote control for everything else. This attaches magnetically to the front when not in use. You're a bit lost without it: only able to turn the fan on and off. With the remote you can choose fan level (0-10), oscillation (off or 70 degrees), sleep timer (30 mins to 8 hours) and see how much life the filter has left. There is a filter change alert and its life is given as a year if used 12 hours a day. It uses an activated carbon and glass HEPA filter and noise is 44-61dB. Unsurprisingly, it sounds like a fan. We tested the Dyson just like the others, to see what impact it had on air quality in an average-sized bedroom. The results weren't terrible: it removed 67 per cent of PM2.5 and 79 per cent of PM10 particles in an hour. This means that despite not setting out to purify the air in the whole room, it does a better job of it than some. The focussed beam of air is pleasant and cooling in the summer. So if you're in the market for a fan anyway, and your budget stretches to the Dyson, it's a good buy. It would be lovely on a bedside table or desk in the summer. But if your priority is air purification then you can get something better for much less. Ideal Home rating: 4 out of 5 stars 4. Dimplex DXAPV3NBest budget air purifier
Weight: 1.4kg Reasons to buy: It’s on a discount right now, so great if you’re on a budget If you're on a really tight budget, this slim air purifier is better than no air purifier at all. It's the size of a cookbook stood upright (333 x 248 x 133mm) so doesn't take up much space on a bedside table. The control is simply a lever on the right-hand side that chooses between the two speeds and off. Noise levels are 40-50dB. On both settings it sounds like a fan but it's a white noise you could easily ignore and go to sleep with. Filter life is quoted as 2,000 hours of use but there's no filter change indicator. Filtration is HEPA and carbon but the size of the filter is small compared with others on test, so it's surprising that it claims to be suitable for a room measuring up to 28m². The technical data reveals that this is based on 1.75 air changes per hour. So if you want 5 air changes per hour, your room would have to be just under 10m², which sounds more realistic. CADRs for smoke, pollen and dust are 80, 89 and 79m³/h, much lower than others on test. These were borne out by the test results. It removed 57 per cent of PM2.5 and 66 per cent of PM10 particles in an hour. This makes it the least effective air purifier on test but it's also by far the cheapest. If you have a small bedroom then using the Dimplex would improve air quality. But we'd recommend the Blueair 411 as well worth the extra expense. Ideal Home rating: 4 out of 5 stars 5. TaoTronics TT-AP005 Credit: TaoTronics Weight: 2.7kg Reasons to buy: lightweight and small enough for most spaces; 12-hour timer; quiet on lowest settings A 3-stage filtering system including HEPA and carbon and a simple design with light indicator make the TaoTronics TT-AP005 air purifier a fantastic option for anyone who is enamoured with some of the ‘fancier’ features of more expensive models but who doesn’t want to spend the earth. The purifier will suit anyone wanting cleaner air in a space up to 323 sq ft. Like products from Dyson and Blueair, the TT-AP005 has a light on top that indicates air quality – blue for excellent, green for good, orange for moderate and red for poor – that helps you manage its performance. There’s no app or smart home compatibility, but you can set a timer for 2, 4, 8 and 12 hours or place it in sleep mode to reduce noise to 24dB. The fan can also be adjusted between three speed settings, or you can put it in auto mode to let the purifier manage itself based on air quality. How to choose the best air purifier Credit: Blueair Do air purifiers work?Yes. Read the reviews because some are better than others and you should pick the right machine for your room size. But yes, they remove everything from dust to very fine particles from the air, quietly and invisibly. In the summer, opening doors and windows for ventilation is a great way to improve indoor air quality – unless you live on a really congested road. But in colder months an air purifier is just the ticket. Are air purifiers effective?Improving indoor air quality is beneficial for anyone. Given a choice between walking down a polluted main road or a side road next to a park, you'd pick the latter every time. Indoor air quality is under threat from wafted-in pollutants, allergens, dust particles, candles, open fires, Volatile Organic Compounds (VOCs) from cleaning products and "off-gassing". This is a process where VOCs are released from paints and plastics for years. So using an air purifier is like taking the leafy side of the road. They can be especially helpful if anyone in the family has asthma or allergies. Where to place an air purifierThe machine cleans and circulates all the air in the room. So the only thing that matters is not to place it too close to the wall or furniture. You want 10cm around it on all sides to guarantee airflow in and out of the air purifier. Room-wise, if you pick one room, pick the bedroom. You spend about a third of your life in there, hopefully with the door shut (which is better for fire safety, too). The clean air will help promote deep sleep, as well as being good for your health. Do air purifiers remove smells?Air purifiers that use activated carbon filters will remove the Volatile Organic Compounds (VOCs) that cause smells. That could be a musty smell or the particulates from a scented candle or aerosol. How long does it take for an air purifier to clean a room?It depends not just on the air purifier but how big the room is. Measure your floor space and look for a machine that promises to clean the air in a room of that size five times an hour. Which means it filters all the air in the room once every 12 minutes. Machines sometimes claim to clean large spaces but then they only promise to clean the air a couple of times an hour. How much should I spend on an air purifier?For one room: £150 and look at the Blueair 411, which outperforms others that cost more. Budget £500-700 if you want to clean the air in a much larger space. What are the different types of filter and which do I need?The more stages of filtration, the better, to remove different sized particles.
How do I get the right-sized machine for my room?Measure your floor space in m². Then pick a machine that promises to clean the air in the room five times an hour. Ceiling heights are pretty consistent so this is accurate enough. If you enjoy maths homework then you can measure the volume of the space in m³ and look at the Clean Air Delivery Rate (CADR) of various machines to see which suits you best. What else should I think about when buying an air purifier?Noise if you're sensitive to it, measured in decibels (dB). If you want a discreet air purifier, consider a machine that's quiet on its lowest setting. Or one with an auto mode that is quiet unless it needs to scrub the air more, which is unlikely in the middle of the night. Sleep timers are ok for the bedside but surely it's better to have a quiet machine that you can leave on, so the air is clean all night. How we test our air purifiersOur testers Caramel and Caroline have decades of experience of reviewing technology products between them. Writing for, among others, The Evening Standard, The Express, The Guardian, The Independent, The Mail on Sunday, The Sunday Mirror, The Telegraph and The Sunday Times, Caramel has long been part of the Ideal Home family and knows exactly what you're looking for in an air purifier. London's air pollution, along with two tweens and a dog, meant that the air in Caramel's house needed a good scrub. She tested each machine rigorously at home, taking into account the size, price, controls, features and noise levels as well as the all-important air purification performance. Performance was tested using expensive high-end industrial equipment, namely the Met One Instruments Model 804 Handheld Particle Counter. For each air purifier, Caramel tested the room's initial air quality and then tested it again after the air purifier had been used at its top setting for an hour. Finally, she compared the two sets of results to establish how well the air had been cleaned. She focussed on the PM10 and PM2.5 figures for our test because these are the ones the World Health Organisation uses as benchmarks of air quality. These are particles measuring no more than 10 microns and no more than 2.5 microns. The post Best air purifier – improve your indoor air quality and reduce allergens appeared first on Ideal Home. |
| 42 Easy DIY projects and fun makes to do this weekend for every room in the house Posted: 28 May 2021 03:30 AM PDT Are you stuck for something to do this weekend? We were, too, until we compiled this list of easy DIY tasks and projects to tackle over the weekend. It doesn’t matter whether you have two days, two hours or a handful of minutes to tackle a job, as we’ve got all bases covered. Best of all, each project on the list is easily achievable and most require minimal supplies to get them done. I’ve already tackled a few of these at home – begging and borrowing items like paint, a rotary sander and even old house bricks (!) from next-door neighbours. Of course, abiding to all-important social distancing laws is still key, so we’ve tried not to stray too far or order things unnecessarily. But you’ll be surprised how many of these easy DIY and Decorating jobs you can tick off just by using the tester pots and tools gathering dust at the back of the shed! Are you ready to get your DIY on this bank holiday weekend? We're celebrating all things DIY with Ideal Home's Let's DIY This weekender, sponsored by Saint-Gobain Weber. You'll find everything you need to know to turn your dream DIY projects into a reality, including inspiring ideas, how to project advice and loads of expert tips. Happy DIYing! 42 Easy DIY projects do this weekend1. Paint a faux headboard Image credit: Crown Use a leftover tin of paint to transform your bedroom. ‘Creating a perfect semi-circle with paint is easier than you think’ says Judy Smith, Crown Paints Colour Consultant. ‘First of all, measure the length of your wall and mark its centre, or wherever you want the centre of your semi-circle to be.’ ‘Hammer a nail into the spot you've just marked, just above the skirting board. Depending on how wide you want your semi-circle to be, measure out some string and cut it to size. The longer the string, the bigger the semi-circle. Tie one end of the string to a pencil and the other end to the nail. If you're not allowed to use nails on your wall, extra strong tape will hold the string in place.’ ‘Once you're all set, start tracing out your semi-circle on the wall from one way to the other. Making sure you're pulling the pencil tight on the string. Once you've drawn the outline, use a small paint brush to create a precise edge at the top of your semi-circle. You can then go in with a paint roller or larger brush to fill in the rest of the shape.’ 2. Rack out the shed Image credit: Store A long weekend is the perfect time to do the jobs you have been putting off, but will benefit from greatly – such as the task of racking out the shed. Get your garden storage in order to make tending to your plot a joy throughout the season ahead. 3. Give an old piece of furniture a colourful makeover Image credit: Heather Young Do you have an old piece of wooden furniture such as a chest of drawers, sideboard or wardrobe that is looking dated and in need of a new look? A simple coat of furniture paint goes a long way to make something old feel brand new. Let this fine example inspire your own DIY project. This wardrobe transformation is the work of Ideal Home’s Editor Heather Young who has upcycled an old family heirloom for her young daughter’s room. See Heather’s upcycled wardrobe transformation for yourself. 4. Put up simple shelves Image credit: Polly Eltes A clutter free home is a happy home. A simple yet highly effective DIY and decorating task is putting up shelves to free up surface space in any room. It’s often the easy tasks we delay doing most, but we say don’t delay because the results are totally transformative. Watch our easy guide for how to put up a floating shelf. 5. Nail together a DIY garden signpost Image credit: Pelargonium for Europe Though all the projects listed here should be relatively straightforward, we’ve starting with a REALLY easy one. And given we are finally allowed to have friends in the garden, it couldn’t be a more perfect time to do it. You can use any leftover bits of wood from indoor DIY projects and those tester pots from paint that wasn’t quite right for the walls. Here’s how: How to make a DIY garden signpost with leftover outdoor paint and upcycled wood battens 6. Make a family of grizzly planters Image credit: Hobbycraft This grrrrr-eat little project for pot plants with personality is one you can get the kids involved with. It uses air-drying clay, which is readily available online, plus acrylic paint and some sandpaper. Try your hand: How to make DIY bear plant pots. 7. Give your shower door a steel-framed makeover Image credit: Jasmine Gurney Next up, we’ve taken a tip from savvy DIYer Jasmine of Instagram's @_OhAbode. She gave her shower screen this cool Crittall-style finish using black electrical tape. The budget hack cost the grand total of £2, but looks super stylish. See this savvy before and after crittall effect shower door hack made for just £2! 8. Transform doors and windows with film Image credit: The Window Film Company Window film is available to buy online, but you can also buy designs at the likes of B&Q and Screwfix. Use it to create an on-trend fluted pattern on plain glass doors, or to give yourself more privacy by covering the bottom half of windows. 9. Paint the ceiling Image credit: Future PLC/ David Giles It’s got to be one of the biggest and most transformative decorating trends of the year. And painting the ceiling is a bold change that will make a room feel dramatic, cosy, and that bit more ‘designer’. It’s easy to achieve, too. 10. Panel your walls Image credit: Future PLC/ Dominic Blackmore Another big trend hitting homes in 2021 is the one for wall panelling. It’s now readily available in DIY stores as primed-to-paint, stick-to-the-wall panels. But you can also have a go creating a bespoke look with MDF batons or strips. Take a look at our wall panelling ideas for different options and the basics of how to do the job. 11. Upcycle a chest of drawers into a planter Image credit: Future PLC/ Colin Poole We love this brilliant idea for breathing new life into an unloved piece of furniture by literally filling it with new life! Paint and some plastic lining to hold the soil are the main ingredients for this satisfying job. Let’s DIY this! How to upcycle a planter – just in time for summer. 12. Hang new curtainsImage credit: Future PLC/ Nick Pope Do you have a pair you’ve been meaning to hang for a while? Or are you thinking of running up some new curtains yourself? This guide might help…Here’s How to hang curtains beautifully – whether in a tricky bay window or a simple setting. 13. Paint the stairs Image credit: Future PLC/ Colin Poole Stick of the sight of that stained old stair carpet? Tear it up and replace with a gorgeous paint job. You could try a graduated ombre effect using a range of tests pots on the risers, keeping to one colour on treads. Let’s DIY this: How to paint a staircase to transform your hallway by painting your steps. 14. Create a garden path or edge a border with old bricks Image credit: Future PLC Put that pile of leftover bricks to good use and make a path that mirrors the shape of your flowerbeds. Lay them long and sideways in a bed of gravel to create a patterned curve. 15. Hang your photos image credit: Future PLC/ Simon Whitmore Why not use this time to audit all the photos on your phone, then print a few out and create a wall of photos? Play with composition – especially in areas like stairways or hallways, where walls are often bare and uninspired. For a smarter look, stick to photo frames of the same colour, and print all photos in either colour or black and white, rather than mixing and matching. 16. Wallpaper the bathroom Image credit: Future PLC/ David Giles All that white sanitaryware does put a bathroom in danger of feeling cold and clinical. One way to add colour is to paper the walls in an on-trend botanical print. you can use any wallpaper to do this – as long as you treat it correctly. 17. Try this spice rack hack Image credit: Future/Dominic Blackmore Spice racks can be so much more than storage for your garam masala! Hang them upside down and they become a rail for hanging baby clothes or jewellery. And the right way up, they can hold anything from plants to books. 18. Tile a splashback Image credit: Future PLC/ Jake Curtis Protect the wall behind a sink or oven with a newly tiled splashback. You can give a kitchen, bathroom or cloakroom a whole new look in just an afternoon! Let’s DIY this! How to tile a splashback to protect walls and add a splash of style to your decor scheme. 19. Build a pallet sofa
Turn your garden into another room and give the whole family more space by building a sofa out of old pallets. Let’s DIY this: How to make pallet garden furniture – a step-by-step guide. 20. Paint your front door image credit: TI Media Impress your neighbours by painting your door, boosting your home’s curb appeal. Let’s DIY this: How to paint your front door to offer plenty of kerb appeal 21. Turn a wine rack into a towel holderLooking for affordable bathroom storage? Take an inexpensive wine rack, fix it to the wall or pop it on a vanity unit and use it to store rolled up towels. 22. Make trendy terrazzo plant pots Image credit: Rust-Oleum Bored teens might like to try this fun make. Give plain plant pots a jazzy makeover with our simple guide on How to make terrazzo planters – create some pretty plant pots for your greenery. 23. Paint your fences Image credit: Future PLC/ Allun Calendar Get that garden ready for barbecue weather and paint the fences. You don’t need to stick to one colour or stain – why not try a pretty pattern? Let’s DIY this: How to paint a fence 24. Add pizzazz with a mural Image credit: Future PLC/ James French Grab those tester pots and let your imagination run wild! See all our imaginative paint ideas – to create feature walls and paint effects to give any room a makeover. 25. Paint your floorboards Image credit: Future PLC/ Lizzie Orme Sort out that tatty old wooden floor by painting it white, or go further and add a patterned stencil for extra wow! Let’s DIY this! How to paint floorboards white or any other colour – plus tips for adding a stylish stencil pattern 26. Make a macrame plant hangerYou’ll find this knotted make super relaxing! Let’s DIY this: How to make a macrame plant hanger to add greenery to your home 27. Paint your kitchen units Image credit: Future PLC/ Colin Poole Give your tired kitchen a whole new look by painting the units…Let’s DIY this! How to paint kitchen cabinets – give your units a whole new look 28. Or just change the cabinet handles Image credit: Ikea You can order these sexy leather pulls online from IKEA. All you’ll need for this is a screwdriver and your replacement handles! Buy now: Osternas leather handles, £15 for two, IKEA 29. Cover your worktops with vinyl and fake a marble look Image credit: Future PLC/ Lizzie Orme You could also revamp a dining or coffee table with an easy-to-use marble effect film. The adhesive film simple sticks to your existing work surface to provide a new look in an instant. 30. Build a living plant wall Image credit: Dobbies Go green indoors or out with the ultimate plant wall. Our friends at Dobbies have explained exactly how to get wall of fabulous foliage. Let’s DIY this: How to make a living plant wall 31. Upcycle a bathroom vanity unit
Give an old table or chest a second chance, and potentially create more storage in the bathroom.Discover How to upcycle a vanity unit – to create a super-stylish piece of furniture. 32. Wallpaper your stair risers Image credit: Future PLC/ Jake Curtis If painting them isn’t enough, here’s a fun way to add pattern. Let’s DIY this: How to wallpaper your stairs to add colour to your hallway. 33. Swap your door handles Image credit: Future PLC/ Paul Raeside It’s a simple job that will take less than an hour! Let’s DIY this: How to fit a door handle – change your door knob for a new one. 34. Plant a hanging basket or two Image credit: Future PLC/Mark Scott There’s an art to it, but do it right and you’ll bring colour to your garden all summer long. Follow these top tips: How to plant a hanging basket totransform your garden with this pretty outdoor accessory 35. Switch your kitchen tapImage credit: Future PLC/Malcolm Menzies Sick of the drips? You can do this yourself in a jiffy! Let’s DIY this! How to change a tap and give your kitchen a fresh new look 36. Make your own ‘stoneware’ vases with spray paint! Image credit: Rust-Oleum Become a craft potter without the mess of moulding clay. Let’s DIY this: How to create a stunning stone-effect vase for just £6 using a can of spray paint 37. Make a pallet bed Image Credit: Brent Darby Taken from the brilliant book ‘Pallet Style’, this more ambitious make might take the weekend. But if you are looking for a new bed right now and can’t have one delivered, this might provide a temporary solution. Let’s DIY this: How to make your own pallet bed – a step-by-step guide. Buy now: Pallet Style: 20 Creative Home Porjects by Nikkita Palmer, £11, Amazon 38. Set up an outdoor cinema Image credit: Cuprinol Take move nights outdoors for a change of scene. Let’s DIY this: How to make an outdoor cinema in your back garden to enjoy movies without having to leave the house. 39. Sew some pretty bathroom storage Image credit: Hobbycraft Our friends at Hobbycraft shared this easy make with us. If you’re looking to tame the clutter of toiletries in your bathroom, why not grab some scraps of fabric and have a go? Here’s how: How to make fabric bathroom storage boxes – for toiletries, make-up and hair accessories 40. Build a ‘mum cave’ under the stairs Image credit: SWNS One of our favourite stories of the year so far comes from a mum that decided to create a little escape in the small cupboard under the stairs. 41. Use kitchen storage to reorganise your workstation Image credit: Future PLC/Dominic Blackmore Working from home? Bring a bit of order to your desk by using kitchen storage – such as this trough and spice rack – as a place to stash stationery. 42. Brighten up an outdoor wall Image credit: Sandtex Paint old frames in different bright colours and fill them with succulents for a dramatic transformation. You could do the same with mirrors, too!
Good luck with your projects, and don’t forget to tag us on Instagram @idealhomeuk and add the hashtag #letsDIYthis. The post 42 Easy DIY projects and fun makes to do this weekend for every room in the house appeared first on Ideal Home. |
| May Bank holiday opening times for all your favourite DIY retailer and supermarkets Posted: 28 May 2021 03:00 AM PDT Hurray for the looong weekend! A whole day extra, to do with as we like. Whether you’re tackling a DIY project or hosting a BBQ, we can guarantee one thing you won’t like to do is waste any of the free time. And that includes turning up to the shops and find them closed! Because this can happen, as shops often open and close at unusual times during any holiday period. We’ve compiled a handy one-stop list of DIY store and supermarket May Bank Holiday opening times, to make your life a little bit easier.
May bank holiday opening times 2020Tesco bank holiday opening times
On Monday, most Tescos around the UK will open from 8am to 6pm. However, most Tesco Express stores will be open as usual throughout the weekend. Opening hours may vary from store to store, so Tesco advise customers to visit the Tesco store locator to check their local store's opening times over the bank holiday weekend. Sainsbury’s bank holiday opening timesAll Sainsbury’s stores will be open as usual from 8 am to 10 pm, but times may vary from town to town. You can check the specific time for your local branch closer to the time using the Sainsbury’s store finder. Asda bank holiday opening times Image credit: Asda The opening hours will vary depending on the store. But generally speaking stores will be open on Sunday from 10am-4pm and Monday 6am-8pm. You can check the specific time for your local Asda branch using the online store finder. Morrisons Bank Holiday opening timesAcross the long weekend the normal Sunday hours apply 10am-4pm at Morrisons. On the Monday the store will be open from 7am to 8pm. Use the Morrisons store locator to find more specific local store opening times, especially for stores with petrol stations. Waitrose Bank Holiday opening times Image credit: Waitrose & Partners Waitrose is open this Sunday from 10am-4pm and on bank holiday Monday 8am-6pm. Use the branch finder to check the timings of your local Waitrose. Aldi Bank Holiday opening timesAldi supermarkets will be open normal working hours over the May bank holiday weekend, that’s Sunday 10am-4pm. However, it will be adjusting its hours on Monday to 8am-8pm. For more specific local store times, visit the Aldi store finder.
Lidl bank holiday opening timesThe discount supermarket will be operating a special bank holiday opening time of 8am-8pm (instead of 8am-10pm). However normal Sunday hours of 10am-4pm apply. For specific times at your local store, visit the Lidl store finder.
B&Q bank holiday opening timesThe DIY retailer is there for all your need this week, with stores open business as usual. To check your local store times visit the B&Q store finder. Wickes Bank Holiday opening times Photo credit: Geography Photos/Contributor Getty Images No need to panic, Wickes opening hours over the bank holiday are pretty standard across Saturday, Sunday and Monday. Sunday hours are 10am-4pm. To see specific details for your local store check the Wickes Stores. Homebase bank holiday opening timesThis DIY hero is one hand all weekend too, open Saturday 8am-8pm; Sunday 10am-4pm and Monday 8am-8pm. Check the opening times of your local store using Homebase store finder. High Street May bank holiday opening times 2021Argos bank holiday opening times 2021 Image credit: Argos Argos opening times vary from store to store, nationwide. On Sunday, stores are open as normal from 10am-4pm and on Monday they will be opening with reduced hours from 10am to 5pm. Check the opening times of your local store using the Argos branch finder. John Lewis bank holiday opening times 2019The majority of John Lewis stores will be open from 9am-5pm over the long weekend. But operating normal Sunday hours of 10a.m-4pm. Find your local store for more specific timings.
Happy (sunny) bank holiday to all! The post May Bank holiday opening times for all your favourite DIY retailer and supermarkets appeared first on Ideal Home. |
| How to dress a bay window – ways to overcome awkward layout with blinds, curtains and shutters Posted: 28 May 2021 02:00 AM PDT Bay windows are a beautiful feature in any room, but dressing them can be tricky business. While the architectural detail is an attractive addition to add interest to a room it presents an awkward shape for dressing with curtain ideas and blinds. Here are our top ideas and designs for dressing bay windows – which work in any room and space. How to dress a bay windowCombine Roman blinds with curtains Image credit: Future PLC/ Katie Lee Choose a Roman blind for each bay window dressing, and measure them to hang slightly over the frame of the window to ensure the entire glass is covered and there are no gaps at the edges of the blinds. Go for a large scale pattern for the blinds to create impact and team with a plain curtain in a toning colour. Roll-up Roman blinds are a simple solution for bay windows, while the curtains can either add extra privacy and warmth, or can simply be a decorative addition, framing the window for a smart finish and without the need to be drawn. Use cafe-style curtains or shutters at the bottom of the window Image credit: Future PLC/ Rachael Smith For an informal effect, hang pieces of light fabric or shutters at the bottom half of the bay window, allowing light through the top half, but also creating privacy – especially important in a bedroom. Hem the panels of fabric and hang them on a flexible net curtain wire, so they can be gathered at the side if you need more light. Interior designer reveals what not to do when choosing curtains – from measuring to styling, for more inspiration. The overall look is laid back yet contemporary, and bring the look together with other natural elements around the room, like linen cushions and pale furniture. Hang a curtain at each window Image credit: Future PLC/ Tim Young Curtain poles for bay windows can be expensive and tricky to fit around curves and bends, so fitting a separate pole at each window is a good option. Hang a pair of curtains at the middle window and then frame each side with another curtain. This will create an extremely sophisticated look, bringing the focus to the bay, and tie back hooks fitted high up will allow the curtains to be gathered in an attractive swag of fabric. Finish the look with a narrow pelmet around the top of the window in a dark fabric to draw the eye upwards and create a sense of space. Hang curtains across the front of the bay Image credit: Future PLC/ Rachael Smith For a simply, fuss-free look, hang a thin wire rail across the front of the bay window and use a light muslin or linen curtain to create privacy without blocking out the light. If you have a desk area or storage in the bay window space that you want to hide, then this curtain can act as the ideal screen, keeping the rest of the room clutter-free. Combine panels with curtainsLightly patterned fabric screens are a neat way of diffusing light and creating privacy at a bay window. Fit the screens on a sliding rail, which is designed to fit around the curves of the bay. Combine with a curtain at each side. These curtains only need to be drawn at the sides of the bay, and can be fitted onto a simply rail, fitted at the top of each side window. Choose a bolder patterned fabric for the side curtains to create an eye-catching frame around the bay. The post How to dress a bay window – ways to overcome awkward layout with blinds, curtains and shutters appeared first on Ideal Home. |
| DIY headboard ideas to create a stunning backdrop for your bed on a budget Posted: 28 May 2021 01:00 AM PDT  Your bedroom decor can be instantly updated with the simplest of changes – for instance a fresh new bedding set can inject a bold accent colour or a switch of bedside lamp to uplift the scheme. But when it comes to bigger changes such as the bed itself we can often feel halted by our budget, because so often a new bed is not cheap – plus we are more mindful than ever of waste. The solution, if you have a perfectly good bedstead but want to change things up is an affordable DIY headboard idea to give your bedroom a style makeover. From fabric panels hung on the wall behind the bed to savvy storage solutions that double up as a headboard, there’s a DIY and decorating option for all budgets and styles. Are you ready to get your DIY on this bank holiday weekend? We're celebrating all things DIY with Ideal Home's Let's DIY This weekender, sponsored by Saint-Gobain Weber. You'll find everything you need to know to turn your dream DIY projects into a reality, including inspiring ideas, how to project advice and loads of expert tips. Happy DIYing! DIY Headboard ideas1. Fashion a fabric cover image credit: Future Publishing PLC/ Dan Duchars To makeover an existing fabric headboard you simply need a new fabric to breathe new life into the scheme. Make a loose cover, in the same manner you would do for a chair, that neatly ties at either side of the existing headboard. The new cover will conceal the old headboard, giving you the freedom to change the decor scheme in an instant. The beauty of such a versatile solution is that it can be changed as frequently as you decide, as a bonus it’s easily removable and therefore washable. 2. Double bedroom storage as a headboard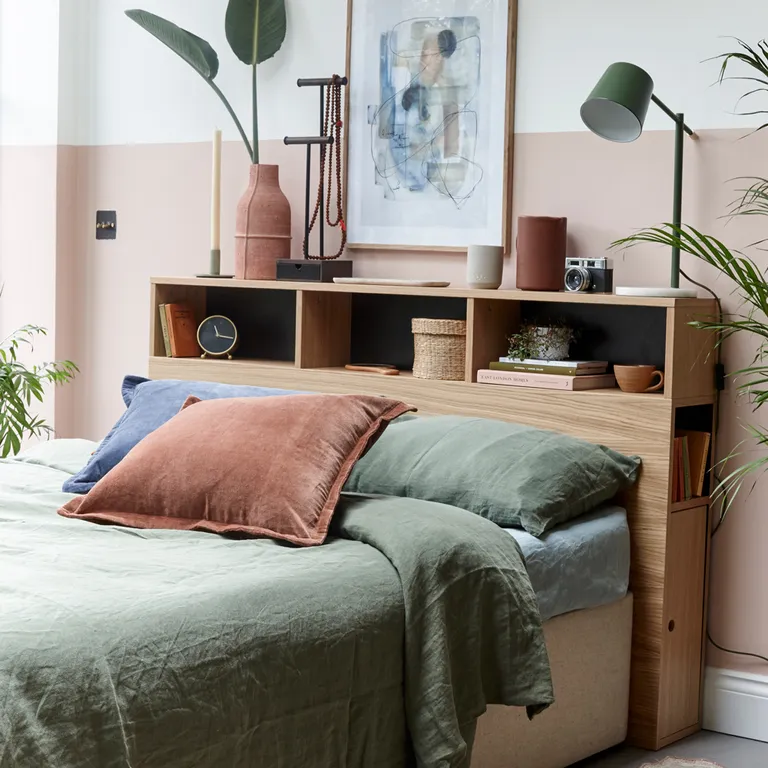 Image credit: Future PLC This alternative headboard is an ideal small bedroom idea to save space. The chosen storage unit is positioned behind the bed to form a headboard to lean up against, while acting as key storage for all manner of bedroom essentials. Combining the two purposes helps to save valuable floorspace. You could paint the front of the unit to give it a different perspective. 3. Wall-mount a soft option Image credit: Future Publishing PLC/Carolyn Barber Hang cushions with ties from a simple curtain pole hung above the bed, just switch the cushions when you fancy a change! Choosing a bold patterned fabric makes the headboard the focal point but remember to keep the bedlinen plain to perfectly balance the look, or go vice-versa with plain headboard cushions and patterned bedlinen. Top tip: Position the cushions at the perfect height to act as a support for your back when sitting up in bed with a good book. 5. Box the bed in to surround yourself with colour Image credit: Future PLC/ Dominic Blackmore Fill the space between a set of wardrobes, one either side of the bed, by building a headboard deep enough to display accessories. Paint the wardrobes and headboard in a matching colour for a smart co-ordinated look and fix wall-mounted lamps onto the headboard for easy bedtime reading. Carve out a space above the headboard box to use a patterned wallpaper, to add interest and a riot of accent colour to the set up. 6. Hang a cafe curtain-style headboard Image credit: Future PLC/ Dan Duchars Add a curtain-style swatch of fabric to act as a decorative headboard panel behind the bed – to create a captivating focal point. For this easy DIY project simply secure an attractive curtain pole onto the wall above the bed for the purpose of hanging the fabric headboard design. You have the option to hang curtain-like panels are you can add wadding to fashion a lightweight panel which will provide an element of padding. 7. Paint a semi circle on the wall in place of a headboardImage credit: Crown Get creative with paint to fashion a block of colour in place of a psychical headboard. The use of colour helps to create the perfect backdrop for a bed, giving enough prominence to the zone without having to have a headboard. ‘Creating a perfect semi-circle with paint is easier than you think’ says Judy Smith, Crown Paints Colour Consultant. ‘First of all, measure the length of your wall and mark its centre, or wherever you want the centre of your semi-circle to be.’ ‘Once you've taped the skirting board with masking tape to protect it from splatters, hammer a nail into the spot you've just marked, just above the skirting board. Depending on how wide you want your semi-circle to be, measure out some string and cut it to size. The longer the string, the bigger the semi-circle. Tie one end of the string to a pencil and the other end to the nail. If you're not allowed to use nails on your wall, extra strong tape will hold the string in place.’ ‘Once you're all set, start tracing out your semi-circle on the wall from one way to the other. Making sure you're pulling the pencil tight on the string. Once you've drawn the outline, use a small paint brush to create a precise edge at the top of your semi-circle. You can then go in with a paint roller or larger brush to fill in the rest of the shape.’ 8. Declutter with secret built-in storage Image credit: FuturePLC/ Simon Whitmore Create hidden cubbyholes behind your headboard with three picture ledges and a piece of Fablon covered MDF board. Mount the picture ledges on the wall equidistant apart, with the top picture ledge upside down to provide the top ledge, fix the MDF board over the front or the ledges for a sleek, modern feel. 9. Use shoe storage for a clever bedhead design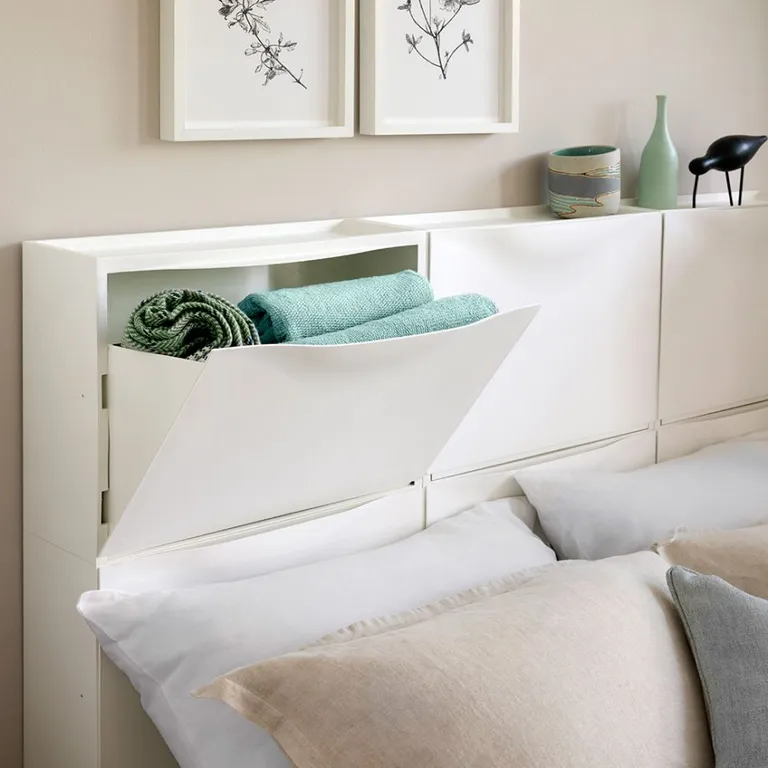 Image credit: Future PLC/ Simon Whitmore Update a divan bed with this clever bedhead hack, which not only provides storage but also offers a perfect little ledge for display. Using six Ikea TRONES units, stack them on top of each other and secure to the wall. Great for stowing away spare bedding, pyjamas and books when bedroom space is at a premium. 10. Create a rustic up-cycled headboard Image credit: FuturePLC/Tim Young Make a bespoke headboard by fixing reclaimed planks, vintage floorboards or scaffold planks to a wall behind the bed for texture. Take it one step further and encase your bed base in the same wood too. Remember to give planks a thorough sanding down to avoid rough spots or splinters. 11. Set the scene with a wallpaper headboard Image credit: Future PLC/ Tim Young Make a boutique-hotel-style design feature by hanging a striking wallpaper panel behind the bed. While this can be used as a feature wall behind an existing headboard it’s also a savvy solution in place of a headboard. Top tip is to make the panel slightly wider than a headboard to frame your bed perfectly. To really add a design wow factor, create neat raised edges with wooden battens – but this finish is optional, if you want less work. 12. Frame an upholstered headboard Image credit: Future PLC/ Dominic Blackmore Surround a fabric covered headboard with a deep wooden frame to create a surface you can use to display ceramics and framed prints. Paint in a similar tone as the upholstery, or make a feature of it by painting with a contrasting shade. The warm greys create a smart but comfortable vibe – layer up throws and cushions to make the bed super welcoming. 13. Upcycle wooden doors and shutters Image credit: Future PLC/ Tim Young Visit a reclamation or salvage yard to pick up beautifully aged French doors or aged shutters to use as a characterful headboard. Remove any door furniture, such as handles and hinges to ensure the look is more styled and purposefully curated. 14. Add interest with ornate wooden carvings Image credit: Future PLC Use ornate carved wooden wall art tiles to create a captivating headboard with decorative interest. To make the design moveable, should you choose to reposition the bed at any stage, secure the wooden tiles to a sheet of MDF cut to size to ensure they fit perfectly. Carefully measure out the design first to ensure you have equal overhang either side of the bed. 15. Extend onto the ceiling Image credit: Future PLC Really set the scene by extending a DIY headboard design onto the ceiling. In this case upcycled wooden planks are used to create a bed canopy that frames the bed, using the wall behind and the ceiling above. This idea is a real statement, for those looking to make the bed the stand-out star of the decor. What can I use instead of a headboard?Instead of a traditional headboard there are a number of savvy DIY headboard ideas to get the look. The most cost-effective way to give your bed a headboard style focal point is by painting the wall behind. Although there’s no physical headboard in place the block of colour positioned at the head of the bed can go a long way to creating the illusion of the real thing. Another good alternative, especially from a budget perspective, is repurposing storage units. This not only gives a physical structure to support the end of the bed, it frees up floor space by combining two bulky pieces of furniture – the bed and the unit. The post DIY headboard ideas to create a stunning backdrop for your bed on a budget appeared first on Ideal Home. |
| See how a DIYer saved £330 by transforming her hallway with paint and stickers Posted: 27 May 2021 11:00 PM PDT Have you ever had a quote for some decorating work, only to wonder if it’s something you could have turned your hand to yourself? That’s what happened to Danielle Duvall when she got a quote for her hallway makeover – and by doing the work herself, she saved a whopping £330!
Danielle, 40, from Nottingham, was initially quoted £450 to decorate her hallway but decided she didn’t want to pay that. Instead, she had a go at the work herself and ended up paying just £120 for her DIY hallway makeover– which is quite a difference. 'I was given a free professional quote for my walls and ceilings to be painted,' Danielle told money-saving community LatestDeals.co.uk. 'I told the decorator that I’d supply the paint and would do all the woodwork myself, but the quote still came back at £450. It’s a lot of money and I just don’t have it to hand out like that, so I decided to do the project myself, with a bit of help from a friend.’ Painted DIY hallway makeoverBefore Image credit: Danielle Duvall The stairs are one of the first things you see when entering Danielle’s home, so she was keen to make them look nice. 'I did have carpet on my stairs, but it had started to come away,’ says Danielle. ‘The hallway is so cold, the carpet just wouldn’t stay down. Plus, it was a nightmare to keep the stairs clean with people coming in and out.’ Taking up the carpet left Danielle with some old terracotta-coloured tiles that she was keen to cover up – and it got her thinking about how she could do the project on a budget. 'After browsing eBay for floor and stair tiles, I came across stair riser stickers, which looked a bit different,’ she says. ‘I thought I’d buy some and see how they looked.’ Painting the stairs Image credit: Danielle Duvall To start with Danielle needed to give the whole space a lick of paint. 'I’ve always used magnolia or white gloss before,’ she says, ‘but the woodwork always seems to change to a yellow colour after a while or just looks dirty, so I decided to have a change and go for a cream and light grey colour scheme throughout.’ Sourcing supplies for the project proved relatively cheap. Danielle picked up paint for the walls and woodwork, and then turned her attention to the stairs, purchasing some light grey floor paint from eBay. 'I painted the walls and ceilings first, then I did all the woodwork,’ she says. ‘That involved scrubbing all the stairs clean of paint, then filling in two stair tiles that were broken with some grip fill. After that, for four nights in a row, I applied one layer of tile paint on all the steps.’ 'For projects like this, it's important to pick the right paint and prepare the area thoroughly,’ she advises. 'Sand down your stair rail before decorating to ensure the surface is smooth and even, and be sure to wipe everything down with a damp microfibre cloth before getting started.' Adding stair risers Image credit: Danielle Duvall Get the look: Dulux Luxurious Ivory Lace Silk Emulsion paint, £16 for 2.5 litres, Wickes Get the look: SupaDec Industrial Floor Paint in light grey, £13.44 for 1 litre, Amazon Having decided she wanted to add a pattern to her stair risers, Danielle bought a pack of Moroccan-style stair riser stickers for just £27.25 on eBay. ‘I measured the stair risers and trimmed down the stickers, before applying them to each step,’ she says. Laying floor tiles Image credit: Danielle Duvall At the bottom of the stairs is a small area that Danielle decided to tile. She chose a striking monochrome design and laid them in just over an hour. Buy now: Moroccan floor tiles in Sillia Black, £5.99 for a pack of 11, Studio After Image credit: Danielle Duvall The project took eight days overall, with a five-day break halfway through. 'There were plenty of challenges along the way, such as covering up paint mistakes and cleaning the dirt off of the stairs and woodwork,’ says Danielle. ‘I also had to be mindful of any dust that was trapped inside gaps and holes, and there were lots of marks and imperfections on the walls, which made the painting more difficult.’
The finished result is a total transformation of the once-tired hallway, with the new graphic-print stairs very much a stylish entry into Danielle’s home. 'If I had to do it all again I would definitely give myself more time to get it done,’ she says, ‘but I'm happy with it now it's finished.' The post See how a DIYer saved £330 by transforming her hallway with paint and stickers appeared first on Ideal Home. |
| Simba mattress deals – 35% off orders over £300 Posted: 27 May 2021 10:43 PM PDT Need a new mattress? Then check out these Simba mattress deals which mean you can save hundreds on products from one of the leading mattress brands. Made in Britain using British and recycled materials wherever possible, buying in a Simba mattress sale means you can save money and help save the planet while you’re at it. But that isn’t the only reason to make the most of a deal on one of the best mattresses around. We have tested every mattress in the Simba range, from their crowd-pleasing Simba Hybrid, to the new 10-layered Simba Luxe – and we highly rate the lot with 4.5 and 5 star ratings. As the ‘Hybrid’ in their names suggests, all Simba mattresses use a combination of foam and springs for the ultimate in support, cooling and comfort. Their signature Simba Pure layer is an upper layer of open cell foam that moulds to your body, accompanied by a breathable sleep surface that regulates temperature. Best Simba mattress dealsSo what can you expect from the latest Simba mattress sale? If you spend over £300 you can save 35% and this is applicable to everything on the site until 23:59pm on Monday 31st May 2021. You can get the brand new Simba Luxe Double for just £1,039.35, down from £1,599. Or if you are on a tighter budget, invest in the Simba Hydrid Double for just £538.35. While you are at it, you can also upgrade all of your bedding with Simba’s range of awarding winning mattress toppers, protectors, pillows and their hybrid duvet that we think is one of the best duvets for all seasons. Some of these bedding items cost under £300 individually, but the discount will be applied to the full value of your basket. See some top offers below – there are no codes to remember for these Simba mattress deals either as the prices shown include the discount. Easy!  Simba Hybrid King Size | Was £939, now £610.35  Simba Hybrid Pro Double | Was £1,159, now £753.35  Simba Hybrid Luxe King Size | Was £1,799, now £1,169.35 What else can you buy in the Simba sale?Don’t just use this awesome sale to upgrade your mattress – Simba has a wide range of bedding including their amazing Orbit weighted blanket and top rated Simba Hybrid mattress topper. You can get sheets, duvets, pillows and bedlinen too, so if you really want to treat yourself, use this as a chance to buy the lot. You can also buy a Simba bedding bundle priced from £550.20 for a single Hybrid mattress, one pillow, single duvet and mattress protector.  Simba Bedding Bundle | From £550.20 for a single Why should you buy a Simba mattress deal?We all know how important sleep is, but many of us are not giving ourselves the best chances of a great night’s sleep by using a mattress that is old, worn or unsuitable for our sleep position. With experts recommending we replace our mattress every seven years, lots of people should consider an upgrade when a mattress sale presents itself. This should be particularly pertinent if you are suffering any form of back or joint pain that your mattress could be contributing to. The Simba mattresses are well designed for supporting those with these types of problems, offering a combo of springs and foam that keep the spine well aligned, while giving softness for hips, knees and shoulders. As this level of engineering can be pricey, looking for a mattress sale is a great way to take care of yourself without breaking the bank. You can also take these Simba mattress deals as a chance to upgrade other bedding items. Better pillows, a duvet that is better for temperature regulation or a mattress protector to protect your new mattress are all worth investing in. You should also look at Simba mattress toppers too if you are not in market for a new mattress itself, but want to improve comfort of your current bed. They are great for sofa beds, too. Find out more in our guide to the best mattress toppers. What else to consider when buying a mattress in a salePanic buying can set in when you see something is on offer, but making time for a bit of research into finding the right mattress for you is key. Read reviews of any mattresses you like the look of, taking note of comments from people with similar sleep issues to you if required. Next look for companies like Simba who offer free trials of their mattresses. Simba offer 200 nights risk free – if you find this isn’t the mattress for you, they will let you return it and refund what you paid, no questions asked. Different brands offer different trial lengths, so make a note and remember that if you buy in the sale, you will be refunded the sale price you paid, even if you return when the mattress is back at full price. The post Simba mattress deals – 35% off orders over £300 appeared first on Ideal Home. |


| You are subscribed to email updates from Ideal Home. To stop receiving these emails, you may unsubscribe now. | Email delivery powered by Google |
| Google, 1600 Amphitheatre Parkway, Mountain View, CA 94043, United States | |


No comments:
Post a Comment