Ideal Home |
- 14 paint problems – how to fix paint peeling, blistering and flaking off
- Too hot to sleep? Here's how to keep bedrooms cool during hot weather
- How to make a Roman blind – an easy guide to making a practical window treatment
- Wall panelling ideas to add character, cover uneven walls and insulate any room
- See how a savvy Mum turned her beige bathroom into a Miami-inspired retreat for less than £350
| 14 paint problems – how to fix paint peeling, blistering and flaking off Posted: 01 Jun 2021 08:59 AM PDT You can’t beat the satisfaction of a DIY job done well. But sometimes the results don’t go to plan – seemingly through no fault of your own – which leaves you feeling far from content. We reveal the most common paint problems that occur and how to avoid them, or how to fix them should they have already occurred. From paint peeling, blistering and foaming we ask the experts at Dulux to help solve the most common DIY and decorating dilemmas when it comes to paint ideas around the home. Follow the simple steps to avoid your own painting headache. 14 Paint problems – how to fix them Image credit: Future PLC/ Dominic Blackmore 1. Blistering and flakingThe last thing you want in your freshly painted room is for the paint to start blistering and flaking off the wall – and yet it’s a common problem. It can be caused by a number of factors, from moisture trapped beneath the surface of the paint or by paint being applied over a powdery surface. Unclean surfaces can be another cause, highlighting the importance to sugar soap the walls to remove any dirt, oil, and grease. Excessive movement imposing stress on the paint film can result in cracking which in turn lets in moisture, ultimately resulting in a flaking paint. ‘Resins present in knots causing light coloured paints to discolour or even flake. Resin bleed and flaking is a common problem where dark colours are used on south facing elevation. This is because dark colours absorb more heat than light colours’ explain the experts at Dulux. To fix it the expert team advise, ‘All loose material will have to be removed back to a firm edge, spot primed with the appropriate primer, and then recoated with the appropriate product. If large areas are involved it's best to totally strip the surface back to a bare surface and start again.’  Image credit: Dulux 2. Bleeding/StainingThis unsightly finish is usually caused by contamination of the underlying surface by soluble stains. It’s easily fixed with good prep. ‘It is important to seal the original stain’ explain the experts at Dulux. ‘You can do that by applying a coat of Polycell Stain Stop prior to re-decorating.’ See how to paint a wall like a professional with our expert guide. 3. Shrivelling paint surfacesWrinkling of new paintwork occurs when the surface of the paint dries too quickly. The surface will form a thin skin before the paint underneath has fully dried, meaning it shrinks. This is likely to be worse if a thick coat of paint is applied, especially to horizontal surfaces. It can also occur if a second coat is applied before the first one is completely dry. ‘Allow the paint to dry and harden. This may take several days, or weeks, depending on the drying conditions. When dry, rub the surface down using ‘wet and dry’ abrasive paper, and clean with warm water with a little detergent added. Rinse the surface with clean water and allow to dry before repainting. If you are unable to wait for it to dry it would be best to scrape off the tacky paint taking it back to a sound, dry surface.  Image credit: Dulux 4. CissingThe term cissing is used to explain the notion of when paint fails to adhere to a surface. This is caused by painting over contaminated surfaces such as wax, oil or polish. The paint cannot stick to the surface and draws away leaving unpainted patches. To fix the patchiness the experts advise, ‘Allow the surface to dry and then rub down using ‘wet and dry’ abrasive paper and a solution of warm water and detergent. Once rinsed and dried, repaint the area.’ 5. Filler showing through the paintSo often there are holes to be filled before painting, but what happens when the fillers shows through? ‘Make sure that all filled areas are rubbed down smooth and level’ say the experts. ‘You will need to prime the filler before painting to prevent subsequent coats being absorbed more rapidly than in other areas. Use a coat of regular emulsion thinned 10-20% with clean water – once that's dry, apply a full coat of emulsion.’ 6. Foaming paint Image credit: Dulux Using the wrong type of roller can result in a foaming paint film. ‘Avoid sponge or foam rollers if you're using a water-based paint. If you’re using a long pile roller, make sure it's wetted out properly. Foaming happens when air gets into the wet paint film to create air bubbles. When these bubbles burst craters are left on the film surface – sometimes these craters dry to give an even film.’ What to do if the craters still show? ‘You will need to rub down using ‘wet and dry’ abrasive paper using water with a little detergent added. The surface should then be rinsed and allowed to dry before repainting. If this is impractical due to the size of the area, line the affected area horizontally using lining paper and then repaint.’ Before you go in with a roller be sure you know how to cut in paint for perfect edges and corners. 7. Mud crackingWhen the paint application is too thick and heavy on textured or embossed surface such as blown vinyl wallpapers or pebbledash it creates a mud cracking effect. This is especially true if the paint was applied by brush. ‘Cracking can also occur when Matt paint is applied over Silk if the sheen is not removed from the silk coating.’ ‘One or two thinned coats of paints may fill in the cracks. For internal walls, use a soft sheen paint. If the affected area is over wallpaper, the best thing to do is to remove the paper and start again.’  Image credit: Dulux 8. Chalky finish on exterior wallsA powdery finish is most likely caused by a wearing away of the paint by weathering. It could also be evidence of salts seeping from the surface. Fix it like a pro,’Brush the affected area down with a stiff bristle brush to remove as much powdery material as possible before applying a coat of primer, such as Weathershield Exterior Stabilising Primer’ is the expert advice. ‘If the powder is due to salts/efflorescence then wipe the surface with a dry cloth to exhaust the salts before coating with an Alkali Resisting primer to eliminate staining. Then just repaint in your chosen finish.’ 9. Cracking plaster Image credit: Future PLC/Chris Snook Most commonly an occurrence in new houses, often the result of plaster drying out or movement of the building. To fix it, the team say, ‘Cut out all cracks and remove all dust and debris. Fill the cracks using an appropriate filler. (the Polycell Polyfilla range has a filler for every size of gap). Then just paint in your chosen finish.’ 10. Mould growth on surfacesYou can’t paint over mould in the hope that it will disappear unfortunately. Instead you need to treat the problem before painting. ‘Treat affected areas should be treated with fungicidal wash, such as Weathershield Multi-Surface Fungicidal Wash. Once rinsed, allow to dry and coated with your chosen masonry paint, we recommend Weathershield All Weather Protection Smooth Masonry Paint. 11. Loss of sheenWhen a gloss loses its sheen, normally only noticed with high gloss paint and varnishes, it’s caused by the settling of dew or condensation on the paint shortly after application – a problem most likely to occur in areas of high condensation like bathrooms. ‘When the surface is thoroughly dry, rub the affected surface down using ‘wet and dry’ abrasive paper and recoat. Only do this if the conditions improve or when the condensation problem is resolved.’ 12. Yellowing on and around radiators Image credit: Future PLC/ David Parmiter The effect of heat can have an adverse reaction on conventional solvent based gloss paints, hence why you will see brilliant white paint on and around radiators sporting a yellow tinge over time. ‘There are two options to prevent this from happening. Firstly, paint the radiator the same colour as the wall as yellowing is much more noticeable with white paint. Alternatively use Hammerite Quick Drying Radiator Enamel (White or Magnolia) or Radiator Enamel (White).’ 13. Rain spottingSurface blemishes occur on a paint finish if rain that has fallen on the surface before the film has had a chance to fully dry. To fix it, simply wait for it the dry, ‘When the surface is thoroughly dry, rub the affected surface down using ‘wet and dry’ abrasive paper. Then recoat.’ 14. Rotten wood Image credit: Cuprinol Due to its nature wood is prone to rot when exposed to excessive moisture for prolonged periods of time – but wood is a staple material in many homes, so how do we fix the problem? Look to our shed paint ideas for inspiration. ‘Cut out all rotten wood and replace with sound timber’ Dulux advise. ‘Prepare the area before painting – there is a wide range of Cuprinol and Polycell products available to prepare the area ready for painting. Smaller rotten areas of joinery may be strengthened with Cuprinol Ultra Tough Wood Hardener and then filled with Cuprinol Ultra Tough Hardener prior to painting.’ The post 14 paint problems – how to fix paint peeling, blistering and flaking off appeared first on Ideal Home. |
| Too hot to sleep? Here's how to keep bedrooms cool during hot weather Posted: 01 Jun 2021 02:00 AM PDT All year long, most of us dream of basking in hot weather but– and as much as we hate to complain – when the weather suddenly becomes freakishly warm, it can play havoc with our sleep. While most of us lap up the sunshine during the day, those long hot nights are notable for the absence of shut-eye. Fear not, if your home isn’t kitted out with air-con there are plenty of simpler ways to help keep your bedroom cool during the warmer months to help get a better night's sleep. After a few hours of tossing and turning, we all want to know one thing – what can we do when the mercury rises and it’s too hot to sleep? How to keep bedrooms cool during hot weather Image credit: Future PLC/ Jonathan Jones ‘A baking bedroom can impact on our comfort,’ agrees Simon Williams of the National Bed Federation (NBF). 'Your body temperature needs to drop slightly before you go to bed, which is why you just can’t sleep when you’re too hot. ‘An ideal bedroom temperature should be around 16 to 18°C, so it can be difficult to get comfortable in a hot and stuffy space, which leaves many people suffering from a disturbed night’s sleep.’ Fortunately, there are some amazing ways to stay cool when it’s too hot to sleep. From cooling pillows to creating airflow, try these simple and effective steps to ensure you stay cool and comfortable in bed this summer. 1. Block out the light Image credit: Future PLC/ James French Keep curtains or blinds drawn during the day to keep the sun out. Blackout blinds were made for this sort of weather and shutters will also come into their own, blocking the light while letting in the air. Lights and appliances can generate a lot of heat, so turn them off unless you need them. ‘To begin with, consider factors such as which direction your window faces’ says Jason Peterkin, director at 247 Blinds. ‘For example, a south-facing room will benefit from thicker, thermal materials to help keep it cool. Generally speaking, wooden venetian blinds and plantation shutters are great for keeping the temperature down in the home as they allow you to adjust the amount of light filtering into the room by altering the size of the gap between the slats. The wood also acts as a natural heat conductor, helping to keep the warm air out during the summer months. ‘If you want to completely block out the sunlight, opt for blackout blinds. The thick fabric will not only help to regulate the temperature of the house, but also ensure you get a better night's sleep during the brighter months and lighter mornings.’ 2. Encourage airflow in the right rooms Image credit: Future PLC/ Colin Poole When we are hot, it’s tempting to crack open as many windows and doors as possible to allow air to circulate. However, this isn't always the smartest option. Deciding whether to keep windows closed or open them slightly involves considering the direction the sun is facing. North-facing and south-facing windows need different consideration when it comes to cooling down our rooms. ‘Choosing whether to open your windows or keep them closed depends on their positioning’ advises Adam Pawson, Head of Digital at Safestyle. ‘If your windows are south-facing, it is best to close your curtains or blinds, or put the window in the night vent position to allow some air in. Whereas, if your windows are north-facing, it's advised to keep them shut to avoid any hot air coming in.’ If you’ve got an attic, try opening the hatch. Hot air rises and this will give it somewhere to go. 3. Switch your sheets Image credit: Future PLC/ Polly Eltes It’s time to swap winter sheets for summer alternatives – those with natural materials. Doing more than just freshening up your bedroom, lighter and more breathable sheets can help avoid feeling stuffy and sweaty during sleep. 'Pure cotton sheets have sensory benefits and, being naturally breathable, help to regulate your temperature and moisture levels while you sleep,' explains Lucy Ackroyd, Head of Design at Christy. 'Preventing the dreaded clammy feeling you can experience with synthetic fibres.’ ‘Not only that, but high thread count fabrics are smoother against the skin, so as well as being much more comfortable, you are less likely to feel tangled up or trapped by rougher fabrics that cling, especially to nightwear. Try Percale as opposed to Sateen sheets, as they're made with a looser weave and therefore are much more breathable.' ‘As well as making sure you have the right sheets for summer, you should also make sure you have the right duvet too. During these hotter months, a lighter tog of 4.5 is recommended. If you like something a little heavier but still breathable, try a 10.5 tog.’ 4. Welcome nature into the bedroom Image credit: Future PLC/ Catherine Gratwicke House plants have never been so popular, and now the hot weather will give us even more excuse to add to the collection – because did you know they can help keep you cool? ‘Indoor plants can help cool a house in warm weather, as they consume hot air for their natural processes’ explain the team at Stelrad. ‘When an atmosphere heats up, plants will often release excess water into the air from their leaves – as a result they cool themselves and the surrounding environment. Some of the best ones include rubber plants, Chinese evergreens, palms, mother-in-law's tongues and ficus benjaminas.’ 5. Head to a different roomSome rooms of the house are naturally cooler than others. Remember that heat rises, so you might find downstairs areas less oppressive on a warm night. North-facing rooms also tend to be a lot cooler than those in the rest of a property. Even if you can’t relocate your bedroom permanently, it might be worth sleeping on a sofa or air bed. 6. Cool your bedding
Despite ridding your bed of thick duvets and blankets – ideally using a cotton sheet and the lowest tog rating you can find, you may still be hot. Try these cooling bedroom hacks to improve your slumber:
7. Switch off the lightsAs you may remember from science class, light bulbs give off heat. Switching off helps to keep things feeling cooler. ‘It's best to avoid any sort of extra light or heat sources when the temperature is already scorching!’ say the team at Stelrad. ‘Plus, you'll save money on the electric bill – it's a win win!’ 8. Use cool technology to sleep smarterUse an electric fan: see our Best fans to cool your home this summer. Quiet tower fans with timers and a choice of settings are the smart choice if you struggle to fall asleep, but desk fans and pedestal fans will do the job nicely, too. If it’s really hot, put a shallow bowl of iced water in front of the fan to cool the air. Top tip: ‘Put a bowl bucket or even tupperware filled with ice water directly in front of a fan. As the ice melts the breeze from the fan will pick up the cool air coming from the ice's surface’ explains the team at Stelrad. ‘This will recreate a cool breeze, similar to an air conditioning unit. Alternatively, a wet flannel or small, damp towel placed over a fan works just as well.’ 9. Try natural ways to sleep easier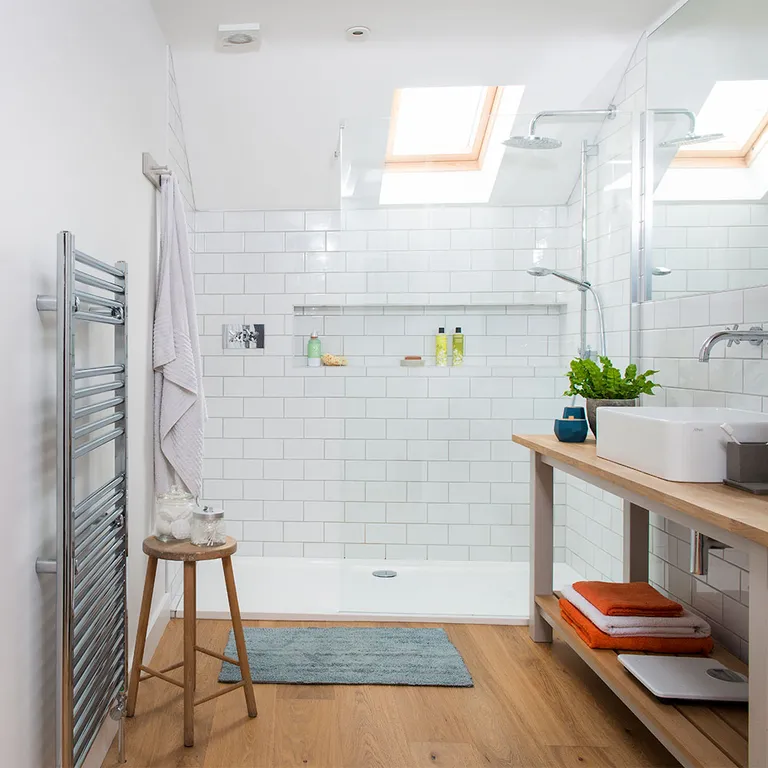 Image credit: Colin Poole
10. Wear the right clothes to bedWear light cotton nightwear. This is actually better than wearing nothing at all, as natural fabrics will absorb any perspiration. A top tip: Cool socks in the fridge and wear them. Cooling your feet lowers the overall temperature of your skin and body. 11. Choose the right mattress Image credit: FuturePLC/ Simon Whitmore Jonathan Warren, director at bed specialist Time4Sleep comments on just how important it is to choose the right mattress and what to consider if you struggle to sleep during the summer. ‘There are a number of mattress options available that can help you to regulate your body's temperature. Generally speaking, a mattress with a high content of natural fillings such as wool, cotton or bamboo is often a great choice for those suffering to sleep in the heat as they tend to be cooler as well as being naturally hypoallergenic.’ ‘Other options to consider are new generation elite gel memory foam mattresses that include intelligent temperature regulating technology to help keep you cool in the summer and warm during the winter. These mattresses include a temperature regulating cool gel that adjusts with your body temperature to ensure you're never too hot or cold during the night, allowing you to have a truly blissful night's sleep.’ We’ve done the research, so you don’t have to! Read: Best mattress reviews 2021 – the top sprung, hybrid and memory foam choices as tested by our reviewers Too hot to sleep? Try these cool new productsThe cooling pillow Image credit: JML Buy now: Chillmax Cooling Pillow Gel Insert, £9.99, JML Chillmax Pillow's inner gel reacts to your body temperature to absorb excess heat, drawing it away from your skin to produce a natural cooling effect for up to three hours. The cooling mattress topper
Buy now: Gel Fushion Memory Foam Mattress Topper, £125 for a double, Dunelm If you're not in the market for buying a new mattress, this topper is made from a gel-infused memory foam that absorbs and disperses body heat while providing excellent support and comfort. It also has ventilation holes through the foam to allow airflow and breathability. So there you have it – hopefully a good night’s sleep is within your grasp! Stay cool, kids. The post Too hot to sleep? Here's how to keep bedrooms cool during hot weather appeared first on Ideal Home. |
| How to make a Roman blind – an easy guide to making a practical window treatment Posted: 01 Jun 2021 12:22 AM PDT A classic Roman blind is a simple but beautiful way to dress a window. Roman blinds offer a smart and highly-practical solution to blocking out the sun, while adding colour and pattern to dress windows – a great way to enhance stylish curtain ideas. The difference between a roller blind and a Roman blind is the method in which it opens. Unlike a roller blind, which as the name would suggests rolls down, a Roman blind gently folds down layer by layer. The design is stacked rather than rolled, which offers a more polished finish with the blind is raised. Our design uses lining fabric, rings, eyelets and dowelling for a neat, professional look. See our step-by-step guide to make your own Roman blind, to dress any window in any room. How to make a Roman Blind Image credit: Future PLC/ Jeremy Phillips Note: Before you embark on your blind project, take a look at the latest rules and regulations on blind safety. Visit makeitsafe.org.uk for up-to-date information What you will need
Not sure how to measure up? See our video how to measure Roman blinds 1. Fix your blind’s supporting structureAttach the batten above the window frame and press the self-adhesive hook fastener along the front of the batten. 2. Work out the size of your blindMeasure from the top of the batten to your required finished drop, adding 2.5cm each for the top and bottom hems. For the width, measure the length of the batten and add 2.5cm for each side seam. Cut out your main and lining fabrics to these measurements. 3. Line your blindRight side up, lay out your main fabric on a flat surface. Place the lining fabric on top, matching raw edges all round. Pin all round then stitch the side and bottom edges, taking a 2.5cm seam. Remove pins. 4. Create dowel pockets Illustration by Michael A Hill To create a dowel pocket along the bottom edge, stitch a second line of stitching 6mm from the raw edge. Insert dowel. Trim seam allowances and turn through and press. 5. Create the pleatsLay the blind lining side up and measure 5cm from the top of the blind. Mark with a pencil line across the width of the blind. Divide the remaining length of the blind into 20cm to 30cm pleats, finishing with a half pleat at the bottom. Mark each section with a pencil mark as before. 6. Make pockets to hold the dowels at each of the pleatsCut 8cm strips of lining fabric to the width of the blind for each of the marked pencil lines. Fold each strip in half along the length and stitch the long raw edge and one end, taking a 1cm seam. Turn through and press.  Illustration by Michael A Hill Centre the pockets along the marked pencil lines and pin and tack in place. Machine stitch each long edge, through all thicknesses, being careful not to pucker the fabric. 8. Fix the dowels in placeSlide the dowels into the pockets, turning under the remaining raw edges on the pockets and slip stitching to hold dowels in position. 9. Add the plastic ringsOn each pocket mark the centre point of the blind and slip stitch a plastic ring in place. Repeat 5cm in from each side edge of the blind on each pocket (see illustration). 10. Make the top hemTurn the raw edges of the main fabric and lining fabric to the back of the blind by 2.5cm, press and tack. Stitch the sew-on loop fastener in place, close to the fold. 11. Trim your blindCut a length of decorative trim or braid to the width of the blind and slip stitch in place along the bottom edge. Hang the blind from the batten. 12. Attach the eyeletsScrew three eyelets to the underside of the batten so that each aligns with each row of plastic rings on the blind. Screw a fourth eyelet to the edge of the batten where the cords will fall and where the blind will be operated from. 13. Attach and tighten the cords Illustration by Michael A Hill Tie each length of cord to each of the three rings on the lowest pleat. Then thread each length of cord through each of the rings above it, and through the eyelets, finishing on the working side of the batten. Trim the cords to a suitable length and attach the blind pull (painted in a complementary colour if you prefer). Fix a cleat in place on the wall and use to secure the cords. If you’re looking get crafty, why not start now with our step-by-step guide to transforming your windows? The post How to make a Roman blind – an easy guide to making a practical window treatment appeared first on Ideal Home. |
| Wall panelling ideas to add character, cover uneven walls and insulate any room Posted: 31 May 2021 11:30 PM PDT  If you’re after a country house look or hoping to give a space more traditional charm, wall panelling or cladding is a great way to update a room. Adding wall panelling is a simple way to bring architectural shape to featureless rooms, while protecting walls from the general wear and tear of family life – making it as practical as it is stylish. In recent months the trend for wall panelling has gone stratospheric. With homeowners becoming bolder with their DIY and decorating projects. Wall Panelling IdeasAvailable in a wide range of mouldings, from subtle tongue and groove to grand period designs, there’s a panelling style to suit every bathroom, living room, kitchen… basically any room you can think of. Not only that, panelling is an ideal way to provide additional insulation, cover uneven walls – and even hide radiators or fireplaces. Read on to discover our favourite wall panelling ideas, plus some tips on how to fit panelling in your home. 1. Choose ribbed panelling that’s decadently detailed Image credit: Dominic Blackmore Mixing ornate ribbed and portrait panels makes the walls stand out. Perfect for spaces where you literally want to feel as if they’re closing in on you, for a cosy cocooning feel. Paint it dark grey, emerald green or navy – all on trend right now. 2. Consider panelling as an alternative to tiles Image credit: Oliver Gordon Panelling is a great way to make a statement in a bathroom instead of tiles, and you can top it with a narrow shelf to provide storage for toiletries or candles that will make bath times all the more relaxing. But surely wood panelling will warp in a steamy bathroom? Not if you get a suitable material. ‘Panelling with a half-round bead profile can be made on moisture-resistant MDF sheeting,’ says Joan Madeley, co-founder of The English Panelling Company. ‘It looks like the real thing after painting, and is perfect for boxing in pipeworks.’ 3. Keep it simple with Shaker Image credit: Future Publishing PLC/ Dominic Blackmore Ideal for small rooms, this classic, unfussy design will subtly smarten up any space. It’s great for making white rooms look less bland and won’t steal the limelight away from any statement furniture. These strips of 4 inch MDF have been butted up to make rectangles, and pinned to the wall before painting. You could also build out to create a display ledge or bookshelf. 4. Add grandeur with a Jacobean-style grid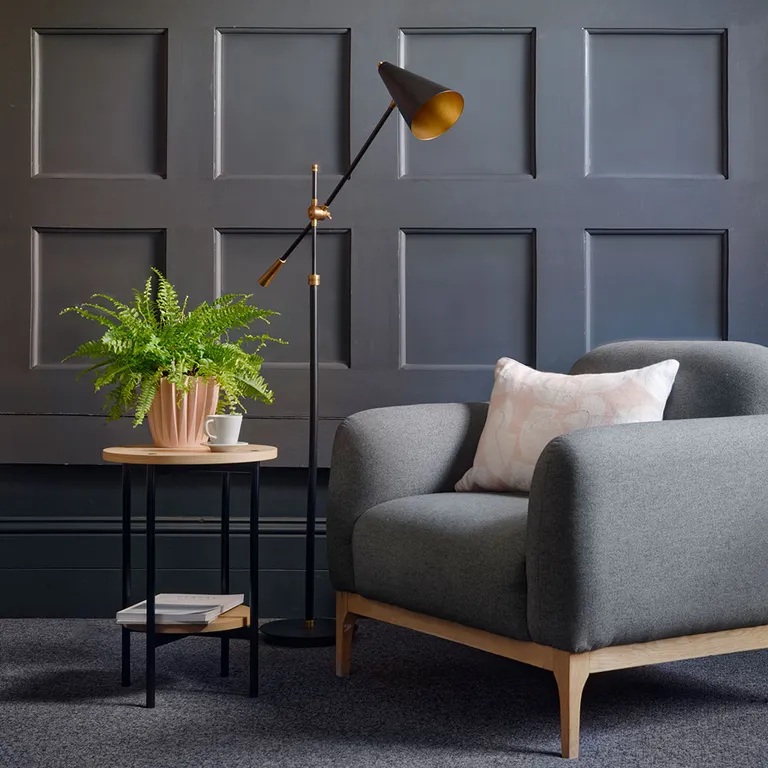 Image credit: Future Publishing PLC/ Dominic Blackmore This large-scale grid adds impact when used over the full height of a wall. It’s a historic style, but simple enough for modern spaces, too. Paint it in a flat eggshell, continued onto the skirting, and match it to your floor for an immersive effect. Adding beading onto the edge of the panelling creates an elegant feel. Here, we’ve used 6 x 1inch panel framing with inset quadrants of around 40 x 40cm. 5. Panel over a structural feature Image credit: Future Publishing PLC/ Dominic Blackmore Clad an unused chimney breast by building out a frame, and covering it in two styles of panelling. Dividing the panels at dado height will provide a small ledge for a display. Here, we’ve used panels measuring around 50 x 50cm, created by attaching strips of 2 x 1in timber. The dado shelf is in 2 x 1in timber with a small moulding attached. Below the dado, we’ve added 2 x 1inch timber with 2 inch gaps. 6. Panel up to a picture rail to add height Image credit: Future Publishing PLC/ Simon Whitmore
7. Protect walls with panels at dado height Image credit: Future Publishing PLC/ Dominic Blackmore This style is practical in hallways, where walls can get knocked in passing, and in dining rooms, where pushed-back chairs hit the wall. Plus, as it only covers the lower third of the wall, it won’t dominate. Create the perfect backdrop by painting the walls, shutters, panelling and architrave in the same colour. Consider a striking Dining room colour scheme, to add life with bold, beautiful colour. 8. Recreate cabin cladding Image credit: Future Publishing PLC/ Dominic Blackmore Swap a headboard for the Scandi-style simplicity of paint-washed pine planks, fixed vertically behind the bed. They’ll look great paired with a modern platform bed and linen bedding. Sand any rough knots in the wood, and protect with matt varnish. Here, raw pine 6 x 1in tongue-and-groove panels are nailed to wall batons. 9. Incorporate a peg rail Image credit: Simon Whitmore The style of panelling in this study is the easiest to achieve. All it involves are attaching a few strips of wood to the walls to create box shapes and painting everything the same shade. A horizontal piece of wood provides a perfect opportunity to incorporate a peg rail as the wall has been reinforced. It’s a great way to sneak in a little extra storage for hanging coats or other bits and pieces. 10. Cheat wall panelling with a head board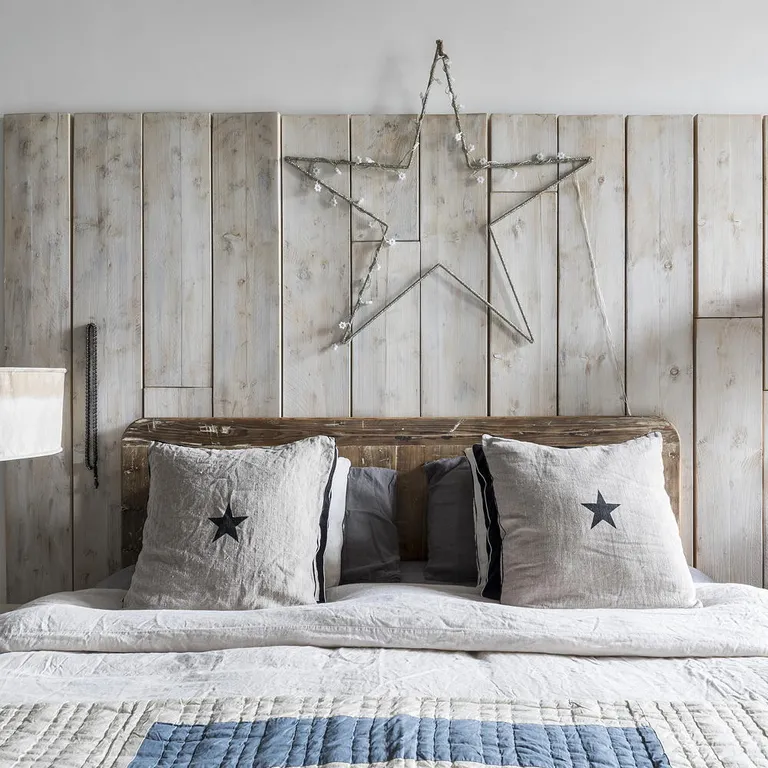 Image credit: Chris Snook If you live in rented accommodation or aren’t ready to commit to wood panelling in your room, you can always fake it with a headboard like in this simple white bedroom idea. This bleached rustic design is far wider than the bed and adds an extra layer of texture and colour to this room. However, what is even handier is you can easily attach accessories to it, without permanent damage to your walls. 11. Fake it with wallpaper
When you want wood panelling without the cost or work involved, you can fake it altogether with a clever printed wallpaper. Modern designs enable you to get the look without having to do the DIY involved, meaning walls are in immaculate condition – aside from a coat of wallpaper paste. With the ease of wallpaper you can opt for a more elaborate wood panelling design, one that adds interest with ornate detailing. 12. Add wood-effect tiles instead Image credit: Future Publishing PLC/ Polly Eltes At first glance, this modern panelling looks like wood – but it is, in fact, porcelain. Advanced manufacturing techniques make it possible to create super-realistic tiles with the fine detail and texture of wood, and without the concerns about warping in a bathroom. Running them horizontally and matching them to the floor tricks the eye into thinking the room is wider than it is. However, it can sometimes make a ceiling feel lower, so be careful about using it in a small room. 13. Add character to a room devoid of features Image credit: Future Publishing PLC/ Alun Callender Here, Jacobean-style panelling adds some period drama to a dining room. It’s full of character and a little more formal than tongue and groove. Run the panels only a third of the way up the wall to make a ceiling seem higher. ‘Panelling looks at its best if it is one-third or two-thirds of the way up the wall, or full height,’ says Jon Madeley, co-founder of The English Panelling Company. ‘If panelling runs only half-way up the wall it can run the risk of making the ceiling look lower than it is.’ 14. Use wide floor-to-ceiling wall panelling for a contemporary look Image credit: Future Publishing PLC/ Paul Raeside Panelling is a great way to add character to a modern kitchen. The wide tongue and groove panels give this room a polished contemporary look. Full wall panelling is great if you are looking to cover up uneven walls. It also works a treat here in disguising the pantry door. 15. Use white tongue-and-groove panels for a coastal look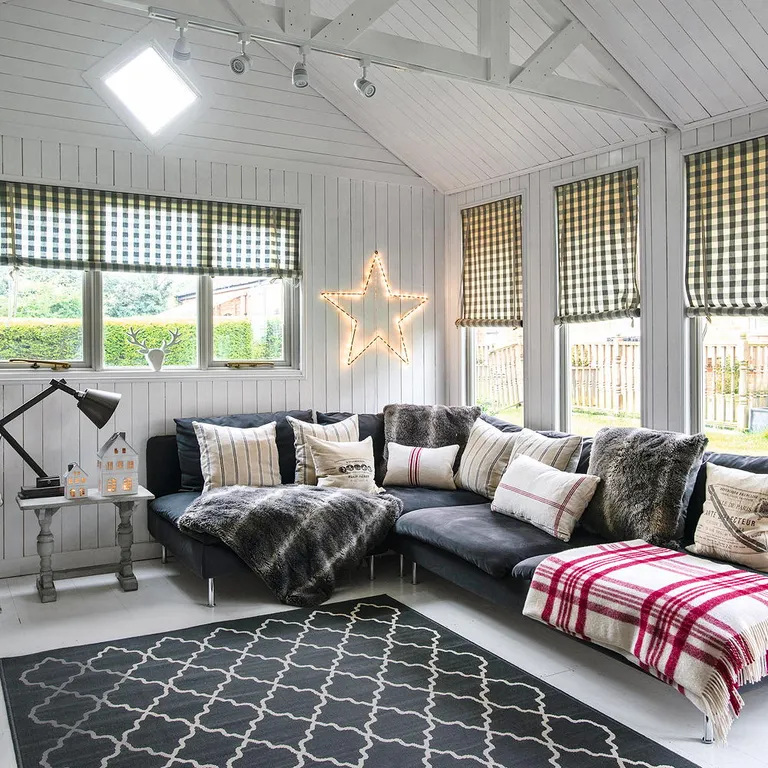 Image credit: Polly Eltes Whitewashed panels like this summon images of seaside beach huts. The thin panels crisscrossing over the walls and ceiling give the room a rustic appeal which can be easily maintained with just a lick of paint. It also works wonders at bouncing the light around a room. 16. Paint half-wall panelling a light colour Image credit: Polly Eltes As we’ve mentioned, panelling half a wall can run the risk of making a ceiling look smaller than it is. Avoid this by painting the panels in a pale shade such as this grey, but keep it slightly darker than the wall. Make any radiators or pipe work blend in by painting in the same shade as the panelling, to avoid detracting from the panelling itself. 17. Make a feature wall out of reclaimed wood Image credit: Future Publishing PLC/ Polly Eltes Reclaimed wood can be a gorgeously eco-friendly way to create a feature wall in a kitchen. It can be a little more expensive than other forms of tongue-and-groove panelling, if you purchase it from a specialist. However, if you are willing to do a bit of rummaging at a salvage yard and put in a little elbow grease with a saw and sand paper, it could be a great way to score serious style points on a budget. 18. Paint panelling in blush pink for a modern twist Image credit: Dominic Blackmore Tongue-and-groove wall panels are perfect for painting in a whole range of colours. The sky is the limit on your colour choice, but on-trend options include pale pink and dark charcoal grey. If you’re considering panelling as a DIY project, these boards are very easy to put up. As the name suggests the boards are designed to slot together and are ‘secret nailed’ to supporting patterns. The newer lookalike versions consist of sheets of MDF with the v-joint profile already routed. They’re stable and can even be fitted to a wall that’s not perfectly flat. 19. Frame a large window with panels Image credit: David Giles A large window shouldn’t get in the way of adding wall panelling in your bathroom. Jacobean style panels do a great job of mimicking the shape of the window and framing it. Faking the panel look is easier than it looks – simply use thin strips of MDF to create a grid. Space the strips out as close together or far apart to achieve the size of panel you’re going for and paint in one colour to achieve the look. 20. Mix it up Image credit: Future Publishing PLC/ Polly Eltes Add further character to walls by mixing up wood panel finishes, from top to bottom. This charming country living room captivates with a fusion of fixed vertically planks on the lower potion of the wall, with a wider set Jacobean-style grid above. The decide adds interest and height to the lower level ceiling, perfect as for a small living room idea in a country cottage. 21. Incorporate the bath Image credit: Future Publishing PLC/ Brent Darby Looking for a stylish bath panel idea? Consider this smart way of seamlessly incorporating the bath into the surrounding wood panelling. The dado-height wood panelling (seen reflected in the stylish round mirror) is echoed by the bath panel which helps to unify and define all surfaces, the panelling is even channelled on the cupboard doors for further effect. Wall panelling – everything you need to knowWhat are the benefits of panelling?Besides looking fabulous, panelling is a quick-fix solution for older walls in less-than-perfect condition. As long as the plaster isn’t blown, and you’ve dealt with any damp, panelling can be popped right over existing walls for an instant neat finish. In the bathroom it makes a warmer alternative to tiles. Does wall panelling have to be made from MDF?Wood is the traditional material used for wall panels but if you’re going for a more modern painted finish, MDF is much better value and is actually a very stable board. In high-moisture environments, like bathrooms, it’s essential to use Moisture Resistant (MR) MDF. Proficiently painted with an eggshell finish, it will cope admirably with splashes, but not total immersion, so don’t use it in the shower. Can I install wall panelling myself?It depends on ability but there are plenty of panelling kits designed specifically for DIYers. These tend to be MDF-based (solid timber requires professional skills/ tools) and can be simply glued onto the walls using a ‘No Nails’ type adhesive. Things can get complicated if there are tricky alcoves and windows to work around, so it may be worth hiring a local carpenter or handyman to ensure smart results – use Rated People to find local trades.  Image credit: Future Publishing PLC/ Brent Darby What height should wall panelling be?The top of the panelling should sit either a third or two-thirds of the way up the wall. Dividing the wall in half can make the ceilings fell lower. do work with existing architectural features – running panelling up to a picture rail is very effective – and think about the height of windows and sanitary ware. Don’t forget to include access panels to any isolation valves or cisterns for plumbing maintenance. How do I make DIY wall panelling look professional?Most panelling specialists supply matching dado rails, which can be used to hide a multitude of levelling sins, leaving a crisp connection between panelling and wall. Installing skirting over the top of panelling will do the same at floor level. How do I paint wall panelling?Depending on the style of panelling, it is usually best to paint it all in one colour, especially if you have used MDF pieces, to make the whole wall look like one piece of panelling. Additional words: Nicky Phillips The post Wall panelling ideas to add character, cover uneven walls and insulate any room appeared first on Ideal Home. |
| See how a savvy Mum turned her beige bathroom into a Miami-inspired retreat for less than £350 Posted: 31 May 2021 11:00 PM PDT We can’t resist a drastic makeover, and this is one of the best we’ve seen in a while. This Miami-inspired bathroom makeover might have been completed on a very small budget, but it makes a big impact.
Craving a holiday, 31-year-old Lauren Hubbard decided to bring the sunshine to her own home with a bathroom makeover that’s bright, colourful and fabulously quirky. The mum of two, from Hull, decided to document her efforts on Instagram after moving to her partner’s home just before the pandemic. ‘I started a home account initially to track my own progress and to show off my efforts to family and friends who couldn’t visit,’ she says. ‘The room has had a complete makeover and looks like an entirely different space,’ Lauren told home insulation supplier Insulation Express. ‘Including all the accessories it cost just £350 in total.’ Miami-inspired bathroom makeoverBefore Image credit: @homeofgetkooky As you can see, the initial space was crying out for a revamp. Neutral walls and plain tiles gave Lauren a blank canvas to play with and she certainly gave it her all, with vibrant colours and artistic accent pieces. ‘My style is fearless,’ she says. ‘I love colour, pattern and bold designs and I’m very experimental. I like getting the maximum effect for the least money possible and I’m not afraid to try different combinations, either – if they don't work you can always change them.’ Let’s take a look at the finished result… After Image credit: @homeofgetkooky The first thing you’ll notice is the striking colour scheme, where walls painted in a hot fuchsia pink from Valspar clash boldly with the peppermint wall tiles. The tiles have a gold border that was created with Annie Sloan’s gold metal leaf size. Lauren runs an online business, Get Kooky, which sells self-adhesive decorative vinyl, and she chose a design to cover the bath panel and wall above that combines her two favourite colours – pink and green. ‘This bathroom is mainly enjoyed by the kids and I knew they’d love the nice bright colours,’ says Lauren. ‘But equally, it’s perfect for me to wind down in with a soak after a busy day.’  Image credit: @homeofgetkooky On the other side of the room, the under-sink cupboard from B&M was painted in the same peppermint green, while the Enhet mirrored cabinet above was transformed using gold spray paint from Rustoleum.  Image credit: @homeofgetkooky There’s plenty of fun artworks dotted around the bathroom, most of which are from Oh So Daisy, Printed Weird and Nanas of Anarchy. And you can’t have a Miami-style bathroom without a flamingo!  Image credit: @homeofgetkooky In another corner, floating shelves from Homebase have been painted the same petrol-blue shade as the wall, while a gold disco ball from Amazon completes the look overhead.
According to Jenny Turner, property expert at Insulation Express, the colours that Lauren has used are the hottest choices for next season. ‘Our research shows that warm exotic shades of pink, pale pink, and mint green are on trend this summer 2021,’ she says. Are you a fan of 60s Miami style? Has Lauren’s bathroom inspired you to go bold with your next colour scheme? The post See how a savvy Mum turned her beige bathroom into a Miami-inspired retreat for less than £350 appeared first on Ideal Home. |


| You are subscribed to email updates from Ideal Home. To stop receiving these emails, you may unsubscribe now. | Email delivery powered by Google |
| Google, 1600 Amphitheatre Parkway, Mountain View, CA 94043, United States | |


No comments:
Post a Comment