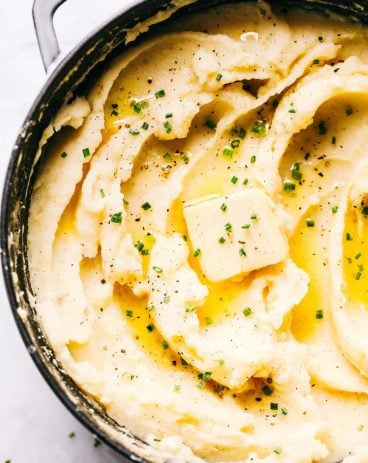
Turkey gravy is rich, thick, and creamy! This gravy takes less than 15 minutes to make! Once you drizzle it all over your turkey and potatoes, well, you will use this recipe for every holiday season!
Are you ready for your holiday dinner?! If you love sides during your holiday meal then try this Green Bean Casserole, Sweet Potatoes, or this easy Stuffing to add to your meal.
Turkey Gravy
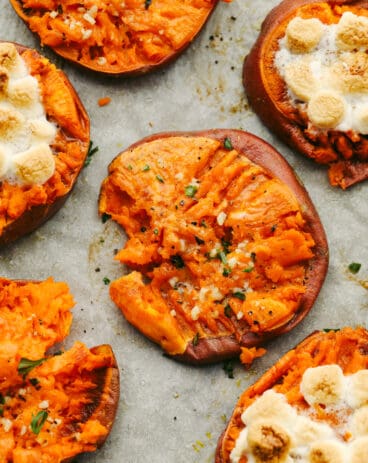
You can’t go wrong when making homemade gravy for your holidays! This is an easy-to-make turkey gravy that will add to any Thanksgiving or Christmas dinner. I love the flavors this turkey gravy brings! It is thick, rich, and smooth and I have a hard time not drizzling it all over my plate. It blends so well with turkey, potatoes, and all other side dishes you have on your dinner table. Try it on this Roasted Honey Cinnamon Butter Sweet Potatoes, this Green Bean Casserole, and this Roasted Autumn Vegetable Stuffing!
I feel like gravy is one of those staple side dishes that no one talks about but everyone expects. Can you imagine being served turkey and potatoes with no gravy?? That’s why you need this recipe on hand! It is so simple to make and uses all of the juices from your turkey anyways. So don’t let your guests (or yourself!) down by not having gravy at your holiday get-together!
What You Need to Make Turkey Gravy
Just a few simple ingredients that will help make your turkey dinner above the rest! Plus, it is so simple to whisk together in one pan! See the recipe card below for a list of exact ingredient measurements.
Pan drippings from turkey: This has all the flavoring you need to make your turkey gravy perfection!
Chicken broth: The chicken broth makes it so that you have MORE gravy and makes it rich, creamy and silky smooth.
Flour: I used all purpose flour for this recipe! This is what will thicken it up!
Salt and pepper: Add these seasonings to taste!
Let’s Make Some Gravy!
Making your turkey gravy couldn’t be easier. Just a couple of ingredients and a few steps to follow before you are drizzling this gravy on top of everything!
Making a roux: In a saucepan or roasting pan allow the drippings to deglaze over medium high heat. Whisk in 1 cup chicken broth and skim large pieces of fat.
Making the turkey gravy: Whisk in flour and continue to simmer until lumps have dissolved and gravy has thickened. Add an additional ½ cup- 1 cup chicken broth to get desired thickness. Salt and Pepper to taste.
How to Thicken Gravy
Some like a thinner gravy and others like it hearty and thick! Either way tastes amazing! When thickening the gravy, I prefer to use flour over cornstarch to thicken gravy but both will do the trick! To thicken up your gravy, you will play with the amount of drippings vs four (or cornstarch). Once you make this recipe if it’s too runny then go ahead and create your slurry with either flour or cornstarch. Once you have made that then add it to the broth to make thicker turkey gravy.
How to Make Gravy WITHOUT Turkey Drippings
If you don’t have a turkey to use for the flavoring, then you can still make this gravy! Instead of the drippings then you can use turkey stock or broth for flavoring. Add in your choice of thickening agent (cornstarch or flour). Then, continue to follow the instruction for making gravy just leaving out the drippings. Your gravy will taste just as good!
Tips for Making Turkey Gravy
This turkey gravy is straightforward and easy to make! You will love all the flavoring it has to offer this holiday season. Here are some tips to help you make this turkey gravy turn out perfectly!
Hot drippings: Make sure that your turkey drippings are still hot when adding them to the gravy. If they have already cooled then warm them back up on the stove. Don’t let them burn!
What is a roux? A roux is a mixture that you make outside of the drippings. Once you add it to them, you stir until everything thickens! A roux is equal parts fat to flour.
Cornstrarch or flour? Substitute cornstarch for your flour if you prefer a different thickening agent. Mix equal parts cornstarch and water or broth.
Thick or thin: Thicken or thin out your gravy by adding more or less flour or cornstarch to your gravy.
Smooth gravy: For a smoother gravy strain the pan drippings before adding them to the gravy. This will leave out the thicker chunks of drippings. Whisking your gravy is a key instruction so you get a smooth textured gravy. If it is lumpy pour it through a sieve before serving.
Serve it warm: Serve your turkey gravy warm. If is begins to cool slightly, simply warm up in the microwave for 15 to 20 seconds at a time until it is warm through.
How to Store Leftovers
Thanksgiving leftovers are the BEST! Gravy always goes fast at our house so we rarely have leftovers. But if I do, this is how I store them!
Refrigerator: Once it is completely cooled, place in an airtight container or ziplock baggie. This will store in the refrigerator for 1 to 2 days.
Reheating: When you are ready to reheat it then pour it back into a saucepan and add a 1 to 2 tablespoons of chicken broth or water if you want to thin it If not, just heat it on low heat gently, stirring it occasionally until it is warmed through. This will take about 10 to 15 minutes.
Make it a Holiday Meal!
If you love this turkey gravy and want ALL the sides to go with it, then use these recipes and make it a meal! They are so delicious and the best thing about gravy is you can put it on EVERYTHING and it makes it all taste that much better! Don’t limit yourself to just these sides either. Make it a feast and go all out with all the holiday foods! Enjoy!
Turkey gravy is rich, thick, and creamy! This gravy takes less than 15 minutes to make! Once you drizzle it all over your turkey and potatoes, well, you will use this recipe for every holiday season!
Course Dinner, Main Course, Side Dish
Cuisine American
Keyword gravy, Turkey gravy
Prep Time 5minutes
Cook Time 10minutes
Total Time 15minutes
Servings 12people
Calories 11kcal
Author Alyssa Rivers
Ingredients
Pan Drippings from 12-14 pound turkey
1 1/2-2cupschicken broth
1/4cupflour
salt and pepper to taste
Instructions
In a saucepan or roasting pan allow the drippings to deglaze over medium-high heat. Whisk in 1 cup chicken broth and skim large pieces of fat.
Whisk in flour and continue to simmer until lumps have dissolved and gravy has thickened. Add an additional ½ cup- 1 cup chicken broth to get the desired thickness. Salt and Pepper to taste.
Notes
Updated on November 16, 2021Originally Posted on October 17, 2019
Fruit cake is a classic holiday dessert that you’re going to love! With this recipe, you’ll get a moist, flavorful treat every time!
Not only are these types of bread delicious, but they’re great for gifting! Apple, lemon, and blueberry banana bread are more fruit-filled desserts that will be loved wherever they go!
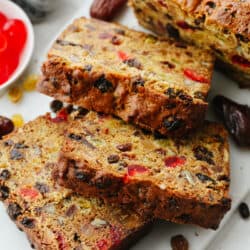
Amazing Holiday Fruitcake Recipe
I’m going to be honest here. I don’t get the hate for fruit cake! If made properly, fruit cake can compete with the best of them. Get the idea that fruit cake is hard and flavorless out of your head! At its core, fruit cake is just a quick bread with more mix-ins added. It can be as soft, moist, and wonderful as your favorite banana bread! This tasty fruit cake has a melt-in-your-mouth brown sugar bread base. From there, you add in all of your favorite fillings! From dates to dried pineapple, raisins to cherries, the sky is the limit! The best part of it all is that you can soak them all in your favorite liquor for added flavor! This recipe is easily customizable.
I’ve been making this fruit cake for friends, family, and neighbors and they have all been loving it! It’s a great way to spread a little holiday cheer. Delicious, too! Once you take a bite of this cake filled with the flavors of caramelized brown sugar, zesty citrus, and rich fruit, you’ll be hooked! There’s a reason it’s been hanging around since ancient times! This rustic recipe is incredible and bursting with so much flavor. Let’s make some fruit cake!
Fruit Cake Ingredients
This ingredient list is on the longer side, but the good news is most of them are mix-ins! Not a fan of some of them? You can easily swap them out for other toppings or omit them entirely. See my tips below for more suggestions on what to add to your fruit cake!
Cake Base
All-Purpose Flour: All-purpose flour has a low protein content so it’s good for keeping your fruitcake on the lighter side. Flours with too much protein will make it hard and dense.
Baking SodaandBaking Powder: A combination of both is necessary for a fruit cake that raises properly.
Salt: Added to enhance all flavors!
Unsalted Butter Unsalted, room temperature butter will mix into your dough perfectly and add a rich flavor.
Granulated Sugarand Dark Brown Sugar: I like using a mix of granulated and dark brown sugar in my fruit cake. Granulated for sweetness, dark brown sugar for a deeper flavor. They’ll give you the best caramelized flavor when baked.
Sour Cream: The secret ingredient for moist cake and a hint of tangy flavor!
Egg: Used to bind everything together. Make sure it’s room temperature! It will mix together more smoothly.
Lemon and Orange Zest: I love adding citrus zest to balance out sweetness. It’s nice and aromatic, too!
Finely Diced Crystalized Ginger: Crystalized, or “candied” ginger is going to give your cake a sweet flavor with a hint of spice. Perfect for the holidays!
Mix-Ins
Liquor: Traditionally, dark rum or brandy is used. You can also substitute for apple juice or orange juice if you don’t want to use alcohol.
Glazed Cherries: Also known as candied or maraschino cherries, these are a wonderful addition to your sweet cake!
Chopped Dates: Dates are sweet and moist with an almost caramel-y flavor. Perfect for a sweet bread!
Golden and Dark Raisins: I like using a mix of golden and dark raisins. It not only gives your bread more color, but tastes great, too! Golden raisins are tart while dark raisins are rich. They make a great combination!
Dried Pineapple: Sweet and tangy, dried pineapple adds a great flavor and texture to your bread.
Chopped Nuts: I love using a blend of almonds, walnuts, and pecans.
How to Make the Best Fruit Cake
You’re going to love how simple it is to make this fruity treat! Just a few minutes of prep and then it’s hands-off in the oven! I love anything that will put a little time back into my day. Especially around the holidays! But be warned: this fruit cake smells absolutely divine when it’s baking and may give you a case of Christmas cheer!
Preparing Batter
Soak Toppings: (Optional) Prepare at least 24 hours before baking by soaking your dried fruit mixture in dark rum or brandy. If you prefer the cake to be non alcoholic, you can use apple juice or orange juice instead. Use enough to cover all the fruit completely. Cover and let soak overnight, or even several days.
Preheat Oven, Prep Pan: Next, preheat the oven to 325° fahrenheit and line a 9×5 loaf pan with parchment paper. Set aside.
Mix Dry Ingredients: In a medium bowl, whisk together the flour, baking soda, baking powder and salt. Set aside.
Mix in Remaining Ingredients: In the bowl of a mixer, beat the butter, sugar, and brown sugar together on medium-high speed until light and fluffy. Scrape down the bowl and add the sour cream. Mix until combined.
Add Egg and Citrus Zest: Add the egg, lemon zest, and orange zest and mix until combined. Then, add the dry ingredients to the mixer and mix until just barely combined.
Mix in Nuts, Fruit, and Ginger: Next, mix in the crystalized ginger, chopped nuts and the soaked fruit along with any leftover liquid from the fruit. Fold in by hand until everything is evenly distributed throughout the batter.
Baking
Bake: Pour the batter into your prepared pan and place on the middle rack of the oven to bake. Bake for 1 ½-2 hours—until a toothpick comes out clean from the center of the loaf.
Cool: Let the cake cool for about 10-15 minutes before removing from the pan and cooling the rest of the way on a cooling rack.
Wrap and Age: (Optional) If you would like to age the cake, soak cheesecloth in brandy or dark rum and wrap well around the cake. Wrap in plastic wrap and then aluminum foil and store in an airtight container in a dark place. Rewrap the cake in freshly soaked cheesecloth every week until serving. It will keep for months as you continue to age it!
Tips for Making Fruit Cake
This essential holiday dessert can be enhanced with just a few simple tips and tricks! Really, making a successful fruit cake is so easy and delicious! You’ll want to keep this recipe on repeat over the next couple of months.
Toss in Flour: To ensure that your mix-ins don’t sink to the bottom of your loaf pan, toss them with a bit of flour before adding to your batter!
Adding Spice: To add even more flavor to this tasty dessert, sometimes I’ll throw in homemade pumpkin pie spice to the batter. This combination of warm spices definitely checks the boxes on that perfect holiday flavor!
Adding Applesauce: If you struggle to get your fruit cake to retain moisture, add a dollop of applesauce to your batter!
Use a Serrated Knife: Because fruit cake can be on the crumbly side, it’s best to use a serrated knife for nice, uniform slices.
More Mix-ins: More toppings that taste absolutely delicious in this recipe are: cranberries, figs, dried apricots, plums, prunes, cashews, coconut and blueberries! Mix and match to create the perfect fruit cake for you!
Storing Leftovers
The great thing about fruit cake is that it has a longer shelf life than most desserts! Here’s how to store it for best results. You’ll love coming back for a slice this holiday season!
At Room Temperature: This is my personal favorite way to store fruit cake. Wrap in plastic wrap or store in an airtight container in a cool, dry place. It will stay good for up to 1 month. I’ve found that storing at room temperature helps to retain moisture and keep it from getting too hard and dense.
In the Refrigerator: Fruit cake will last in an airtight container or wrapped in plastic wrap for up to 6 months. Note: the longer it stays in the fridge, the harder it will become. Allow to come to room temperature before serving.
In the Freezer: A fruit cake will last in the freezer for up to a year when properly sealed in a freezer safe bag. Allow to thaw overnight in the fridge before serving.
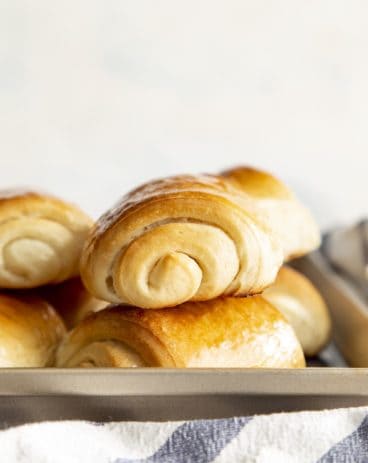
More Easy Holiday Bread Recipes
Warm, soft, and filled with all of the best mix-ins, bread is the perfect holiday treat! It’s great paired with any dinner and the perfect gift for your loved ones! Here are a few more of my favorite holiday bread recipes to munch on this winter! They’re quick, easy, and undeniably tasty.
Fruit cake is a classic holiday dessert that you're going to love! With this recipe, you'll get a moist, flavorful treat every time!
Course Side Dish
Cuisine American
Keyword fruit cake, fruit cake recipe
Prep Time 1day30minutes
Cook Time 2hours
Total Time 1day2hours30minutes
Servings 12slices
Calories 416kcal
Author Alyssa Rivers
Ingredients
3/4CupChopped Dates
1CupGolden Raisins
1CupDark Raisins
¾CupChopped Glazed Cherries
1CupChopped Dried Pineapple
¾cupdark rum or brandyapple juice or orange juice if don't want to use alcohol
2CupsAll-Purpose Flour
1TeaspoonBaking Soda
½TeaspoonBaking Powder
½TeaspoonSalt
½CupUnsalted Butterroom temperature
½Cupgranulated Sugar
½Cupdark brown sugar
1/2CupSour Cream
1largeeggroom temperature
1TablespoonLemon Zest
1TablespoonOrange zest
2TablespoonsFinely Diced Crystalized Ginger
½CupChopped nutsAlmonds, Walnuts, or pecans
Instructions
Prepare at least 24 hours before baking by soaking your dried fruit mixture in dark rum or brandy. If you prefer the cake to be non-alcoholic, you can use apple juice or orange juice instead. Use enough to cover all the fruit completely. Cover and let soak overnight, or even for several days.
Preheat the oven to 325° and line a 9×5 loaf pan with parchment paper. Set aside.
In a medium bowl whisk together the flour, baking soda, baking powder, and salt. Set aside.
In the bowl of a mixer beat the butter, sugar, and brown sugar together on medium-high speed until light and fluffy. Scrape down the bowl and add the sour cream. Mix until combined.
Add the egg, lemon zest, and orange zest and mix until combined. Add the dry ingredients to the mixer and mix until just barely combined.
Add the crystallized ginger, chopped nuts, and the soaked fruit along with any leftover liquid from the fruit. Fold in by hand until everything is evenly distributed throughout the batter.
Pour the batter into your prepared pan and place it on the middle rack of the oven to bake. Bake for 1 ½-2 hours—until a toothpick comes out clean from the center of the loaf.
Let the cake cool for about 10-15 minutes before removing it from the pan and cooling the rest of the way on a cooling rack.
If you would like to age the cake, soak the cheesecloth in brandy or dark rum and wrap well around the cake. Wrap in plastic wrap and then aluminum foil and store in an airtight container in a dark place. Rewrap the cake in freshly soaked cheesecloth every week until serving. It will keep for months as you continue to age it!


No comments:
Post a Comment