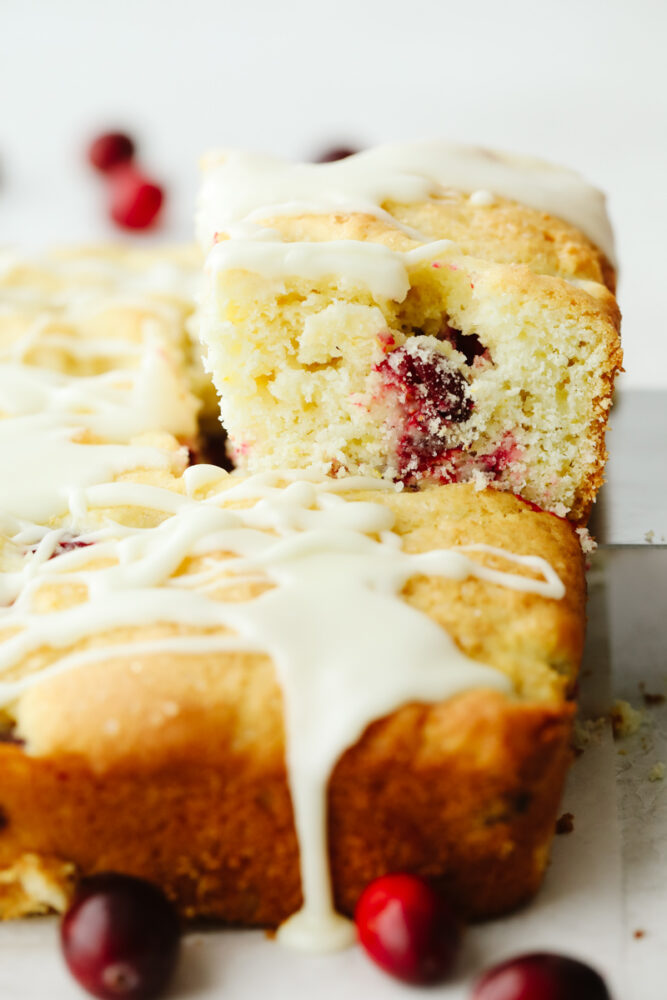
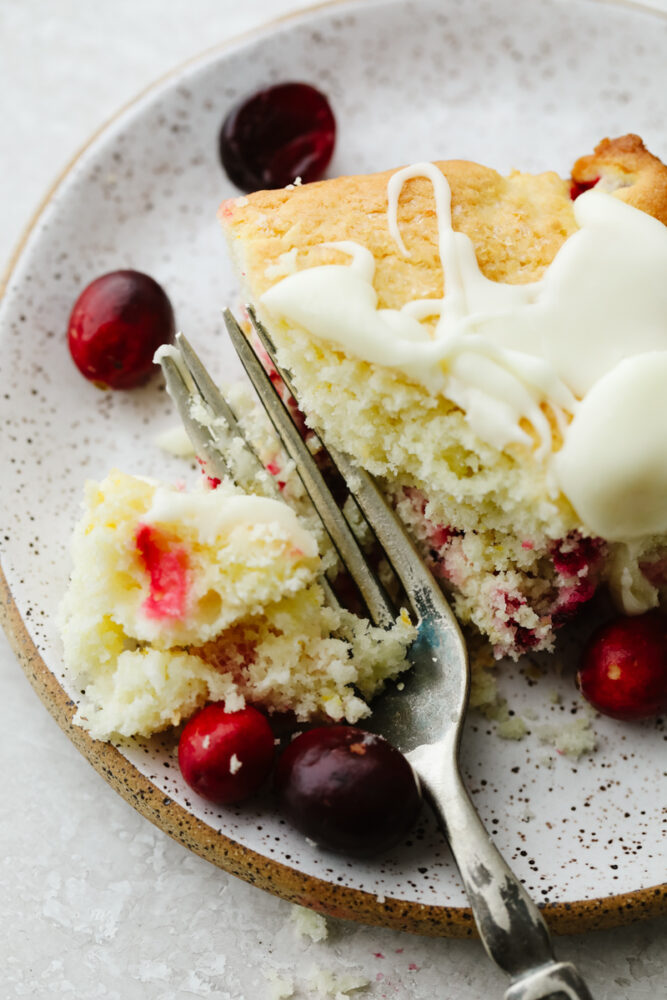
This cranberry cake is soft, fluffy and full of delicious cranberry flavor! Drizzled with an orange glaze on top, this cake is perfect for the holidays!
So, the big question is do I eat this for breakfast, brunch, or dessert? Well… because of the fruit taste and delicious orange glaze, I totally think this can be eaten at any time of the day! I love a cake that mixes and matches flavors! This one has that cranberry taste mixed into the batter and onto you add in a creamy, slightly orange flavored glaze. When you mix the two together… It’s SOO GOOD!!
Not only do I think that this cake is amazing but I love how easy it is to make!! It only takes 15 minutes to put together and then all you have to do is pop it in the oven and wait! I know, I make that sound easy but when you’re hungry, waiting is the hardest part. It is so good and I love serving it at brunch along with some Apple Streusel Muffins, Blueberry Scones, and this amazing Cherry Almond Cream Cheese Breakfast Braid! Try them all, everyone will go crazy over them!
Ingredients You Need to Make Cranberry Cake
This cake is quick and easy to make! You probably have most of these ingredients in your pantry. Especially around the holidays because that’s when we all have cranberries in our fridge already! See the recipe card at the bottom of the post for exact measurements.
Butter: I like to use unsalted butter that has been softened to room temperature!
Orange zest: This fresh flavor really takes this recipe to the next level.
Granulated sugar: The sugar helps sweeten this up and gives a delicious contrast to the tart cranberries.
Egg: The egg helps to bind all of the ingredients together!
Vanilla: This adds a slight flavor to the sweet sugar!
Flour: All purpose flour is what I used and it works great in this recipe.
Salt: The salt in the recipe enhances all of the flavors of the other ingredients!
Baking powder: This is what helps the cake rise and stay soft and fluffy.
Fresh cranberries: Using fresh cranberries adds a delicious tart flavor to this cake. You can’t have cranberry cake without them!
Buttermilk: You can use store bought buttermilk but if you don’t have any on hand then try making this homemade Buttermilk instead!
Coarse sugar: This is for topping on your cake!
Glaze
Powdered sugar: I use powdered sugar instead of granulated sugar because this dissolves much faster and creates that delicious and smooth texture.
Heavy cream: This will mix in with the powdered sugar making it thick and creamy.
Fresh orange juice: My favorite part of the glaze! This flavor combined with the cranberries is SOO GOOD.
Let’s Make Some Cake!
I love the flavor and the texture of this cranberry cake. It’s perfect for the holidays because of the festive cranberries. But let’s be honest, I bake this all year long!
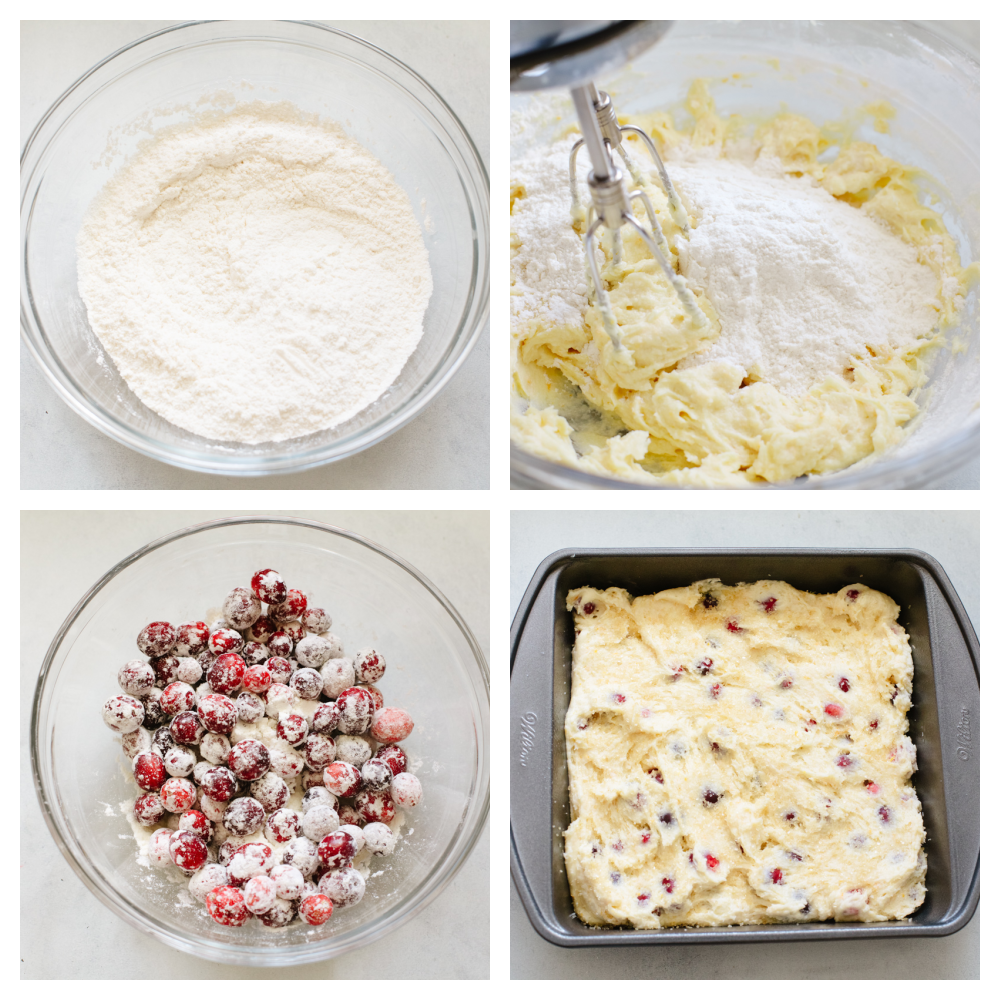
Preheat oven and combine: Preheat the oven to 350°. Grease an 8 or 9 inch square pan and set aside. In a medium bowl cream together the butter, orange zest and sugar. Add the egg and vanilla and beat until combined.
Whisk: In a separate mixing bowl whisk together 1 ¾ cup of flour, salt and baking powder. Toss the cranberries in the remaining ¼ cup of flour.
Combine and fold in cranberries: Add the flour mixture to the creamed mixture a little at a time, alternating with the buttermilk, until fully combined. Gently fold in the cranberries.
Add batter to pan, bake and let it rest: Spread the batter into the prepared baking pan. Sprinkle with coarse sugar. Bake for 35-40 minutes or until a toothpick comes out clean from the center. Let rest for 15 minutes before topping with the glaze and serving.
Glaze
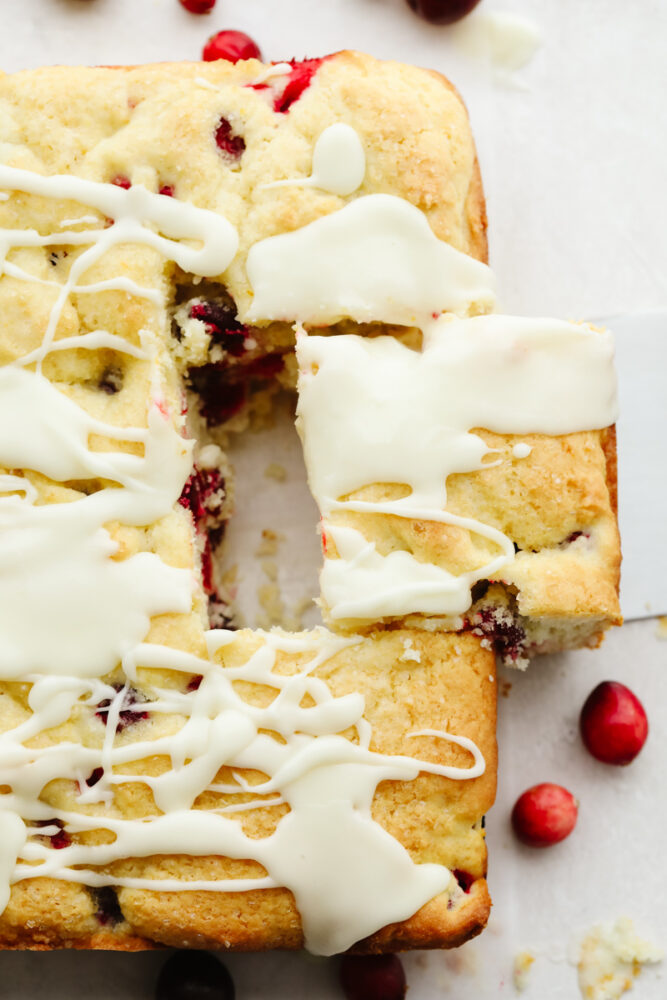
Mix and drizzle: Mix the powdered sugar, heavy cream and orange juice together until smooth. Drizzle across the top of the slightly cooled cake.
Baking Tips
This cranberry cake is easy enough that anyone can make it! Here are a few tips to help you make it turn out just right!
Don’t overmix: When you over mix or set your mixer to mix on high then you add more air to your batter! Use room temperature ingredients so that you don’t have to mix so many lumps and do it on a lower speed.
Don’t open the oven door: I know that it’s tempting to open the oven door while you are baking your cake. But when you open the door while you are baking, you let a lot of the heat out. This makes it so that your cake will bake unevenly. Use the oven light instead of opening the door!
Room temperature ingredients: I know that this can take a bit of thought beforehand but it really helps! Make sure to take all of your refrigerated ingredients out and put them on the counter a few hours before you plan on baking. Bringing your ingredients to room temperature really helps them mix nicely together and makes the dough really smooth!
Varitations
This cranberry cake is so easy and delicious! And, you can mix a few things up to make this cake work just for you! Here are a few ideas.
Cut the cranberries in half: I like to leave the cranberries whole in this recipe but if you like more, smaller bites of cranberries then you can cut them all in half before mixing them in the batter! Then you are sure to get that tart cranberry taste in every single bite!
Frozen cranberries: I love using fresh ingredients every chance that I can but you can use frozen cranberries in a pinch! You can leave them whole or chop them up.
Buttermilk: No buttermilk, no problem! You can make this Homemade Buttermilk instead!
Sugar topping: You can use demerara, turbinado or raw sugar for the topping of sugar. Some will have more crunch than others but they will all taste delicious!
Add a topping! If you want, you can try adding in some sliced almonds, pecans or walnuts to the top of your cake!
How to Store Leftovers
This cranberry cake is great to make ahead and eat later! Here is how you can do that or store any leftovers that you may have.
On the counter: Once your cake has cooled then wrap it tin plastic wrap or store it in an airtight container. It can last on your counter for up to a week.
Freeze: To freeze this cake, wrap it up in plastic wrap and then a layer of foil. Write the date on the foil and this cake can last in your freezer for up to 2 months. When you are ready to eat, thaw it overnight at room temperature (keep it wrapped while thawing). Enjoy!
More Delicious Cakes to Try
I love baking during the holidays which means that I am constantly trying out new recipes! Here are a few of my tried and true favorites that everyone in my family loves! These recipes are SOO GOOD and will have everyone asking for the recipes! Try them out, I’m sure that you will find a few that you come back to over and over again!
This cranberry cake is soft, fluffy and full of delicious cranberry flavor! Drizzled with an orange glaze on top, this cake is perfect for the holidays!
Preheat the oven to 350°. Grease an 8 or 9-inch square pan and set it aside. In a medium bowl cream together the butter, orange zest, and sugar. Add the egg and vanilla and beat until combined.
In a separate mixing bowl whisk together 1 ¾ cup of flour, salt, and baking powder. Toss the cranberries in the remaining ¼ cup of flour.
Add the flour mixture to the creamed mixture a little at a time, alternating with the buttermilk, until fully combined. Gently fold in the cranberries.
Spread the batter into the prepared baking pan. Sprinkle with coarse sugar. Bake for 35-40 minutes or until a toothpick comes out clean from the center. Let rest for 15 minutes before topping with the glaze and serving.
Glaze
Mix the powdered sugar, heavy cream, and orange juice together until smooth. Drizzle across the top of the slightly cooled cake.
Hot and sour soup is savory, delicious, and makes my mouth water just thinking about it! You can’t beat a soup that’s filled with mushrooms, bamboo shoots, tofu, and veggies. It tastes better than at a restaurant!
Soup is perfect for this time of year! Try out some of my other favorites like this Cheeseburger, this amazing Chicken Noodle, or this Gnocchi Soup. They are so good and perfect for a cold, winter day.
What IS Hot and Sour Soup?
If you are wondering what hot and sour soup is and want to know before you make it, I get it! Traditionally seen at Chinese restaurants, hot and sour soup gets its name from white pepper (hot) and rice vinegar (sour). It’s savory and spicy and filled with mushrooms, tofu, green onions, and bamboo shoots. If you haven’t had it before then I’m sure this combination sounds crazy but it’s SOO GOOD. Pair it with some Cashew Chicken, Shrimp Fried Rice, and some Chicken Potstickers and you will have a delicious meal!
I especially love making this soup because it’s so quick and easy to make! It only takes about 25 minutes (that included prepping AND cooking!). So it’s a great choice when you need a delicious and hearty meal quickly! Plus, this recipe tastes better than at a restaurant! I love when I can make a copycat recipe and enjoy it in my own house. Try this out, I think that you will love it!
Ingredients to Make Hot and Sour Soup
This recipe has a few ingredients that you may not regularly have on hand! So look this over, head to the store, and grab everything that you need. It’s SO worth it! See the recipe card at the bottom of the post for exact measurements.
Vegetable broth: This will be used as the base of your soup! It gives it a a ton of delicious flavoring.
Mushrooms: Try using shiitake, baby bella, or button mushrooms. Slice them thinly and don’t forget to remove their stems!
Bamboo shoots: These are optional but are very traditional in this dish!
Rice vinegar: This is where this soup gets the “sour” part of its name! This is my favorite rice vinegar to use.
Soy sauce: You can use regular or reduced sodium!
Ground ginger: I love the added flavor that this spice adds to the dish.
Cornstarch and water: You will mix these two together and when you put it in the broth, it will thicken it up!
Eggs: Beat these well so that they mix in nicely.
White pepper: This is where the “hot” comes in the name of this soup! Start with ½ tsp and add more if you want it hotter!
Firm tofu: I like to use tofu in this dish but if you would rather then you can use cooked shredded chicken instead!
Green onions: These are used for garnish AND taste!
Sesame oil: Top the soup off with a drizzle of this sesame oil.
Let’s Make Some Soup!
This hot and sour soup is so delicious and comes together so quickly! it’s perfect for an appetizer or even an entree if you love it that much!!
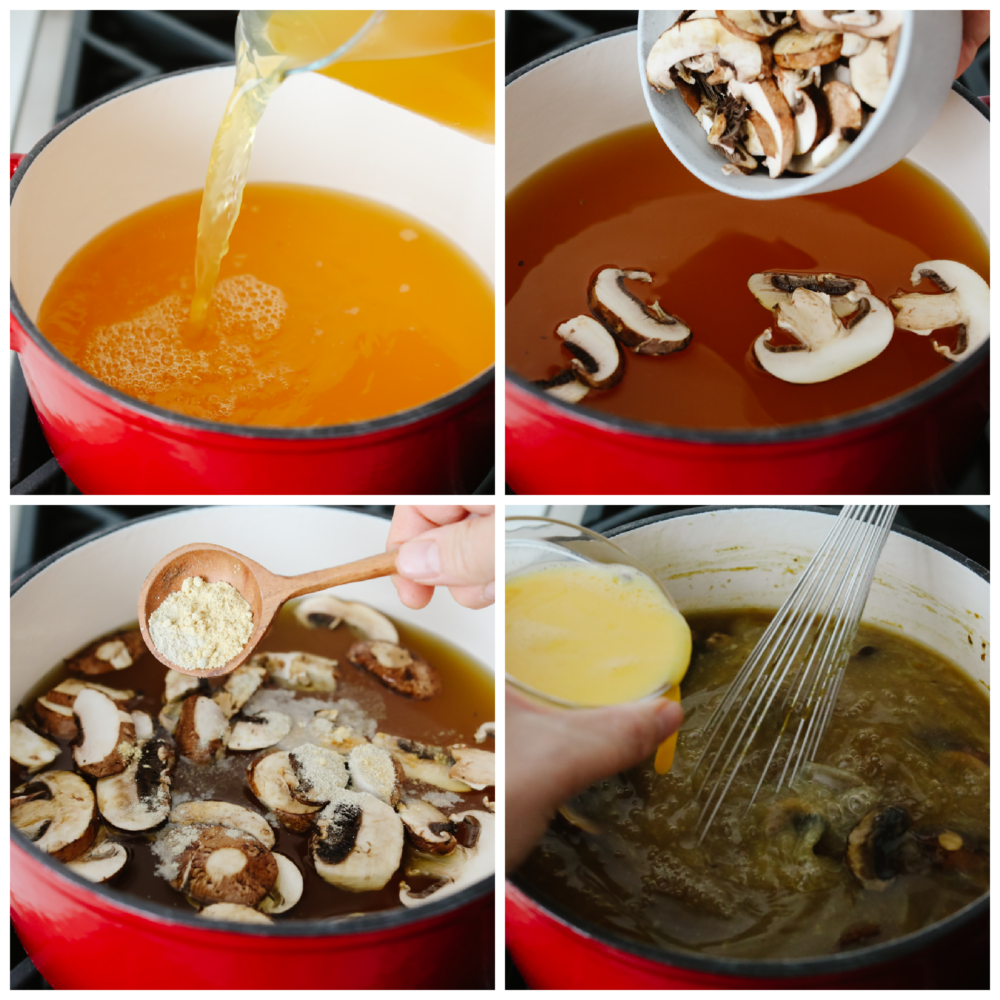
Simmer vegetable broth: In a large pot, add the vegetable broth, and bring simmer over medium high heat.
Whisk: Add the mushrooms, bamboo shoots (if using), vinegar, soy sauce, ground ginger, and white pepper. Whisk to combine, and continue to simmer for about 5 minutes.
Thicken with cornstarch and water: In a small bowl, whisk together the cornstarch and cold water. Then, stir the constarch mixture to the pot once the soup has come to a simmer. Continue to simmer for 5 minutes or until the soup starts to thicken.
Add eggs: While stirring the soup, gradually pour in the beaten eggs, and continue to stir in a circular motion. This will create egg ribbons.
Add tofu, green onions and sesame oil: Add in the cubed tofu and/or cooked shredded chicken, green onions, and sesame oil.
Serve: Serve immediately and enjoy!
Tips and Variations
You can really add or take out things that you like to make this hot and sour soup your own! Here are a few ideas to make this turn out just right!
Adjust the heat: The hot (white pepper) and sour (rice vinegar) can be adjusted to your liking. Add more of either, depending on which taste you like the best!
Vegetables: Any of the vegetables can be left out to your liking. Mushrooms and bamboo shoots are traditionally in hot and sour soup, but feel free to leave them out if you don’t like them!
Protien: You can leave the tofu out and use cooked shredded chicken instead. Or, you can use them bot for a more filling soup!
How to Store Leftovers
If you have leftovers of this hot and sour soup then you can store it and have it for lunch or dinner the next day! Here’s how you can store it!
Refrigerate: Once it has cooled, place your hot and sour soup in an airtight container and put it in your fridge. It can last 2-3 days.
Reheat: When you are ready to eat your leftovers, go ahead and reheat the soup on the stove on medium heat until heated through!
What to Serve With Hot and Sour Soup
If you want to use this as the traditional appetizer that it is, then I have come up with a few entrees and side items that you can serve along with it! It’s all so good that once you are done you will feel like you are eating at a restaurant! Make it an entire meal, your whole family will love it!
Hot and sour soup is savory, delicious and makes my mouth water just thinking about it! You can't beat a soup that's filled with mushrooms, bamboo shoots, tofu and veggies. It tastes better than at a restaurant!
In a large pot, add the vegetable broth, and bring simmer over medium-high heat.
Add the mushrooms, bamboo shoots (if using), vinegar, soy sauce, ground ginger, and white pepper. Whisk to combine, and continue to simmer for about 5 minutes.
In a small bowl, whisk together the cornstarch and cold water. Stir the cornstarch mixture into the pot once the soup has come to a simmer. Continue to simmer for 5 minutes or until the soup starts to thicken.
While stirring the soup, gradually pour in the beaten eggs, and continue to stir in a circular motion. This will create egg ribbons.
Add in the cubed tofu and/or cooked shredded chicken, green onions, and sesame oil.
Serve immediately and enjoy!
Notes
The hot (white pepper) and sour (rice vinegar) can be adjusted to your liking. Add more of either to your preference.Any of the vegetables can be left out to your liking. Mushrooms and bamboo shoots are traditionally in hot and sour soup, but feel free to leave them out if you don’t like them.Any proteins can also be left out, or you can add both for a more filling soup.
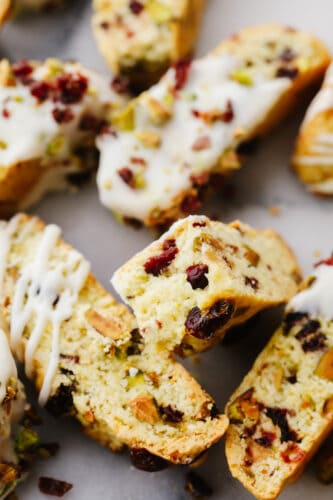
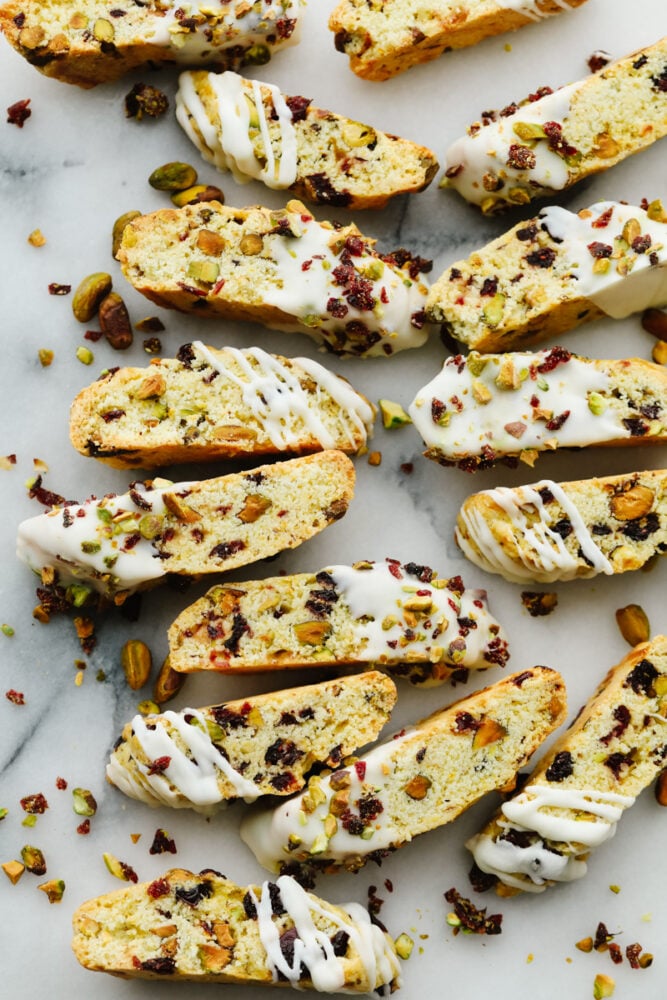
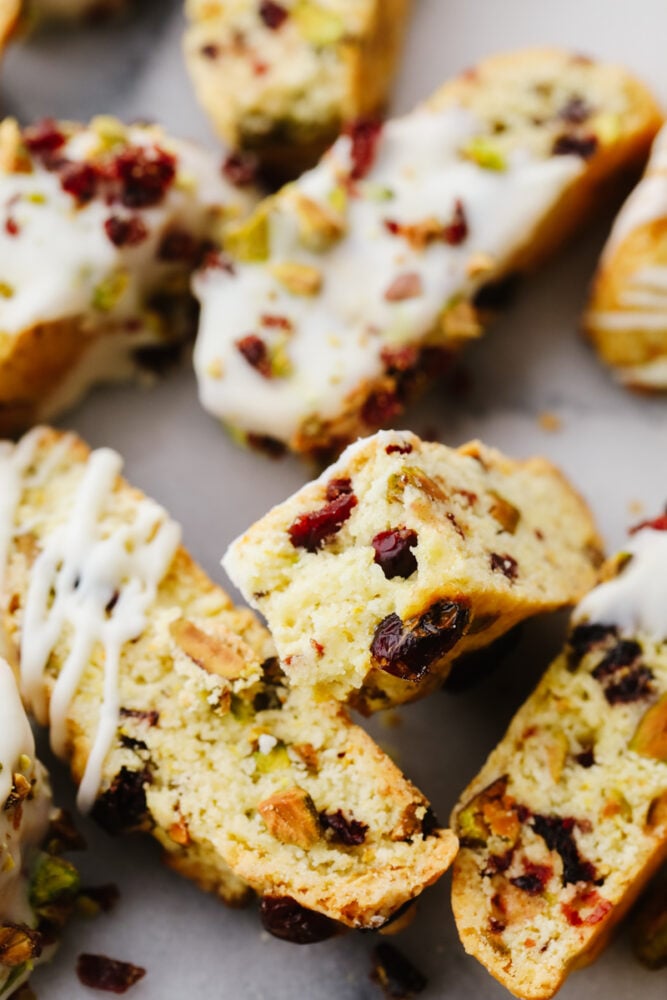
Cranberry pistachio biscotti are the tangy, nutty biscuits of your dreams! Topped off with a delicate white chocolate drizzle, these delicious treats will shine at all of your holiday get-togethers!
Need more tasty baked goods in your life? You should definitely try scones, cannoli, and Linzer cookies! They're festive and ready for teatime!
Homemade Cranberry Pistachio Biscotti Recipe
Cookies and biscuits are great year-round, but there's something about the holidays that brings out the magic in them. These cranberry pistachio biscotti are that and more! They're fabulously crunchy but also delicate. Traditionally, they're made with simple ingredients like almonds or raisins and then dipped in chocolate. Today, I've decided to take a Christmasy twist on this classic recipe and make them with tart cranberries and crunchy pistachios! Need I say more?
If you're not already convinced, cranberry pistachio biscotti are super easy to make! Only 20 minutes of prep time and then it's off to the oven to bake to crumbly perfection! Not to mention, they are absolutely divine alongside hot chocolate, coffee, or tea. They're perfectly dunkable! Serve them at teatime, as an appetizer, or even on a holiday charcuterie board! They're so yummy! Trust me, you're going to love having these tasty treats around. Let's make some biscotti!
What Does Biscotti Taste Like?
Biscotti is technically considered a biscuit but tastes a lot like a crunchy cookie. It may be on the crunchy side, but don’t think break-your-teeth crunchy! These biscuits actually have a light, airy structure, and biting into them is more like a delicate snap. Their shape also makes them perfect for dunking into hot drinks! Combined with being flavored with tasty vanilla and almond, these sweet, sturdy biscuits are a knockout treat!
Italian Biscotti Ingredients
Good news! These biscuits use a lot of basic ingredients. Just get your pistachios and cranberries! You'll find the rest of the ingredients in your cabinet. It's the best! All measurements are in the recipe card below.
All-Purpose Flour: Gives biscotti their airy texture! It's so good!
Sugar: White sugar is used to sweeten up your biscuits.
Baking Powder: For biscuits that aren't too dense, you need baking powder!
Salt: Next, for enhancing flavor we need salt!
Large Eggs: For biscuit dough and egg wash.
Vegetable Oil or Light Olive Oil: Either works great! This is used to add moisture to your biscuit dough.
Vanilla Extract: Vanilla makes everything better! You can also use almond extract to flavor your biscuits.
Orange Zest: I love adding orange zest to my cookies for some tang!
Sweetened Dried Cranberries: Used for both the dough and dipping!
Chopped Pistachios: So delicious and crunchy! Like the cranberries, these are added to both
the dough and used for dipping.
White Chocolate: Use for drizzling and dipping! You can swap this for milk or dark chocolate, whatever you like!
Making Biscotti
Making biscotti at home is so easy! Honestly, once you’ve made them from scratch you won’t want to get them from the store again! Don’t be surprised if this cranberry pistachio biscotti becomes a new holiday favorite. It’s just that good!
Preheat Oven, Line Baking Sheet: First, preheat the oven to 350° Fahrenheit and line a baking sheet with parchment paper. Then, set aside.
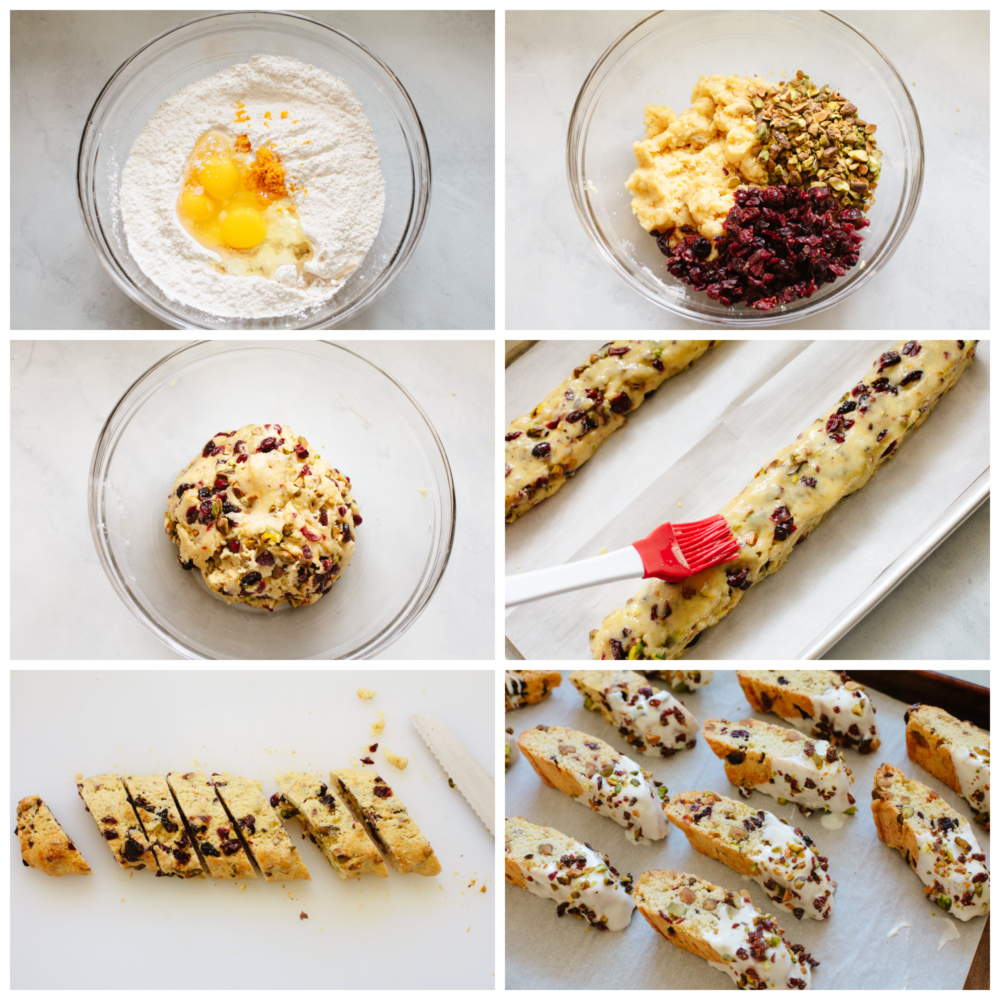
Mix: In a large bowl, combine the flour, sugar, baking powder and salt. Add the eggs, oil, vanilla and orange zest and mix on low until just combined. Fold in the pistachios and cranberries by hand. You may have to actually use your hands to mix them in.
Form: Turn half of the dough out onto the parchment lined baking sheet, form it into a log that is about 14 inches long and 2 inches wide. Lightly wet your fingers and press down on the top of the log to flatten it just slightly. Leaving several inches between the log, repeat with the second half of the dough.
Add Egg Wash, Bake: Mix the beaten egg with 1 tablespoon of water and then brush across the tops of the logs. Bake for about 30-35 minutes, until they are firm on top. Allow to cool completely.
Cut, Bake Again: Once the logs are completely cooled, reheat the oven to 325° Fahrenheit. Transfer the logs to a cutting board and cut each one into 12 pieces using a serrated knife. I cut mine on a slight bias to get longer pieces. Return the slices to the baking sheet, laying them down on the cut side, and bake for 18-20 minutes, until they begin to get crisp.
Dip in Chocolate, Add Toppings: Finally, let the cookies cool completely before dipping the ends in melted white chocolate and sprinkling with the chopped pistachios and cranberries.
Biscotti Tips and Tricks
Here are a few ways to perfect this yummy Italian treat! They’re so easy to make at home. I know you’re going to love how they turn out!
Switch Nuts: Instead of pistachios, you can switch these out for pecans, almonds, walnuts, or cashews.
Cool After First Bake: I like to let my biscotti cool for 5-10 minutes before I cut them. If you cut them too early, the pieces might break.
Use a Serrated Knife: Opt for a serrated knife when cutting your biscotti pieces. This helps you cut clean, uniform slices!
Make it Chocolate: To make a chocolate version of cranberry pistachio biscotti, add a few tablespoons of unsweetened cocoa powder to your biscuit dough.
Dips and Toppings: The best part about this recipe is that it’s completely customizable! You can swap white chocolate for milk or dark chocolate, as well as use caramel sauce for dipping! For toppings, you can add almond slices, chocolate chips, turbinado sugar, raisins, and more!
Storing Leftover Cranberry Pistachio Biscotti
The best part about cranberry pistachio biscotti is that they last for a long time! It’s the perfect dessert to enjoy throughout the holidays.
At Room Temperature: Store your biscotti in an airtight container for up to 2 weeks.
In the Freezer: Store in an airtight container or wrap tightly in plastic wrap. Your biscotti will keep for up to 3 months. Remove from wrap or container and let thaw at room temperature before serving.
More Delicious Holiday Treats
Snacks and treats are the best part of the holidays! I love munching on them just as much as my guests do! I’ve rounded up a few of my favorite holiday sweet treats to share with you. They’re so easy and delicious. Bring on the Christmas cheer!
Cranberry pistachio biscotti are the tangy, nutty biscuits of your dreams! Topped off with a delicate white chocolate drizzle, these delicious treats will shine at all of your holiday get-togethers!
Course Dessert
Cuisine Italian, Italian American
Keyword biscotti, cranberry pistachio biscotti
Prep Time 20minutes
Cook Time 45minutes
Total Time 1hour5minutes
Servings 24Cookies
Calories 103kcal
Author Alyssa Rivers
Ingredients
2 1/4CupsAll-Purpose Flour
1CupGranulated Sugar
½TeaspoonBaking Powder
¼TeaspoonSalt
3LargeEggsroom temperature
¼ CupVegetable Oilor Light Olive Oil
1TeaspoonVanilla Extract
1TablespoonOrange Zest
1CupSweetened Dried Cranberries
1CupChopped Pistachios
1LargeEggbeat for egg wash
White Chocolate for dipping or drizzling
Finely chopped pistachios and cranberries for dipping
Instructions
Preheat the oven to 350° and line a baking sheet with parchment paper. Set aside.
In a large bowl, combine the flour, sugar, baking powder, and salt. Add the eggs, oil, vanilla, and orange zest and mix on low until just combined. Fold in the pistachios and cranberries by hand. You may have to actually use your hands to mix them in.
Turn half of the dough out onto the parchment-lined baking sheet, form it into a log that is about 14 inches long and 2 inches wide. Lightly wet your fingers and press down on the top of the log to flatten it just slightly. Leaving several inches between the log, repeat with the second half of the dough.
Mix the beaten egg with 1 tablespoon of water and then brush across the tops of the logs. Bake for about 30-35 minutes, until they are firm on top. Allow to cool completely.
Once the logs are completely cooled, reheat the oven to 325°. Transfer the logs to a cutting board and cut each one into 12 pieces using a serrated knife. I cut mine on a slight bias to get longer pieces. Return the slices to the baking sheet, laying them down on the cut side, and bake for 18-20 minutes, until they begin to get crisp.
Let the cookies cool completely before dipping the ends in melted white chocolate and sprinkling with the chopped pistachios and cranberries.
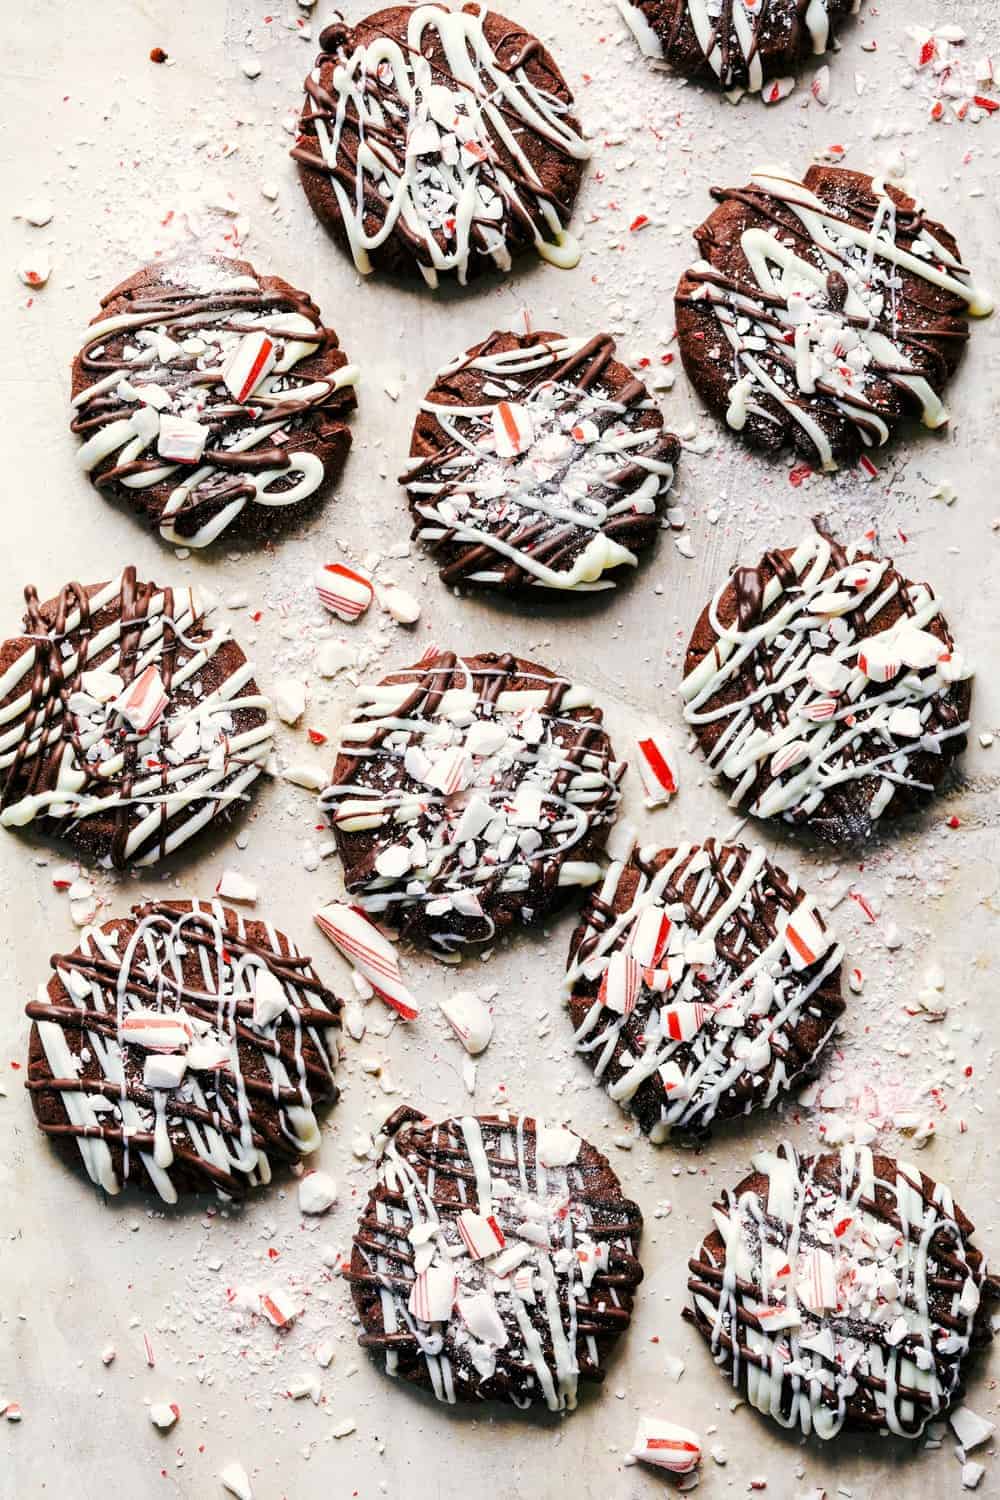
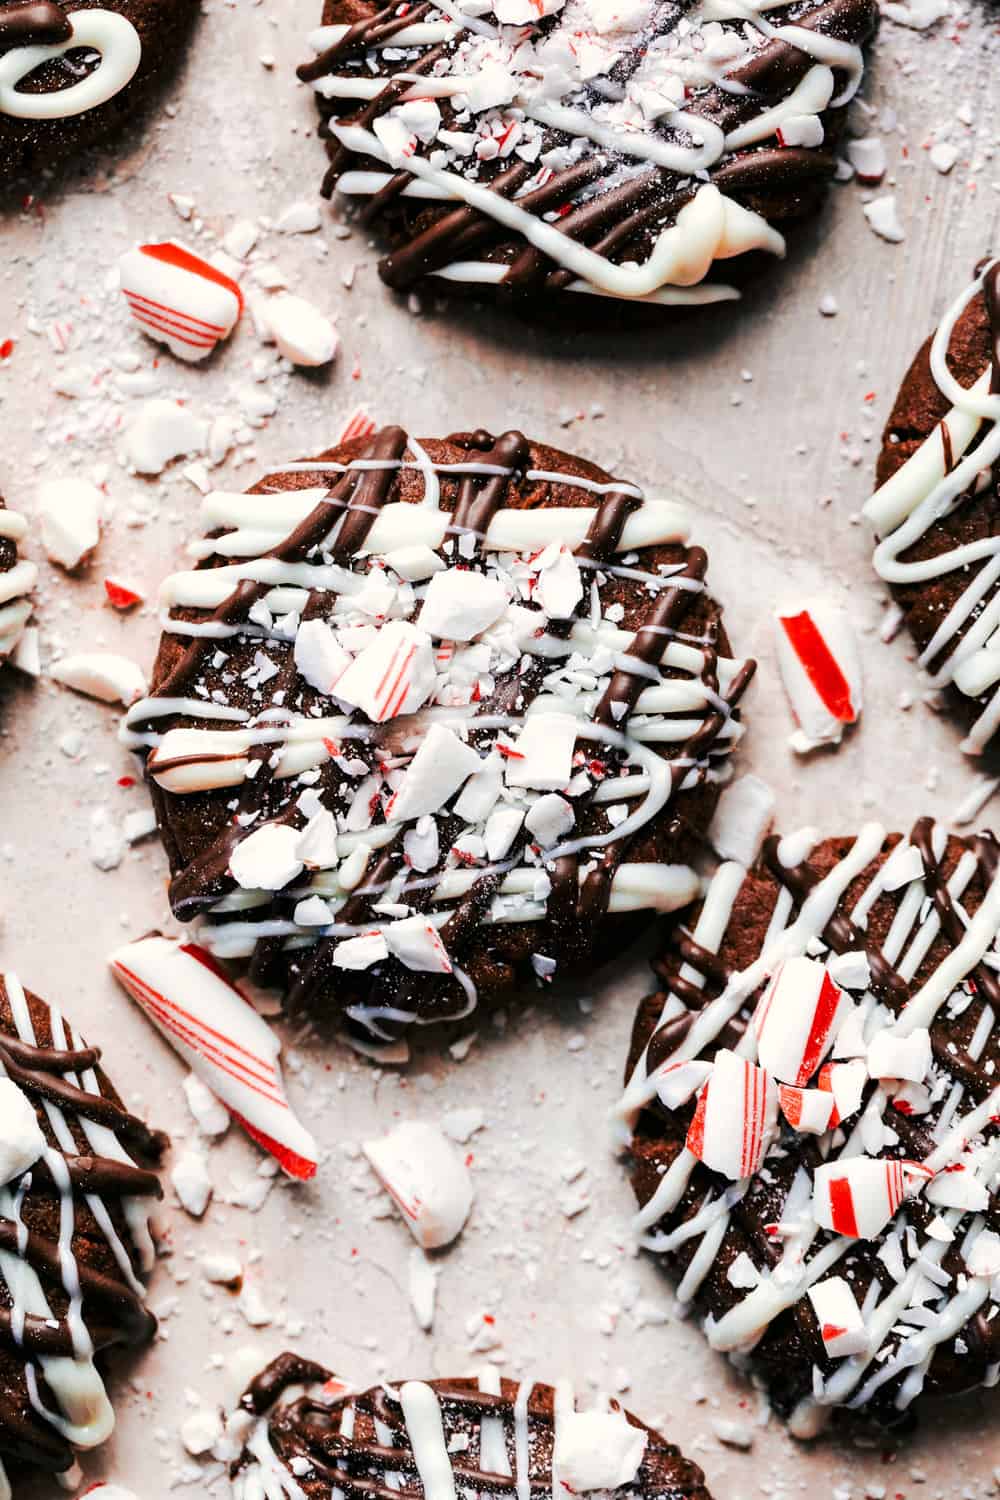
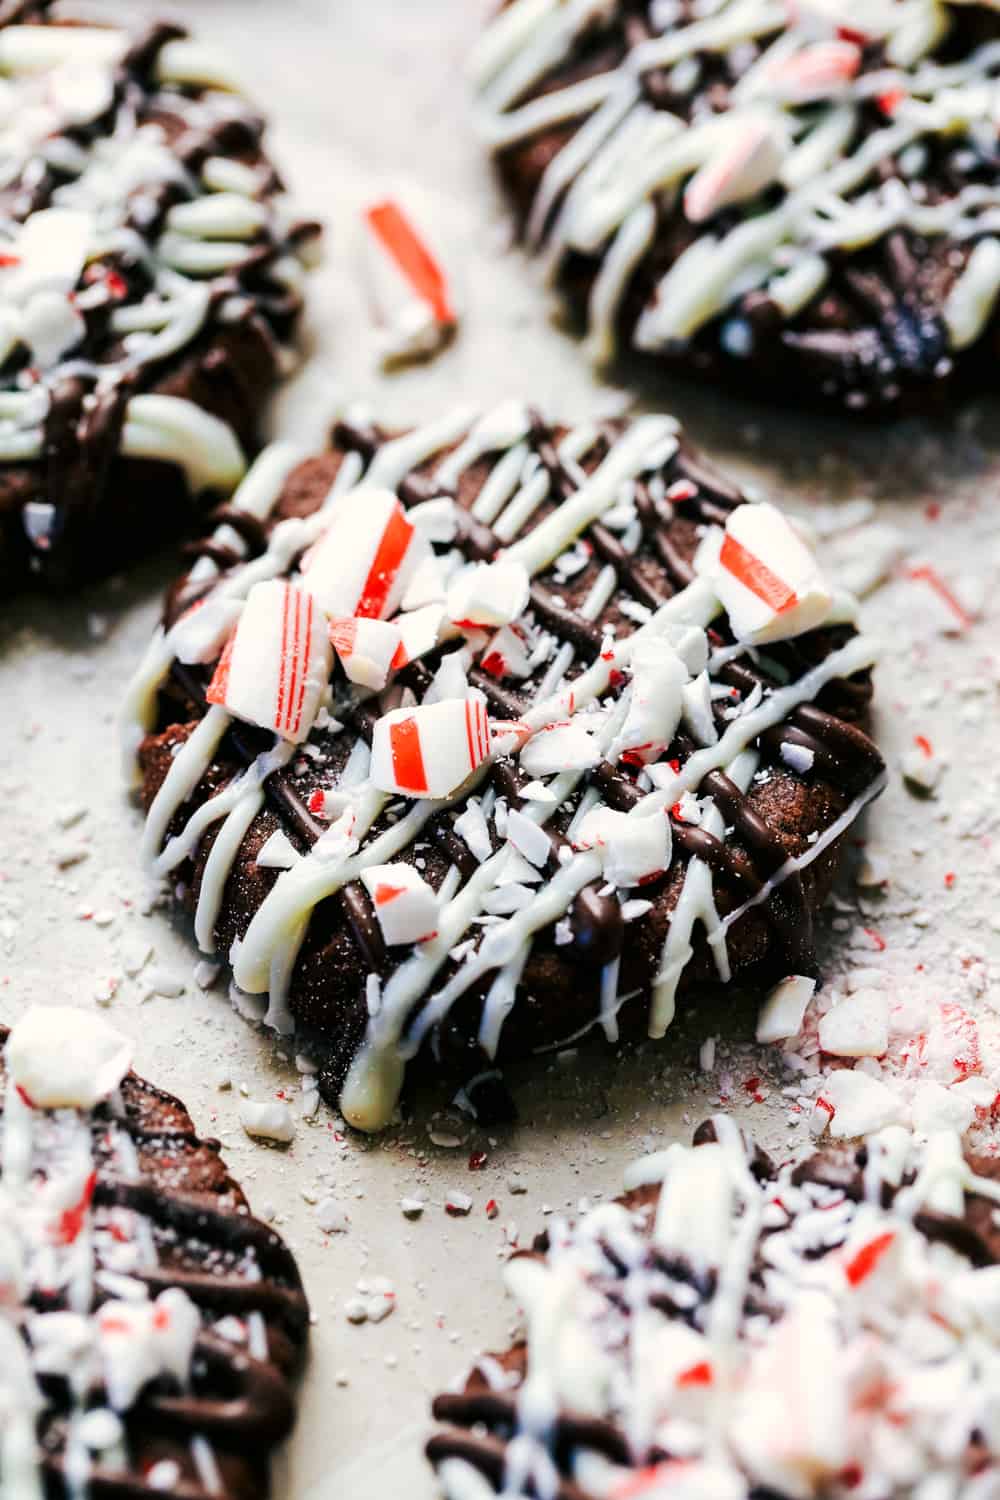
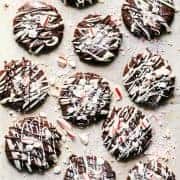
Triple chocolate peppermint cookies are soft and chewy cookies that get drizzled with white and dark chocolate. They are topped with crushed candy canes and are the perfect treat for the holidays!
Does anyone else feel like the holidays can’t begin until you’ve baked a batch of Christmas cookies? Maybe it’s just me but I LOVE Christmas cookies! I especially love the peppermint flavor that’s a huge part of the holidays. So between chocolate, cookies, and peppermint, these are just about perfect. I mean it doesn’t get much better than a soft chocolate cookie with a hint of peppermint! Plus, they look so pretty drizzled with chocolate and topped with crushed candy canes.
These chocolate peppermint cookies are a tried and true favorite at our house and Christmas just wouldn’t be the same without them! Share these with your neighbors and show them what Christmas in a cookie tastes like! In fact, Christmas treats make the perfect neighbor gift. Bake up some of these along with some Red Velvet White Chocolate Chip Cookies, Madeleines, and some Homemade Toffee. Your neighbors will love you forever!
Ingredients for Triple Chocolate Peppermint Cookies
These cookies are simple and easy to make! In fact, make them with your kids. My daughter LOVES helping me with them! Her favorite part is crushing up all of the candy canes! See the recipe card below for a list of exact measurements.
Butter: If you can set this out so that it gets to room temperature before you bake it then that will work the best! softened
Sugar: This is used to sweeten up the cookies!
Egg: I used a large egg that was at room temperature for this recipe.
Peppermint extract: This is the perfect way to flavor these cookies and make them taste just like Christmas!
Flour: I use all purpose flour in this recipe and it works great!
Baking cocoa: This is used to get that delicious, chocolatey flavor!
Baking soda: When you use baking soda in a recipe it helps so that your cookies are soft and not chewy.
Salt: This will enhance all of the other flavors in these yummy cookies!
Baking chocolate: Use white and semisweet baking chocolate to drizzle on top!
Candy canes: Crushing these is my kids favorite part! Sprinkle them on top and then you have yourself a Christmas cookie!
Let’s Bake Some Cookies!
These triple chocolate peppermint cookies just might end up being your favorite of the season! They are a MUST TRY for everyone during the holidays!
Preheat oven and mix butter, sugar and eggs: Preheat the oven to 350 degrees. In a medium-sized mixing bowl cream the butter and sugar until light and fluffy. Add the egg and peppermint extract and mix until incorporated.
Whisk dry ingredients, then combine: In another mixing bowl whisk the flour, cocoa, baking soda and salt. Slowly add to the creamed mixture.
Shape dough, bake and cool: Shape dough into 1 inch balls and place 2 in. apart on ungreased baking sheets. Flatten to 2 in. rounds with the bottom of a glass. Bake 6-8 minutes or until set (do not overbake). Let cool completely on pans and transfer to a wire rack.
Melt chocolates, drizzle and add crushed candy canes: In the microwave in a microwave-safe bowl, add the white chocolate and cook for 30 seconds at a time stirring until melted. Drizzle over the cookies. Repeat for the semisweet chocolate and drizzle. Top with crushed candy canes and let set.
Baking Tips
There are a few extra things to pay attention to when baking cookies! Here are a few tips that will make these triple chocolate peppermint cookies turn out just right!
Room temperature ingredients: I know that this can take a bit of thought beforehand but it really helps! Make sure to take all of your refrigerated ingredients out and put them on the counter a few hours before you plan on baking. Bringing your ingredients to room temperature really helps them mix nicely together and makes the dough really smooth!
Don’t open the oven door: I know that it’s tempting to open the oven door while you are baking your cookies. After all, you just want to see how they are doing! But when you open the door while you are baking, you let a lot of the heat out. This makes it so that your cookies will bake unevenly.
Underbake: Remove the cookies from the oven while they still look gooey in the center. They will continue to bake on the hot tray after they have been removed from the oven!
How to Store (and Freeze!) Leftovers
Whether you have extra or you baked these ahead of time, storing them is easy! Here is how you should store these chocolate peppermint cookies to make them last the longest!
On the counter: Once your cookies have cooled then you should place them in an airtight container. Put it in the counter and they can last up to 3 days!
In the freezer: If you want to freeze these cookies then you totally can! After your cookies cool (and before you put on the chocolate and the crushed candy canes) then place them on a baking sheet that is lined with parchment paper and put it in your freezer. Once the cookies are fully frozen then transfer them to a ziplock bag (labeled with the date) and they will last 8-12 months in your freezer! When you are ready to eat them then just set them out on the counter to thaw. Once they are at room temperature then drizzle on the chocolate and candy canes and they will taste as good as fresh!
More Holiday Desserts to Try!
Tis the season for delicious holiday treats! I have rounded up a few more of my favorites that you MUST TRY this holiday season! They are so good that you will start baking them every year. Make some new traditions and bake these up together as a family. They are so delicious that the hardest part will be picking which one is your favorite!
Triple chocolate peppermint cookies are soft and chewy cookies that get drizzled with white and dark chocolate. They are topped with crushed candy canes and are the perfect treat for the holidays!
Course Dessert, Snack
Cuisine American
Keyword peppermint cookies
Prep Time 10minutes
Cook Time 8minutes
Total Time 18minutes
Servings 36cookies
Calories 137kcal
Author Alyssa Rivers
Ingredients
3/4cupbuttersoftened
1cupsugar
1largeegg
1/4teaspoonpeppermint extract
1 3/4cupsflour
1/2cupbaking cocoa
1/4teaspoonbaking soda
1/4teaspoonsalt
1cupwhite baking chocolate
1cupsemisweet baking chocolate
1/4cupcandy canescrushed
Instructions
Preheat the oven to 350 degrees. In a medium-sized mixing bowl cream the butter and sugar until light and fluffy. Add the egg and peppermint extract and mix until incorporated.
In another mixing bowl whisk the flour, cocoa, baking soda, and salt. Slowly add to the creamed mixture.
Shape dough into 1 inch balls and place 2 in. apart on ungreased baking sheets. Flatten to 2 in. rounds with the bottom of a glass. Bake 6-8 minutes or until set (do not overbake). Let cool completely on pans and transfer to a wire rack.
In the microwave in a microwave-safe bowl, add the white chocolate and cook for 30 seconds at a time stirring until melted. Drizzle over the cookies. Repeat for the semisweet chocolate and drizzle. Top with crushed candy canes and let set.
Notes
Updated on December 3, 2021Originally Posted on December 7, 2017
Christmas Tree Sugar Cookie Recipe – 3 Frosting Ideas!
I’m so ready for the holidays! The Christmas cheer has been hitting me a little early this year… so that means more themed treats coming your way! First the cinnamon roll wreath, then the eggnog pancakes, the chocolatey yule log, and now the cutest little Christmas tree sugar cookies! These buttery sugar cookies are beyond easy to make but so incredibly delicious! In this recipe, I use a little sour cream in my cookie dough which makes them so soft and moist! They’re the perfect buttery treat. You need a batch of these bad boys right now!
I’ve also included 3 super simple frosting ideas to get you started! My kids love helping with this part. I love watching each of them make their own little tree! I used my go-to cream cheese frosting for these cookies. That bit of tang is my favorite! You can also use buttercream or royal icing. No matter the frosting you choose, your Christmas tree sugar cookies are going to be sooo good! Cute, too! This is one recipe I’m surely going to be coming back to again and again this holiday season.
Ingredients for Christmas Tree Sugar Cookies
This sugar cookie recipe is a winner! These cookies are made of pantry staples (to make your life a little easier) but turn out absolutely delicious every time! Of all the sugar cookies I’ve made in the past, I think this recipe is the best! You can find all measurements in the recipe card below.
All-Purpose Flour: Used to give your Christmas tree sugar cookies a light structure!
Salt: You need to add salt to your cookies to enhance their flavor. Without it, they'll be bland!
Baking Powder: For light and fluffy cookies!
Unsalted Butter: I use softened, unsalted butter for a rich flavor and to help the dough mix together smoothly.
Granulated Sugar: White sugar added for that perfect sweetness!
Egg Yolks: Egg yolks have a high fat content which will make your cookies soft and tender.
Sour Cream: Adds extra fat content (soft cookies!) and gives the cookies the slightest bit of tang.
Vanilla Extract: Vanilla helps to deepen the cookies' flavor! Use pure vanilla extract if possible!
Lemon Extract: (Optional) I like to add a bit of lemon extract for a zesty finish.
Let's Make Some Trees!
This recipe is perfect for all of your cookie-making needs this season. It's so easy and you can switch up your cookie cutters to make all kinds of shapes! As cute as they may be, don't expect them to last long! Each cookie is soft, buttery perfection.
Preheat Oven, Line Cookie Sheets: Let's start! To begin, preheat the oven to 350° Fahrenheit and line 2-3 cookie sheets with parchment paper.
Whisk Dry Ingredients: In a medium bowl whisk together the flour, salt and baking powder. Set aside.
Mix Butter and Sugar: In another medium bowl, beat together the butter and sugar for 2-3 minutes until light and fluffy. Add Remaining Ingredients: Next, add the egg yolks, sour cream and extracts and mix until just combined.
Mix Wet and Dry Ingredients: Add the dry ingredients to the wet and mix until just barely full combined.
Roll and Cut: This recipe does not require any chilling time, so you're ready to roll out your cookies! Split the dough into 2-3 pieces and roll them one at a time on a lightly floured surface until they are ¼ inch thick. Use your favorite Christmas tree cookie cutters (or alternative shapes!) to cut out your cookies. Press the scraps together and set aside to rest for about 5 minutes. Reroll the scraps and cut more cookies until all the dough has been used.
Bake: Place the cookies on the parchment lined cookie sheets leaving 1 ½ inches between them. Bake for 7-8 minutes, rotating the pan at 4 minutes. I find this gives the cookies a nice, even bake. The edges will be just set and the cookies will be very light in color and should have very minimal coloring underneath them.
Cool and Frost: Let the cookies cool on the pan for 2 minutes for the shape to set before transferring to a cooling rack. Frost once they are cooled or store in an airtight container until you are ready to frost them.
Sugar Cookie Tips and Tricks
Here are a few of my favorite tips for making your Christmas tree sugar cookies taste as good as they look! You’ll want to make them year-round!
Use Room Temperature Ingredients: The key to a smooth cookie dough is to use room temp wet ingredients! Let your butter, eggs, and sour cream sit out on the counter for 30 minutes before adding to dough mixture.
Don’t Overmix: The best part about sugar cookies is that they are light and fluffy! If you overmix your dough, your cookies will become hard and dense. Only mix until all of the ingredients are combined.
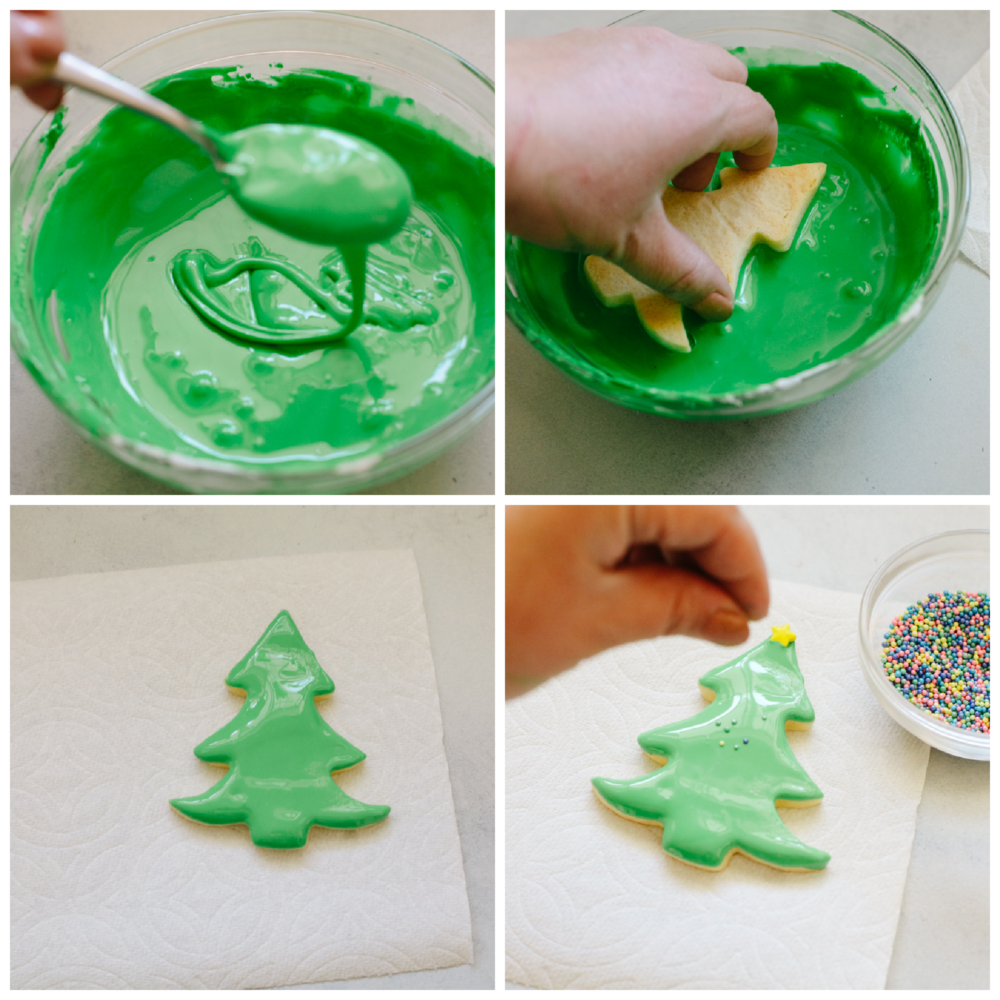
For our first design, we're going to start with the most simple! This one is great if you're making large batches of Christmas tree sugar cookies. Just dunk, sprinkle, and go!
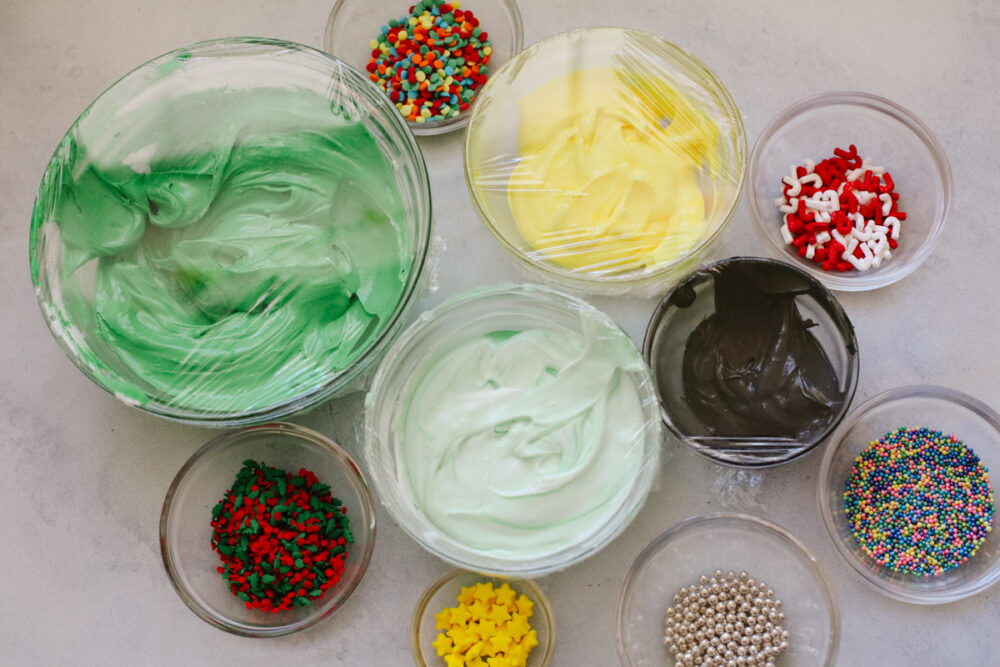
Warm Frosting: Dye a small bowl of frosting a bright green color. You can pop your frosting in the microwave for a few seconds for a smoother texture!
Dip: Place your cookie flat into the melted frosting until it is fully coated.
Sprinkle: Finish up with a candy star and add sprinkles as ornaments!
Christmas Light Tree Design
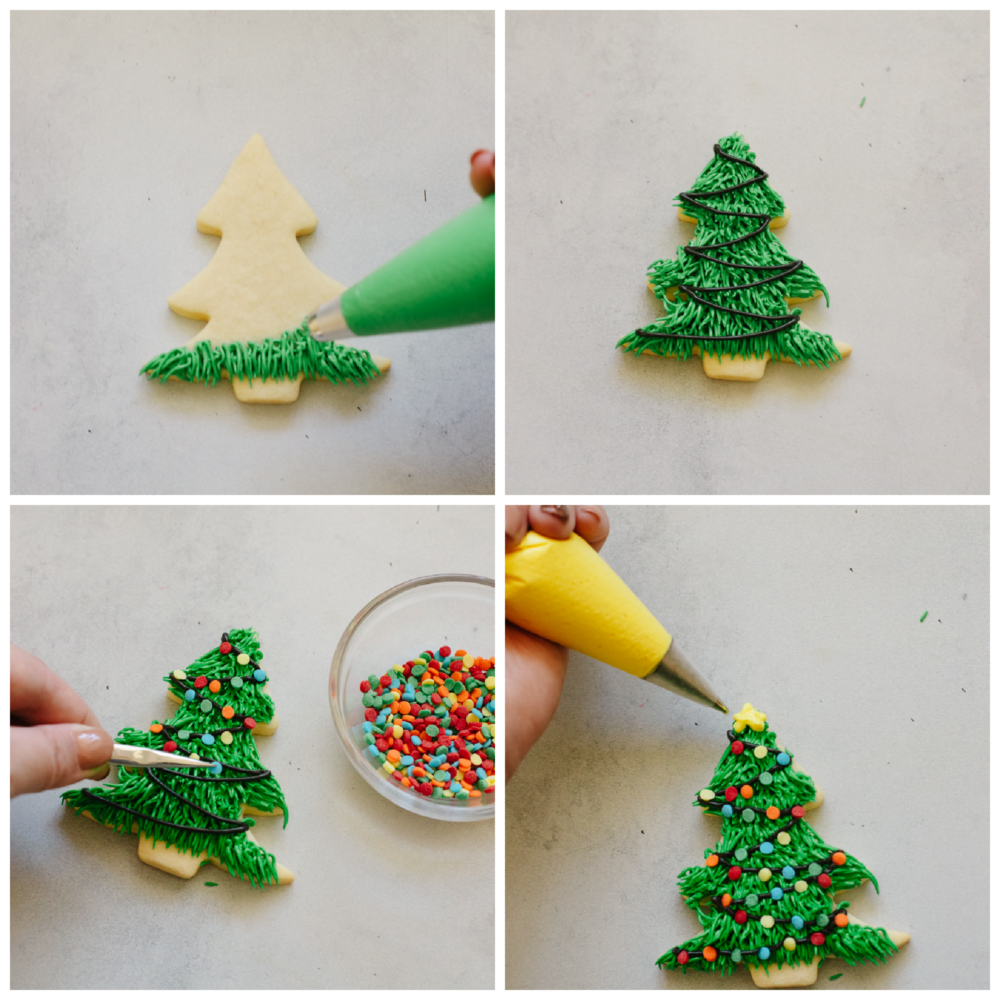
This traditional Christmas tree design is one of my favorites. It's so cute!
Frost Branches and Needles: Using a fine piping tip and green frosting, create needles sloping downward until entire cookie is covered.
Add Lights: Using black gel frosting, pipe a zig zag motion downwards to create the string of Christmas lights. Add multicolored candies on top as bulbs.
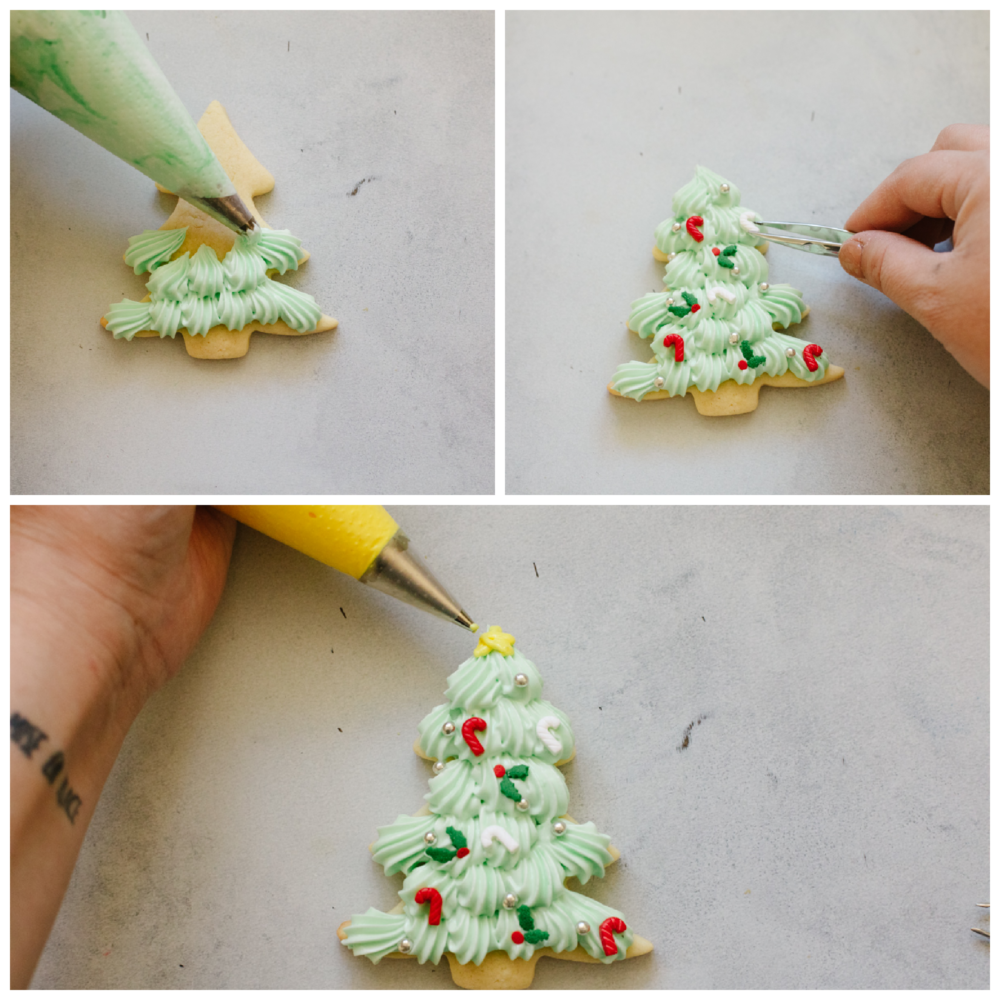
Fluffy Christmas Tree Design
This fluffy tree design is the perfect addition to your sugar cookie lineup! The light green color makes it look frosted with snow!
Mix Light Green Frosting: First, add a bit of white frosting to your green bowl to make a pastel variation.
Frost Needles: Using your pastel green frosting and an extra large star-shaped piping tip, layer dollops to make the tree look fluffy. Cover entire cookie.
Add Details: Using a very fine piping tip or gel liners, add mistletoe and candy cane detailing. You can also add sprinkles for ornaments in between!
Storing Leftover Christmas Tree Cookies
If you have leftover Christmas tree sugar cookies, (which I highly doubt you will) here’s how to store them! I assure you, you’ll love having them around to munch on! There’s so insanely good, even days after you’ve made them!
At Room Temperature: If you have frosted your cookies with royal icing, they can be stored at room temperature in an airtight container for up to 1 week.
In the Refrigerator: If you used buttercream or cream cheese frosting on your cookies, they need to be stored in the fridge. They will last for 2-3 days.
More Christmas Treats
What would the holidays be without all the delicious treats? Spread some Christmas cheer by serving these tasty desserts at your next party! They’re easy, festive, and completely irresistible! I know you and yours will love them!
If you're wanting a dessert that is both festive and delicious, look no further! These Christmas tree sugar cookies will shine at any holiday party!
Course Dessert
Cuisine American
Keyword christmas tree cookies, christmas tree sugar cookies
Prep Time 25minutes
Cook Time 8minutes
Total Time 33minutes
Servings 18Cookies
Calories 137kcal
Author Alyssa Rivers
Ingredients
2CupsAll Purpose Flour
½TeaspoonSalt
½TeaspoonBaking Powder
½CupUnsalted ButterSoftened
2/3CupGranulated Sugar
2Egg Yolks
2TablespoonsSour Cream
1 ½TablespoonVanilla Extract
1TeaspoonLemon Extractoptional
Instructions
Preheat the oven to 350° and line 2-3 cookie sheets with parchment paper.
In a medium bowl whisk together the flour, salt, and baking powder. Set aside.
In another medium bowl beat together the butter and sugar for 2-3 minutes until light and fluffy. Add the egg yolks, sour cream, and extracts and mix until just combined.
Add the dry ingredients to the wet and mix until just barely full combined.
This recipe does not require any chilling time, so you're ready to roll out your cookies! Split the dough into 2-3 pieces and roll them one at a time on a lightly floured surface until they are ¼ inch thick. Use your favorite Christmas tree cookie cutters (or alternative shapes!) to cut out your cookies. Press the scraps together and set them aside to rest for about 5 minutes. Reroll the scraps and cut more cookies until all the dough has been used.
Place the cookies on the parchment-lined cookie sheets leaving 1 ½ inches between them. Bake for 7-8 minutes, rotating the pan at 4 minutes. I find this gives the cookies a nice, even bake. The edges will be just set and the cookies will be very light in color and should have very minimal coloring underneath them.
Let the cookies cool on the pan for 2 minutes for the shape to set before transferring to a cooling rack. Frost, once they are cooled or stored in an airtight container until you are ready to frost them.
























No comments:
Post a Comment