American goulash is an easy, old-fashioned, and comforting meal that is insanely delicious and perfect for the cold winter months. Everything cooks in one pot, even the pasta!
Everyone needs a hearty recipe that they can go to on those chilly days where you want to be warmed up from the inside out! Try this chicken stew, this fantastic beef stroganoff, or this yummy BEST EVER Beef Bourguignon!
What is American Goulash?
Goulash is a hearty dish of stewed beef and tomatoes that was first developed as a Hungarian dish. It typically doesn’t even have pasta, but this American version does and cooks right in the sauce. This makes it an easy and complete meal. It tastes similar to lasagna but without ricotta cheese. I love it because it’s a 1:1 ratio of meaty red sauce with noodles. The more beefy sauce, the better!
This time of year is all about the hearty meals that keep us warm and leave us feeling full and satisfied. American goulash will do precisely that! Plus, it’s easy to make. Get ready for this… You make it all in ONE POT. It only takes about 10 minutes to prepare, and then the rest of the time, it’s just cooking on the stove. This recipe makes a lot, so it’s perfect for feeding a big family, sharing with others, or eating the leftovers for lunch the rest of the week. Enjoy!
Ingredients in One-Pot Goulash
This delicious one-pot meal is perfect when you need an easy recipe for those busy, on-the-go nights. The ingredients are simple, and you probably have most of them already at home and ready to go! See the recipe card at the bottom of the post for exact measurements.
Ground Beef: I like to use lean ground beef in this recipe.
Onion: Dice up your onion into small, similar sized pieces.
Garlic Cloves: If you don’t have fresh garlic cloves on hand then you can use minced garlic. ½ teaspoon equals about 1 clove of garlic.
Water: The water is used as a base to cook the pasta noodles in.
Beef Base (or bouillon): The beef boullion just ups the beef flavor and adds to the overall taste.
Tomato Sauce: The tomato sauce will mix everything together.
Diced Tomatoes: Canned diced tomatoes are easy and work perfect for this sauce.
Bay Leaves: These add in that classic, deep flavoring to the overall dish.
Soy Sauce: My favorite one to use is this soy sauce.
Seasoned Salt: This adds to and enhances the flavors in the goulash.
Paprika: This sweet spices adds in a lot of flavor.
Black Pepper: The pepper will only add in some seasoning, there isn’t enough for any heat.
Elbow Macaroni Noodles: The best part about these is that you pour them in uncooked! No worrying about getting these ready beforehand.
Cheddar Cheese: Freshly shredded cheddar from a block will melt in the sauce better.
Fresh Parsley: This is used as a garnish for the finished recipe!
Let’s Make Some Dinner!
This American goulash is packed to the brim with beef, noodles, and cheese. The flavors are incredible, and my mouth waters just thinking about it!
Brown the Meat: Brown ground beef in a large stock pot. Remove from pan and drain. Leave about 1-2 tablespoons grease in pan. Add the diced onion and then cook for about 5 minutes over medium heat until tender. Add the garlic and cook another minute.
Simmer: Return ground beef to pot along with the water, beef base, cans of tomatoes and sauce, soy sauce, bay leaves, seasoned salt, Italian seasoning, paprika, and black pepper. Then, stir together, bring to a boil, cover, reduce to low and let simmer for 20 minutes.
Add (uncooked) Noodles: Stir in the noodles then cover, and simmer 15-20 minutes or until al dente. Stir occasionally to prevent noodles from sticking to the bottom.
Mix in Cheese: Just before serving, stir in the cheese. Serve garnished with fresh parsley.
What’s the Difference Between Hungarian Goulash and American Goulash?
Hungarian goulash is a thick stew filled with meat and vegetables. It sometimes has dumplings or potatoes in it rather than pasta. The classic sample ingredient in traditional Hungarian goulash is paprika. American goulash doesn’t have any extra vegetables (aside from the tomato-based sauce), and it has macaroni noodles and cheese. American goulash also goes by the name “American chop suey.”
Can You Freeze American Goulash?
YES! This is a fantastic meal to make ahead of time! Here is how you can freeze it after it’s been cooked and reheat it later!
Freeze: Once your goulash has cooled then you can place it in a casserole dish and cover it with a double layer of foil. Or, you can put it in a ziplock bag and lay it flat in your freezer. Make sure to label your container with the date! American goulash can stay frozen for up to 3 months.
Reheat: When you are ready to eat your goulash, take it out of your freezer and thaw it in your fridge overnight. Heat it up on the stove on medium heat until it is warm throughout! Enjoy!
How to Store Leftovers
This goulash recipe makes a lot so it’s likely that you will have leftovers! This makes a fantastic lunch or dinner the next day!
In the Fridge: Place your cooled goulash in an airtight container and put it in your fridge. Leftover goulash can last 3-4 days in the refrigerator.
Reheat: You can heat this back up on the stove on medium heat until it’s warmed through. Or, you can warm it up in the microwave. Cook it for 1-2 minutes on high and stir. Continue this until its warmed up!
What to Serve with Goulash
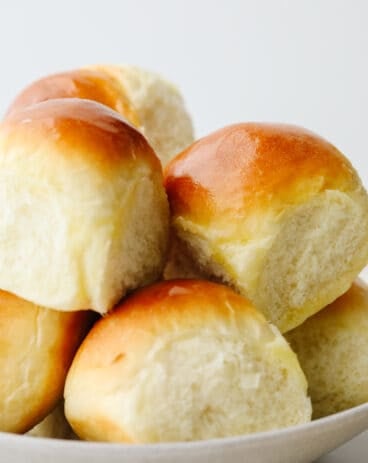
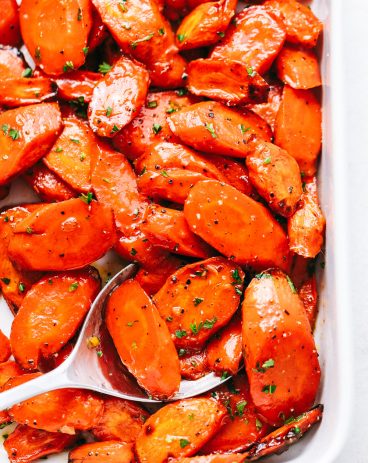
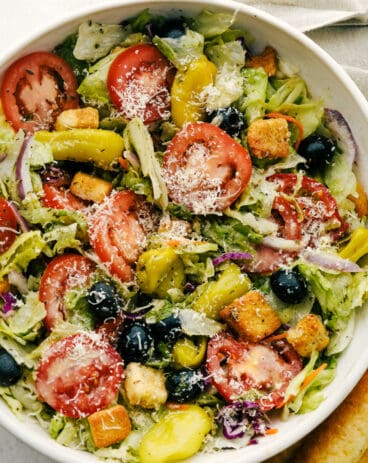
Goulash is a hearty dish that lends itself to just about every side out there! It’s easy to add things to this meal that your entire family will love! I like to add in some rolls or breadsticks, and a couple of veggies and maybe even a salad. I’ve gathered a few recipes that I have served with this before!
American goulash is an easy, old-fashioned, and comforting meal that is insanely delicious and perfect for the cold winter months. Everything cooks in one pot, even the pasta!
Course Dinner
Cuisine American
Keyword american goulash, goulash
Prep Time 10minutes
Cook Time 50minutes
Total Time 1hour
Servings 8People
Calories 562kcal
Author Alyssa Rivers
Ingredients
2poundsground beef
1largeoniondiced
4clovesgarlicminced
3cupswater
1tablespoonbeef baseor bouillon
2(15 ounce cans)tomato sauce
2(15 ounce cans)ddiced tomatoes (one petite diced)
Brown ground beef in a large stockpot. Remove from pan and drain. Leave about 1-2 tablespoons grease in the. Add the diced onion and cook for about 5 minutes over medium heat until tender. Add the garlic and cook another minute.
Return ground beef to pot along with the water, beef base, cans of tomatoes and sauce, soy sauce, bay leaves, seasoned salt, Italian seasoning, paprika, and black pepper. Stir together, bring to a boil, cover, reduce to low, and let simmer for 20 minutes.
Stir in the noodles, cover, and simmer 15-20 minutes or until al dente. Stir occasionally to prevent noodles from sticking to the bottom.
Just before serving, stir in the cheese. Serve garnished with fresh parsley.
Notes
Updated on February 2, 2022Originally Posted on October 5, 2018
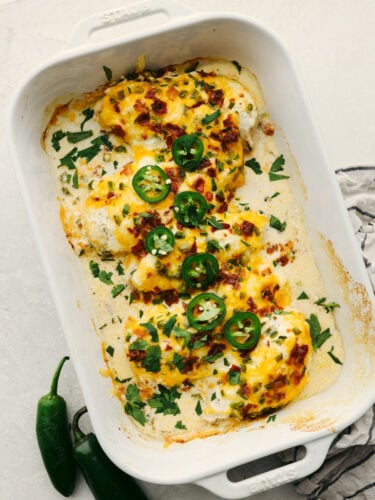
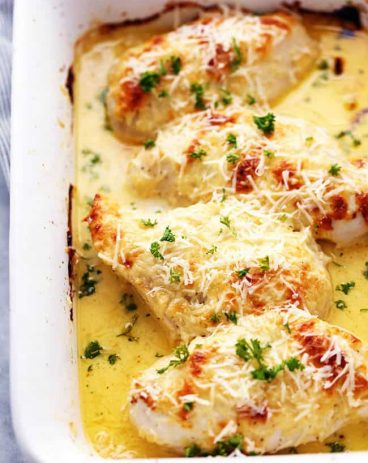
Dinnertime-ready, this jalapeno popper chicken is creamy and delicious with the perfect amount of heat! It has all of the flavors of your favorite appetizers but in one easy-to-make meal!
Jalapeno poppers are easily in the top 3 of my favorite appetizers. I love them so much I’ve even taken the flavors and added them to dips and mac and cheese! You most definitely cannot go wrong with cream cheese, shredded colby jack, and a pop of heat from the jalapenos; all melted together to create one dreamy combination! To be honest, this chicken bake has been life-changing. It has the cheesy goodness of an appetizer but in a more satisfying dinner form. Your family is going to go crazy over it!
As if you needed more reasons to make this jalapeno popper chicken, it’s keto-friendly! It’s a great way to get your appetizer fix without breaking your diet. It’s the perfect combination of protein and fats to work right into your macros! Eating right doesn’t have to mean sacrificing your favorite flavors! Find my full list of keto recipes here. Let’s get cooking!
How Spicy Will This Be?
This chicken bake has a spice level that the whole family can enjoy! Jalapenos become sweeter as they are cooked, and the cream cheese and Colby jack really help to offset the spices.
If You Want More Spice: Leave in the jalapeno seeds! This is where the pepper gets most of its heat.
If You Want Less Spice: Remove seeds, cut jalapenos into smaller pieces, use less of them.
Ingredients for Jalapeno Popper Chicken
This chicken bake uses a lot of simple ingredients, making it a delicious and inexpensive choice for dinner! Whenever I make this for dinner, my family can’t get enough. It’s not too spicy, either, making it something even my picky eaters can enjoy! Measurements for each ingredient can be found in the recipe card below.
Chicken Breasts: I use boneless, skinless chicken breasts here! Look for chicken breasts that are relatively the same size and thickness so they cook at the same rate.
Salt and Pepper: Add both to taste! They help enhance the overall flavor of the jalapeno popper chicken.
Cream Cheese: Cream cheese gives this recipe that perfect creamy, tangy flavor and texture.
Sour Cream: Adds creaminess and a tart flavor.
Onion Powder: For a hint of sharp flavor.
Garlic Powder: Garlic is a must! Add for the perfect savory finishing touch.
Whole Jalapeños: Look for shiny, bright green jalapenos without blemishes.
Colby Jack Cheese: Marbled cheese both looks delicious and tastes delicious! Colby jack has a mild, creamy flavor that pairs perfectly with jalapeno.
Bacon: Crumbled bacon pieces are the cherry on top for this jalapeno popper chicken! They add a fun texture and yummy meaty flavor in each bite.
Let’s Bake!
This jalapeno popper chicken is perfect for busy weeknights. So delicious but only takes 15 minutes of prep time! Be prepared for it to fly off the table!
Preheat Oven, Prep Pan: Let’s start! First, preheat your oven to 375° F. Next, lightly spray a 13×9 inch casserole dish with non-stick cooking spray. Set aside.
Prepare Chicken Breasts: Next, prepare the chicken breasts by removing any fat from the chicken. If the chicken breasts are thick, feel free to cut them in half if you need them to cook faster. Place the chicken breasts in the prepared dish. Season the chicken with salt and pepper and set aside.
Cream Cheese Mixture: In a medium-sized mixing bowl, add the softened cream cheese, sour cream, onion powder, garlic powder. Mix using a handheld electric mixer until ingredients are combined. Spread mixture over the chicken breasts.
Add Toppings: Next, sprinkle on the diced jalapeños, shredded cheese, and crumbled bacon. See tips in notes for the jalapeños and bacon.
Bake: Cover with foil, and bake for 40 minutes or until cooked through and internal temperature of the chicken reaches 165°F. Bake time will depend on the thickness of your chicken. To cook faster, feel free to cut the chicken breasts in half.
Melt Cheese: Remove the foil and bake for an additional 5 minutes to melt the cheese. Garnish with extra sliced jalapeños and fresh cilantro if you like!
Jalapeno Popper Chicken Tips and Variations
This creamy chicken has quickly become a favorite in my family. It’s so easy to make but has the most amazing flavor! Here are a few tips and tricks to keep in mind for the best results!
Chicken Thickness: I recommend looking for chicken breasts that are on the smaller and thinner side. They will cook through faster and more evenly than thick breasts. If yours are too thick, you can always cut them in half to have more uniform pieces.
Check Temperature: Be sure your chicken reaches an internal temperature of 165 degrees Fahrenheit. This is especially important if you are cooking with thick chicken breasts.
Cutting Your Jalapenos: When cutting jalapeños, carefully remove the stem first. Slice lengthwise down the middle of the pepper, and remove the seeds. This is where the heat comes from the pepper! Be sure to wash your hands well after removing the seeds. If you touch your eyes or face without washing your hands, it will burn and be very unpleasant. Feel free to use more peppers if you like it hot, or even keep some of the seeds you want it really hot.
Bacon: To speed up prep, I always like to use pre-cooked bacon. It’s so easy to warm it up in the microwave and then crumble!
Switching Cheese: If you want a cheesier flavor, swap your colby jack for shredded cheddar! And to kick up the heat, add in pepper jack!
Storing Leftover Chicken
Jalapeno popper chicken never lasts long at my house. After all the seconds and thirds, there’s nothing but cheesy sauce left in the pan. Lucky you if you have leftovers! Here’s how to store them for best results.
In the Refrigerator: In an airtight container, your chicken will last for 3-4 days.
Reheating: Reheat your chicken on a baking sheet in the oven for 10-15 minutes at 400 degrees F. You can also pop a piece in the air fryer for 5-10 minutes at 360 degrees Fahrenheit. Check that the internal temperature has reached 165 degrees F before serving.
More One-Pan Chicken Recipes
What’s better than an easy and delicious one-pan dinner to throw together for the kids? I’ll wait. These recipes are always on rotation at my house. With how amazing they taste, you’d never guess they only took a few minutes to prepare! Not to mention, they have a super easy clean-up! Enjoy!
Dinnertime-ready, this jalapeno popper chicken is creamy and delicious with the perfect amount of heat! It has all of the flavors of your favorite appetizers but in one easy-to-make meal!
Course Dinner
Cuisine American
Keyword jalapeno popper chicken
Prep Time 15minutes
Cook Time 45minutes
Total Time 1hour
Servings 6people
Calories 414kcal
Author Alyssa Rivers
Ingredients
2poundschicken breasts, boneless, skinless
salt and pepper to taste
8ouncecream cheese, softened
1/3cupsour cream
1/4teaspoongranulated onion powder
1/4teaspoongranulated garlic powder
2-3wholejalapeños, seeded, diced(more or less to your liking)
1cupColby jack cheese, shredded
1/2cupcooked bacon, crumbled
Instructions
Preheat oven to 375° F. Lightly spray a 13×9 inch casserole dish with non-stick cooking spray. Set aside.
Prepare the chicken breasts by removing any fat from the chicken. If the chicken breasts are thick, feel free to cut them in half if you need them to cook faster. Place the chicken breasts in the prepared dish. Season the chicken with salt and pepper and set aside.
In a medium-sized mixing bowl, add the softened cream cheese, sour cream, onion powder, garlic powder. Mix using a handheld electric mixer until ingredients are combined. Spread mixture over the chicken breasts.
Next, sprinkle on the diced jalapeños, shredded cheese, and crumbled bacon. See tips in notes for the jalapeños and bacon.
Cover with foil, and bake for 40 minutes or until cooked through and internal temperature of the chicken reaches 165°F. Bake time will depend on the thickness of your chicken. To cook faster, feel free to cut the chicken breasts in half.
Remove the foil and bake for an additional 5 minutes to melt the cheese. Garnish with extra sliced jalapeños and fresh cilantro if you like!
Notes
*When cutting jalapeños, carefully remove the stem first. Slice lengthwise down the middle of the pepper, and remove the seeds. This is where the heat comes from the pepper! Be sure to wash your hands well after removing the seeds. If you touch your eyes or face without washing your hands, it will burn and be very unpleasant. Feel free to use more peppers if you like it hot, or even keep some of the seeds you want it really hot.**Pre-cooked store-bought bacon is a great shortcut! Simply microwave according to instructions and crumble.
You cannot beat a homemade sugar cookie with a crisp edge and a soft center. These are the BEST! Topped with my favorite cream cheese frosting and sprinkles, these sugar cookies are a tried and true favorite.
I have tried so many sugar cookie recipes over the years! I found this and used it for my son’s grad party, as well as a friend’s. This is PERFECT. I’ve also shared this recipe with a few others who asked for it after tasting the cookies, and it is now the go to for all of us!
-Debs
The Best Sugar Cookie Recipe
I sure do love sugar cookies! Some people’s favorites are chocolate chip but not mine. Not only are they delicious, but my kids love to help make sugar cookies! We love spending some time in the kitchen making cookies together. I have had a lot of sugar cookies in my day. Some are way too crisp and not soft enough on the inside. You are going to quickly agree that they are the best! Trust me. I made sure by eating at least 3!
I love this recipe because it is the best of both worlds. They are a bit crisp on the outside but not too crispy, and they have the softest center! The edges don’t expand while baking, and they come out looking in the perfect shape. This recipe is a classic, and the dough comes together in a matter of minutes. But I found that the secret to the best sugar cookie is added almond extract. The almond extract adds a rich and delicious almond flavor, making them absolutely perfect.
Ingredients in Sugar Cookies
These cookies are perfect for your Valentine’s Day festivities and are so good that you will want to make them throughout the year! Just change up your cookie cutter, and you are ready to go! See the recipe card at the bottom of the post for exact ingredient measurements.
Butter: If your ingredients are at room temperature then they will mix together more smoothly.
Sugar: Granulated sugar will make this recipe sweet.
Egg: The egg will help bind the dough together.
Vanilla Extract: This will enhance the flavors of the sweet ingredients.
Almond Extract: The secret ingredient to making these sugar cookies the best!
Flour: I used all purpose flour for this recipe.
Baking Powder: This helps the cookie be soft and not chewy.
Salt: This enhances the flavors.
Cream Cheese Frosting
Cream Cheese: Put this on your counter before you plan to bake so that it can soften up.
Butter: I used unsalted, sofened butter to make the frosting smooth,
Powdered Sugar: Using powdered sugar instead of granulated sugar works better because this diddolves quickly and creats a smooth texture.
Vanilla Extract: This enhances the sweetness of the frosting.
Food Coloring: This is totally optional depending on if you want your frosting to be different colors for different occasions.
How To Make Sugar Cookies
These cookies come together so easily! This recipe will become your favorite go-to sugar cookie recipe that you will make again and again.
Beat: In a large bowl beat the butter until smooth and creamy for about one minute. Add the sugar and continue to beat until creamy for about 2 minutes. Add the egg, vanilla, and almond extract and continue to beat until incorporated.
Mix and chill: In a medium sized bowl, whisk together the flour, baking powder, and salt. Slowly add to the creamed mixture and continue to beat until the dough comes together. Form the dough into a ball and chill in the fridge for one hour and can be chilled overnight.
Preheat oven: Preheat oven to 350 degrees. Line a large cookie sheet with parchment paper. Roll dough out to desired thickness (mine were ¼ inch thick) and cut with cookie cutters. Transfer to baking sheet.
Bake: Bake for 8-11 minutes or until just set. I like mine more soft so I cooked mine for 8 minutes. Let cookies cool completely before frosting.
Frost: To make the cream cheese frosting, beat together cream cheese and butter until smooth. Add powdered sugar and vanilla and continue to beat until it is smooth and creamy. Frost cooled cookies.
Do I Have to Chill the Sugar Cookie Dough?
YES! The dough does require an hour of chilling time. This step is essential to how the cookies hold up and helps ensure that the dough doesn’t spread.
Sugar Cookie Baking Tips
These cookies are SOO GOOD, and I want to help make sure that yours turn out perfectly! Here are a few tips and tricks to use while making these cookies.
Room Temperature Ingredients: Before mixing up your dough, take the time to set your ingredients out so that they can soften up. Room temperature ingredients mix up SO much better and your batter and frosting will be so smooth with no lumps!
Don’t Open the Oven: So many people are tempted to open the oven to check out how their cookies are doing. Don’t do it! This causes the hot air to be released and can result in your cookies being baked unevenly. Use the oven light instead!
Sugar cookies make fantastic leftovers because they can last for about a week! So double up that recipe and make a few extra to enjoy!
On the counter: Store any leftover cookies in an airtight container on your counter. They will last up to 7 days!
More Cookie Recipes to Try
Who doesn’t love a good cookie? Cookie recipes are always great to have on hand because they are easy to whip up and always a home run with any family or friends that you are baking them for! These tried and true recipes are sure to all be ones that your family goes crazy for.
You cannot beat homemade sugar cookies with a crisp edge and a soft center. These are the BEST! Topped with my favorite cream cheese frosting and sprinkles, these sugar cookies are a tried and true favorite.
Course Dessert
Cuisine American
Keyword sugar cookies
Prep Time 1hour15minutes
Cook Time 10minutes
Total Time 1hour25minutes
Servings 24cookies
Calories 266kcal
Author Alyssa Rivers
Ingredients
3/4cupButter(softened)
3/4cupSugar
1largeEgg
1teaspoonVanilla Extract
1/2teaspoonAlmond Extract
2 1/4cupsAll-Purpose Flour
1/2teaspoonBaking Powder
1/2teaspoonSalt
Cream Cheese Frosting
8ouncesCream Cheese(softened)
½ cupButter(softened)
4 cupsPowdered Sugar
2teaspoonsVanilla Extract
Food Coloring (Optional)
Instructions
In a large mixing bowl, beat the butter until smooth and creamy for about one minute. Add the sugar and continue to beat until creamy for about 2 minutes. Add the egg, vanilla, and almond extract and continue to beat until incorporated.
In a medium-sized bowl, whisk together the flour, baking powder, and salt. Slowly add to the creamed mixture and continue to beat until the dough comes together. Form the dough into a ball and chill in the fridge for one hour and can be chilled overnight.
Preheat oven to 350 degrees. Line a large cookie sheet with parchment paper. Roll dough out to desired thickness (mine were ¼ inch thick) and cut with cookie cutters. Transfer to baking sheet.
Bake for 8-11 minutes or until just set. I like mine more soft so I cooked mine for 8 minutes. Let cookies cool completely before frosting.
To make the cream cheese frosting
Beat together cream cheese and butter until smooth. Add powdered sugar and vanilla and continue to beat until it is smooth and creamy. Frost cooled cookies.
Notes
Updated Post on February 1. 2022Originally Published February 5, 2019


No comments:
Post a Comment