I could not stop grinning the entire time I was baking, decorating, photographing, and, best of all, eating this American fruit Flag Cake. If I had any idea how much of a joy it would be to transform a fluffy yellow sheet cake into a patriotic Fourth of July dessert, I would have written Flag Cake at the top of my summer bucket list. If you are looking for further evidence that we are never ever too old to have fun with our food, this would be it.
Now, before I go on and tell you why of all the fruit flag cake recipes in the universe you should make this particular flag cake, let me clear up one tiny point: I did not invent flag cake.
While I aspire to that level of culinary adorableness, I've never been particularly adept at fancy desserts or anything bordering on "theme" food.
Dear future parents of my hypothetical children's classmates: please do not judge my children for their mother's pitiful lack of décor at their birthday parties. The party may not have a theme, a cake in the shape of a dinosaur or Disney princess, or any semblance of order, but we will have sangria. I trust you can forgive.
Or maybe we'll have Flag Cake, because SO CUTE. And so delicious. And so, so easy.
"Fourth of July" is an acceptable party theme for ages 1 to 17, is it not?
Or, here is an even better idea: let's all make Flag Cake for the actual Fourth of July!
Although I've seen dozens of different recipes for Flag Cake—Jello, poke, and Cool Whip being three of the most common descriptors—every one of them seemed too heavy or even artificial to be a worthy sweet finale to a special summer barbecue.
Maybe I walked by this shirt too many times at Target, or maybe I have some culinary cuteness buried inside of me after all, but I became fixated on the idea of coming up with a healthier Flag Cake recipe.
I craved a better cake than what Pinterest promised. I wanted it to be made from wholesome ingredients, and I wanted it to taste rich and indulgent enough to be a true crowd pleaser no matter where I served it.
About This Flag Cake
After a few recipe attempts, this Flag Cake recipe is where I landed. The fluffy yellow sheet cake base is made with whole wheat flour and sweetened with honey, and part of the butter has been swapped for Greek yogurt.
The cream cheese frosting includes Greek yogurt also and isn't overpoweringly sweet so that the flavor of the fresh berries can shine.
The Flag Cake is still on decadent side (I kept enough butter and sugar to make it taste like a real cake and not a flag muffin), but in comparison to most other flag cake recipes you'll find, it leaves you the most wiggle room to serve yourself an extra-large slice, thank goodness. Extra large is the size you are going to want!
With its no-fuss sheet cake style, this Flag Cake is ideal for transporting to parties and slicing to serve a crowd. After diving into a piece of the cake myself, I gave a generous serving to our painter.
I thought he'd take it home, but he stood in my kitchen and quietly inhaled the entire thing in approximately 30 seconds.
The rest of the Flag Cake was gifted to friends who had company in town to enjoy it and who are accustomed enough to my blog leftovers not to mind a missing slice or two. They immediately texted to say the cake had been a hit and could I please send them the recipe early.
No one suspected this Flag Cake had been lightened up, and I guaranteed your party won't either!
Make Ahead and Storage Tips
To Make Ahead. Cake can be made 1 day in advance, covered tightly at room temperature, and then frosted before serving. Frosting can also be made 1 day ahead of time and stored in an airtight container in the refrigerator. Let come to room temperature for easier frosting of the cake.
To Store. Store leftovers in the refrigerator, tightly covered, for up to 3 days.
To Freeze. You can also remove the fruit and store for up to 5 days in the refrigerator or freeze for up to 3 months.
3/4cupmilkplus 2 tablespoons—any kind you like—I used 2%, at room temperature
For the Frosting and Decoration:
12ouncesreduced-fat cream cheeseNeufchatel, at room temperature
6tablespoonsunsalted butterat room temperature
1 1/3cupspowdered sugar
1/4cupnonfat plain Greek yogurtat room temperature
1teaspoonpure vanilla extract
1cupfresh blueberries
2-3cupssliced fresh strawberries
Instructions
Preheat the oven to 325 degrees F. Generously grease and lightly flour an 11×17-inch half-sheet pan or coat with baking spray (the floured kind, like this). Set aside.
In the bowl of a stand mixer fitted with the paddle attachment or a large bowl with a hand mixer or spoon, cream the butter for 1 minute on medium speed, until it is smooth and creamy. Add the sugar on medium speed and beat until fluffy and light in color. Beat in the honey, then the eggs and vanilla until smooth and nicely combined, stopping to scrape down the sides and bottom of the bowl a few times. The mixture may look curdled. Beat in the yogurt on medium-high speed until blended.
In a large bowl, whisk together the whole wheat flour, all-purpose flour, baking soda, and salt. Pour one-third of the flour mixture into the butter mixture. Beat on low speed for 5 seconds, then pour in half of the milk. Beat on low speed for 5 seconds. Repeat with the next third of the flour, then the remaining half of the milk. Add the last third of the flour and beat just until combined and the batter is smooth. Do not overmix.
Spread the cake batter into the prepared pan, smoothing it into a thin, even layer with a rubber spatula or offset spatula. Bake for 18 to 22 minutes or until the top is lightly browned and a toothpick inserted in the center comes out clean, rotating the pan 180 degrees once halfway through.
Place the baked cake on a wire rack and let cool in the pan completely. Meanwhile, make the frosting.
For the frosting: In the bowl of a stand mixer fitted with the paddle attachment or a large bowl with a hand mixer or spoon, beat the cream cheese, butter, powdered sugar, yogurt, and vanilla on medium speed until smooth and combined.
Spread the frosting over the cooled cake. Arrange blueberries in rows in top left corner to form the "star" portion of the flag. Line the strawberry slices in 5 rows to form the "stripes." Refrigerate until ready to serve.
Notes
*You can substitute the same amount of all-purpose flour for the 1 1/4 cups white whole wheat flour. If you make this swap, reduce the amount of milk in the recipe to 3/4 cup plus 1 tablespoon.
Cake can be made 1 day in advance, covered tightly at room temperature, and then frosted before serving. Frosting can also be made 1 day ahead of time and stored in an airtight container in the refrigerator. Let come to room temperature for easier frosting of the cake.
Store leftovers in the refrigerator, tightly covered, for up to 3 days. You can also remove the fruit and store for up to 5 days in the refrigerator or freeze for up to 3 months.
These dome-topped, berry-studded, ultra-fluffy Raspberry Muffins are sweet, whole wheat, and worthy of that pricey, precious carton of ruby red raspberries you've been coveting.
Whether you need a healthy breakfast, an on-the-go snack, or a kid-approved baking project, you’ll love waking up to these moist raspberry muffins every morning (or these Cranberry Orange Muffins).
And, if your house shares our warm sentiments towards raspberry muffins, these are not likely to last as many mornings as you intended.
Might I suggest a double batch?
5 Star Review
“This is a wonderful healthy muffin recipe!”
— Audrey —
Eating a homemade, healthy muffin for breakfast always makes me feel special (thank you, Carrot Cake Muffins).
Even though I know firsthand how easy these lemon Raspberry Muffins are to make, I felt like a queen every morning that I sat down with one.
Like many of my muffin recipes, these raspberry muffins are whole grain and employ a few sneaky tricks to make them super moist and healthy:
I added some flaxseed meal to the raspberry muffin batter for an extra nutritional boost. You won’t taste it, but you’ll love taking an extra bite knowing that you’re enjoying some added omega-3 benefits.
I also took inspiration from raspberry muffin recipes with sour cream. I added a few dollops of Greek yogurt to this healthy muffin recipe (like in these Yogurt Muffins).
The goodness of honey or maple syrup naturally sweetens this muffin recipe (and these Banana Bran Muffins) just enough to keep the muffins tender, moist, and subtlety sweet.
In the summer, these muffins are sublime with peak-season fresh raspberries. While you can spring for fresh at other times of the year, it’s not 100% necessary.
That’s because you can enjoy these raspberry muffins with frozen raspberries too! In the recipe box below, I have added notes on how to use frozen berries to make muffins.
The Ingredients
Raspberries. More delicate than other fruits, these juicy berries break apart in the batter as they’re gently stirred in. The way I see it, that just means more bits of raspberry in each bite.
White Whole Wheat Flour. Boost the nutritional content of this healthy muffin recipe with extra fiber and iron without sacrificing texture.
Substitution Tip
If you do not keep white whole wheat flour on hand, you can swap it for an equal amount of all purpose flour or a blend of half regular wheat flour and half all-purpose.
Flaxseed Meal. For a hidden kick of added fiber and omega-3 goodness to these whole wheat raspberry muffins. (I also like to sneak a scoop into these Healthy Banana Chocolate Chip Muffins.)
Baking Powder + Baking Soda. For a double punch of leavening action to give these muffins a supreme rise and domed top.
Butter. For flavor and just enough necessary fat to tenderize the muffins and keep them moist.
Substitution Tip
I have not made these raspberry muffins without butter before. However, readers have reported successfully making these raspberry muffins with coconut oil and vegetable oil.
Honey. My preferred natural sweetener for these muffins (and these Coffee Cake Muffins). It pairs perfectly with the tart raspberries and white whole wheat flour.
Substitution Tip
If you don’t have honey, maple syrup is an equally divine choice for sweetener in these easy raspberry muffins.
Eggs. Provide structure and tenderness.
Greek Yogurt. My swap for sour cream that adds softness and tang to these moist raspberry muffins. (I also add Greek yogurt to my favorite Healthy Banana Muffins recipe.)
Vanilla. Complements the raspberries and balances all the flavors.
Lemon. For a little unexpected brightness, I add fresh lemon juice and zest to these fresh raspberry muffins. (These Orange Muffins with Poppy Seeds are also bursting with bright citrus flavor.)
Turbinado Sugar. A sprinkle on top makes them look (and taste) like they came straight out of a professional bakery case.
The Directions
Whisk together the dry ingredients. In a separate bowl, beat wet ingredients together.
Add the dry ingredients to the wet ingredients, mixing by hand until just combined.
Gently fold in the raspberries.
Scoop the batter into a greased or lined standard-size muffin pan.
TIP!
For a maximum crunchy top, sprinkle each muffin with a full teaspoon of turbinado sugar (trust me!) or omit for a less-sweet muffin.
Bake raspberry muffins at 375 degrees F for 20 to 24 minutes until a toothpick inserted in the center comes out clean. ENJOY!
Recipe Adaptations
Vegan Lemon Raspberry Muffins. I haven't tried this yet, but I think you could safely swap flax eggs for the regular eggs, coconut oil for the butter, and a non-dairy, coconut-based yogurt for the Greek yogurt.
Raspberry Streusel Muffins. Make the recipe as directed, omitting the turbinado sugar sprinkled on top. Instead, top the muffins with the streusel recipe called for in these Healthy Oatmeal Muffins.
Healthy Raspberry Zucchini Muffins. Start with this recipe for Healthy Zucchini Muffins, swapping raspberries for the chocolate chips. You can also add lemon zest if you like.
For Raspberry Muffins with Frozen Raspberries: Prepare the recipe as directed, swapping the fresh raspberries for an equal amount of frozen berries. No need to thaw!
Storage Tips
To Store. Leftover raspberry muffins will keep well in an airtight container at room temperature for 2 to 3 days.
To Freeze. To freeze raspberry muffins, store them in a single layer on a baking sheet and freeze until solid. Transfer the frozen muffins to an airtight freezer-safe storage container or ziptop bag for up to 3 months. Thaw and enjoy as desired.
Fresh or frozen, muffins with raspberries are a true treat!
Frequently Asked Questions
Can I Substitute Raspberries for Blueberries in Muffins?
Sure! In most muffin recipes (including these Healthy Blueberry Muffins), you can swap fresh or frozen raspberries for blueberries (and vice versa) with success.
Can I Make Raspberry Muffins with Buttermilk?
I have not experimented with adding buttermilk to this recipe before. If you’re looking for a fantastic raspberry muffin recipe with buttermilk, I suggest using this Buttermilk Blueberry Muffins recipe as a base and swapping for raspberries.
Can I Make Lemon Raspberry Muffins Without Yogurt?
If you want to omit the Greek yogurt, you could try swapping it for sour cream.
1/2cupnonfat plain Greek yogurtat room temperature
2teaspoonspure vanilla extract
Zest of 2 small lemonsabout 1 1/2 teaspoons
1/4cuplemon juicefrom the same 2 small lemons
1 1/2cupsraspberriesfresh or frozen (about 1 1/2 6-ounce containers); if using frozen, do not thaw first
3tablespoonsturbinadosugar in the raw sugar, for topping (optional)
Instructions
Preheat the oven to 375 degrees F. Lightly coat a standard 12-cup muffin tin with nonstick spray or line with paper liners.
In a medium bowl, whisk together the white whole wheat flour, flaxseed, baking powder, baking soda, and salt.
In a large separate bowl, beat the butter and honey until creamy and combined. Scrape the bottom and sides of the bowl, then add the eggs one at a time, beating well after each addition. Add the Greek yogurt, vanilla, lemon zest, and lemon juice. The batter may look curdled.
Add the dry ingredients to the wet ingredients. By hand with a wooden spatula or spoon, stir in the dry ingredients, just until the flour disappears. The batter will be very thick.
Very gently fold in the raspberries.
Scoop the batter into the prepared muffin cups, using a heaping 1/4 cup for each. For a maximum crunchy top, sprinkle each muffin with a full teaspoon of turbinado sugar (trust me!) or omit for a less-sweet muffin.
Bake the muffins for 20 to 24 minutes, until a toothpick inserted in the center comes out clean.
Remove the from the oven and place on a wire rack to cool in the pan for 5 minutes. After 5 minutes, remove the muffins from the pan and transfer them to the wire rack to cool completely. Enjoy!
Video
Notes
TO STORE: Leftover raspberry muffins will keep well in an airtight container at room temperature for 2 to 3 days.
TO FREEZE: To freeze raspberry muffins, store them in a single layer on a baking sheet and freeze until solid. Transfer the frozen muffins to an airtight freezer-safe storage container or ziptop bag for up to 3 months. Thaw and enjoy as desired.
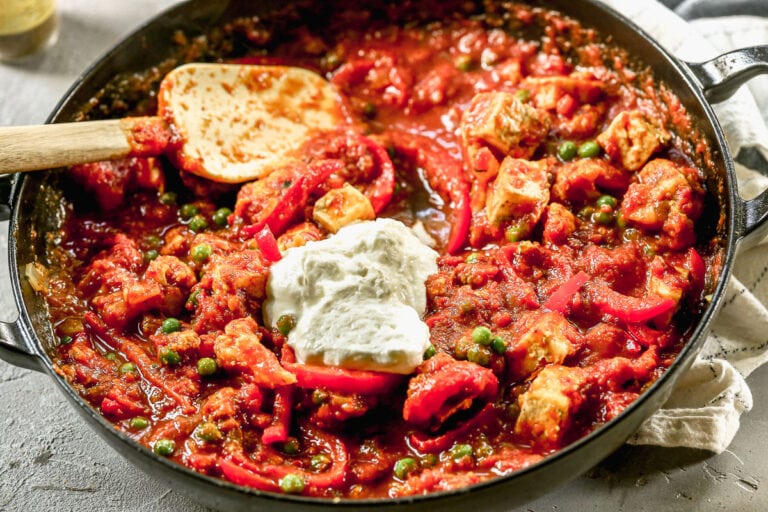
For a healthy vegetarian dinner, try this Paneer Tikka Masala recipe. Featuring a creamy, warmly spiced curry, this paneer tikka masala with fresh vegetables is a flavorful escape to India you can make in your own kitchen.
I spent a month after college traveling through India, a country whose colors, people, and cuisine still captivate my memory and imagination.
Paneer tikka masala is one dish I still crave regularly (along with Potato Curry).
Since I can’t pop back over to India any time my craving strikes, I have to try and bring the flavors of India to life in my kitchen.
I don’t have easy access to a mega-market of Indian spices (or the time to toast and grind the whole spices like in an authentic paneer tikka masala recipe), so this is my adaption.
That said, it is DELISH and is about as close as it gets to a paneer masala restaurant style at home.
It stays true to the authentic recipe’s spirit and core flavor profiles (as does this Instant Pot Lentil Curry) but with ingredients easily found in most supermarkets.
5 Star Review
“Closest recipe I've found to our favorite Indian restaurant we no longer live close to.”
— Melinda —
If you’re new to Indian food, it’s a delightful, enriching cuisine to explore.
This easy paneer tikka masala is the ideal place to start (follow up with this Instant Pot Butter Chicken).
Paneer tikka masala is not spicy in the sense of “hot.”
In general, Indian cuisine is deeply spiced, but it’s not necessarily “spicy” in a way that will leave you panting. Some dishes can be, but this paneer tikka masala is not one of them.
What Does Paneer Tikka Masala Mean?
Before we talk about how to make paneer tikka masala step by step, let’s talk about exactly what this dish is:
What is Paneer?
Paneer is a firm, mild, and pleasant cheese, similar to a curd you’d find in cottage cheese. EXCEPT (and this is important), it tastes way, WAY better than that description sounds.
It’s a bit like a block of feta (or Grilled Halloumi Cheese) but is firmer and far less briny. It’s easy to cook, reasonably inexpensive, and high in protein.
I almost feel like the name "cheese" doesn't apply here because paneer doesn't taste cheesy.
Like tofu (as seen in this Tofu Curry), paneer takes on the flavor of whatever you cook it with, making it ideal for adding to rich, flavorful sauces like masalas and curries.
Dishes made with paneer are usually vegetarian. However, vegans cannot eat paneer because it is a dairy product.
What Does "Tikka" Mean?
Tikka means "bits" and "pieces." We have bits and pieces of paneer. Easy!
Tikka dishes are typically baked at a high temperature or cooked over hot coals. For max at-home ease, we’re going the oven-baked route.
What Does "Masala" Mean?
Masala is a broad term that essentially means a mix of spices. Today’s recipe boasts double the masala action.
There’s a blend of spices coating the paneer before it’s baked, then a second hit is used to make a rich masala gravy (a.k.a. sauce).
Remember, I said we were making an easy, at-home version of Indian paneer tikka masala (like this Tofu Tikka Masala). Therefore, a premixed spice blend is where it’s at! This recipe calls for garam masala.
How to Make Paneer Tikka Masala
Masalas are like any well-loved recipe that gets passed down through the generations. Everyone has their version…and people tend to think their version is the best.
Thus, you shouldn’t be surprised when I say this is the BEST paneer tikka masala you can make at home.
The Ingredients
Paneer. I know paneer is a special item to seek out, and I would never ask you to do that if I didn't think it was 100% worth it. Paneer tikka masala truly is!
Garam Masala. Garam masala is a unique blend of warm spices, such as cinnamon, cardamom, coriander, and more. It provides big time flavor in every teaspoon. Many grocery stores carry it, and you can find it online here. (Curry powder is another popular spice blend, but it tastes different than garam masala.)
Crushed Tomatoes. To create a robust and flavorful masala sauce base.
Substitution Tip
If tomatoes are in peak season, you can make an excellent paneer tikka masala with lightly peeled and pureed fresh tomatoes instead of canned crushed tomatoes.
Fresh Ginger and Fresh Garlic. Don’t skimp on these. Fresh is best in Indian based dishes.
Greek Yogurt. While paneer tikka masala with coconut milk may be traditional, I prefer to make this healthy paneer tikka masala with Greek yogurt. (It’s also my secret to this healthy Curry Chicken Salad.)
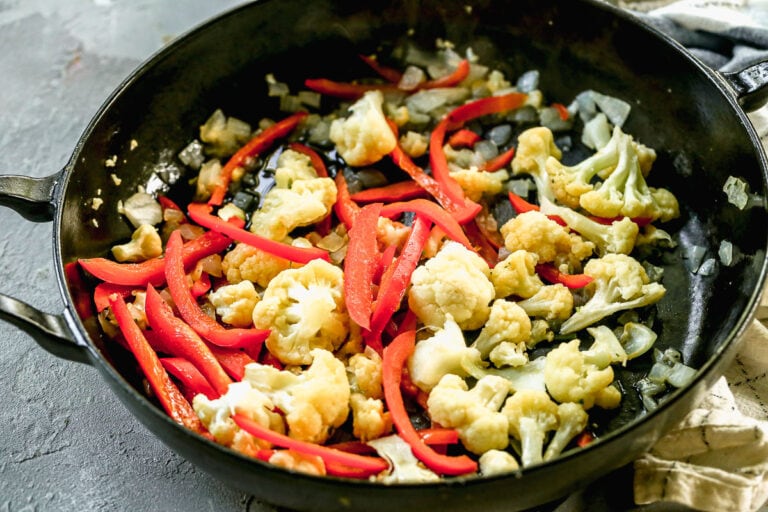
Fresh Vegetables. I like to make my paneer tikka masala with vegetables such as red bell peppers, peas, and a whole head of nutritious cauliflower to make it truly an all-in-one meal (like my favorite Curried Chickpea Hash with Broccoli and Spinach).
Market Swap
Feel free to add or swap other vegetables you enjoy into this paneer tikka masala recipe. Cubed russet potatoes or sliced carrots are especially nice here.
The Directions
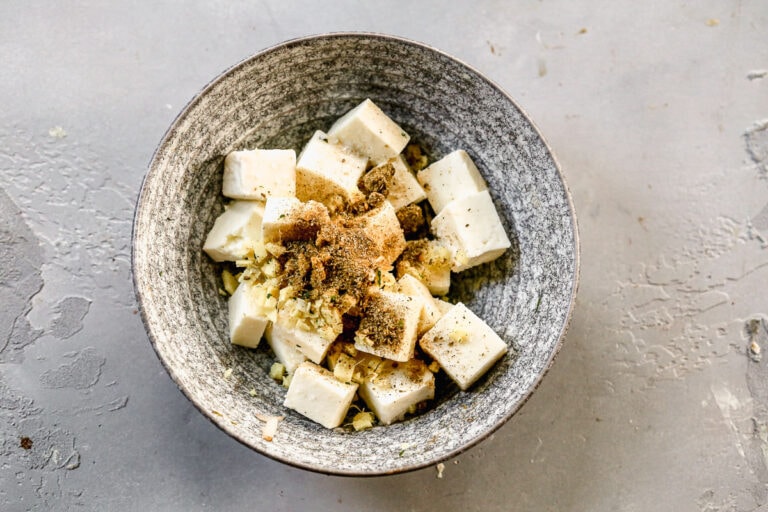
Combine the paneer with the marinade ingredients.
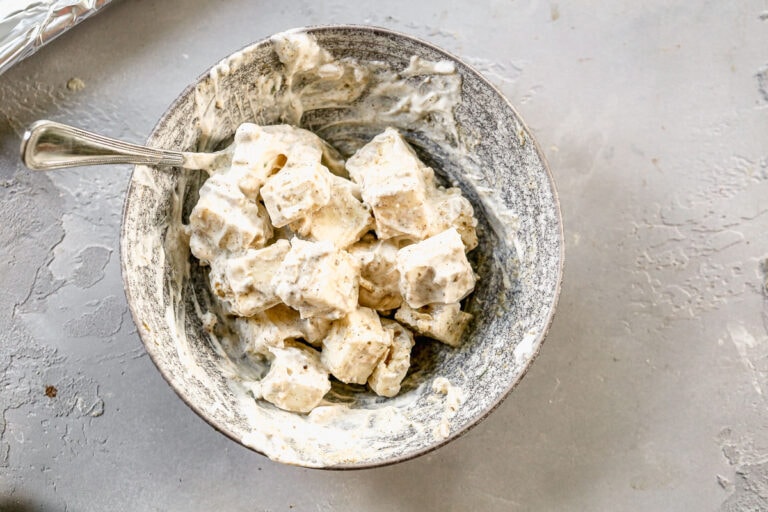
Marinate the paneer.
TIP!
For best results, let the paneer hang out for at least 20 minutes or overnight for maximum flavor.
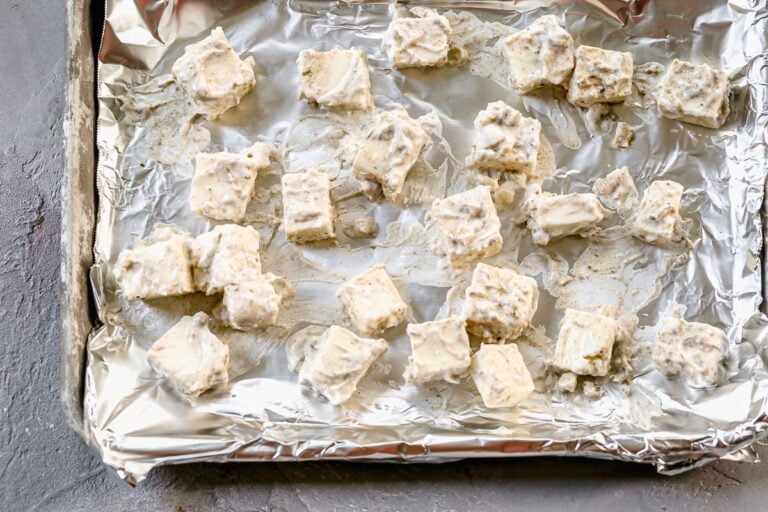
Arrange the paneer on a foil-lined baking sheet.
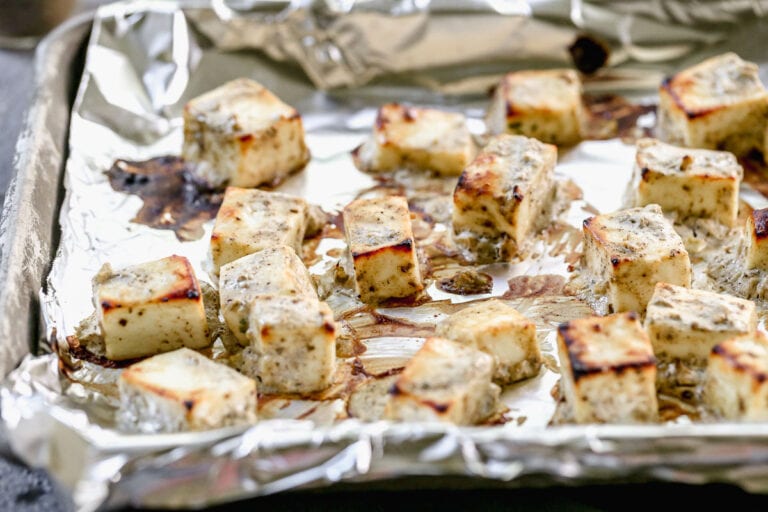
Bake until lightly golden at the edges. Remove and set aside.
Saute the vegetables and aromatics over medium-low heat until tender.
TIP!
Do not let the onion brown—if it starts to turn brown, reduce the heat and continue cooking until soft.
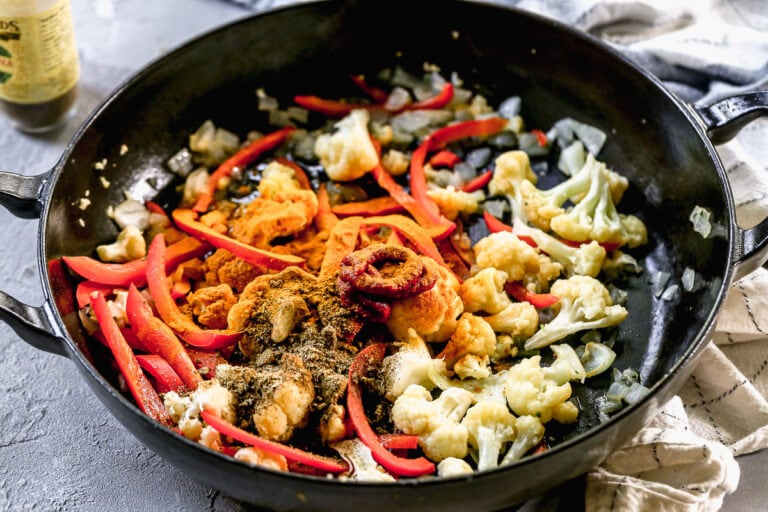
Add the tomato paste and spices to the vegetables.
Stir to combine and cook until tender.
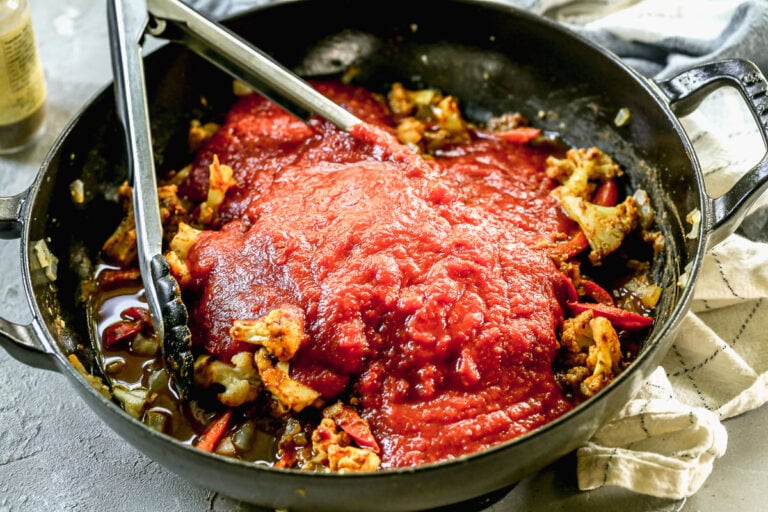
When fragrant, add the crushed tomatoes.
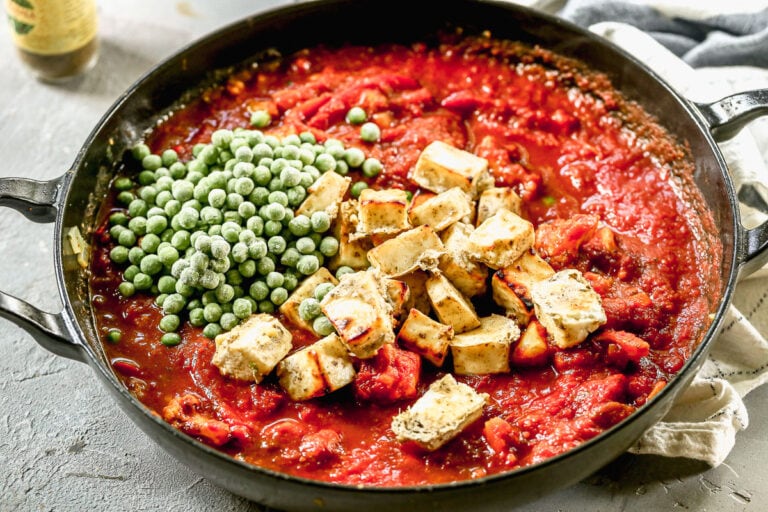
Stir in the cooked paneer and peas.
Remove from heat, stir in the remaining yogurt, and season with salt and pepper, to taste. Top with cilantro and serve with naan or steamed brown rice. ENJOY!
Serving Suggestions
Paneer tikka masala is marvelously saucy and begs for something to mix with it. Pick your vehicle of choice:
Naan. Fluffy, delicious Indian bread is prime for mopping up all that tasty masala gravy. You’ll love this simple Homemade Naan recipe.
Breathe new life and excitement into your weekly dinner routine with a little taste of India. (Then try this Chicken Tikka Masala next!)
Frequently Asked Questions
Where Can I Buy Paneer?
For as wildly common and popular as paneer is in India, up until recently, it has been somewhat difficult to find in the United States. Luckily, it’s becoming more readily available. I’ve heard from a few of you that Costco sells it, and if you don’t have access to Costco, a quick google search will point you to your nearest Indian market.
How Do I Make Paneer from Scratch?
If you can't find paneer, you can go the extra mile and make the best EVER paneer tikka masala by making your paneer from scratch. Celebrated Indian chef Sanjeev Kapoor has this easy paneer recipe.
How is Masala Different from Curry?
The definition mentioned above of masala may sound similar to another popular term in Indian cuisine: curry. Like masala, curry is also a blend of spices. It’s also used to describe thick, rich sauces. While both are used to make thick, aromatic sauces, they have some distinctive differences in their blend of ingredients that make them unique from each other. Generally, masala is more warming and curry is more earthy.
Place the paneer in a bowl and toss with the ginger, garlic, coriander, garam masala, cumin, and salt.
Add the 5 tablespoons of yogurt and stir until the paneer pieces are evenly coated. Let marinate at room temperature for 20 minutes or refrigerate and marinate overnight. Preheat the oven to 400 degrees F.
Line a large baking sheet with aluminum foil and coat with nonstick spray. Arrange the paneer cubes on top in an even layer, discarding any excess marinade.
Bake for 12 to 15 minutes, until the paneer is lightly golden at the edges. Remove from the oven and set aside.
While the paneer bakes, prepare the masala. Heat the coconut oil over medium-low in a large, sturdy skillet. Once hot, add the bell pepper, cauliflower, onion, ginger, garlic, salt, and pepper. Cook, stirring occasionally, for 1 minute, then increase the heat to medium and continue cooking until the vegetables are tender and the onion is translucent; about 12 to 15 minutes. Do not let the onion brown—if it starts to turn brown, reduce the heat and continue cooking until soft.
Add the tomato paste, garam masala, turmeric, and cayenne. Cook and stir constantly for 30 seconds, until very fragrant.
Add crushed tomatoes and cook, stirring occasionally, until hot, about 2 minutes.
Add the paneer and peas, and cook, stirring occasionally, until warmed through, about 2 minutes more.
Remove from heat and let cool for 1 minute. Stir in the 1/2 cup yogurt. Taste and add additional salt and pepper as desired. Sprinkle with cilantro and serve warm with naan bread or brown rice.
Video
Notes
*ABOUT PANEER: Paneer is an Indian cheese that is high in protein, mild in flavor, and delicious! There are not any direct substitutes, so I recommend seeking it out. Try Indian grocery stores or delis or a specialty foods store. Otherwise, you can substitute diced boneless, skinless chicken, though you will need to adjust the cooking time accordingly. It could also work to swap extra firm tofu that has as much moisture pressed out as possible, though I have not tried either of these swaps myself.
**ABOUT GARAM MASALA: Garam masala is an Indian spice blend that can be found in most grocery stores. You can also purchase it online here.
***ABOUTYOGURT: Do not use nonfat yogurt, as it is likely to curdle. Whole milk yogurt is fine. If you do not have Greek yogurt, you can also substitute regular yogurt.
TO STORE: Leftover paneer tikka masala can be stored for 3-5 days in the refrigerator.
TO FREEZE: Stored in a freezer-safe container, paneer tikka masala can be frozen for up to 3 months. Thaw overnight in the fridge before warming.
TO REHEAT: Gently warm paneer tikka masala on the stovetop over low heat until heated through. Do not warm too quickly or the sauce may separate.


 cooked in a rich and flavorful masala gravy. Loaded with veggies and delicious reheated for lunch and dinner. Serve with rice or naan. Recipe at wellplated.com | @wellplated")


No comments:
Post a Comment