RecipeTin Eats |
- Flourless Chocolate Brownies (gluten free)
- Immunity-boosting Green Goddess Soup (delish!)
- My favourite Tomato Salad
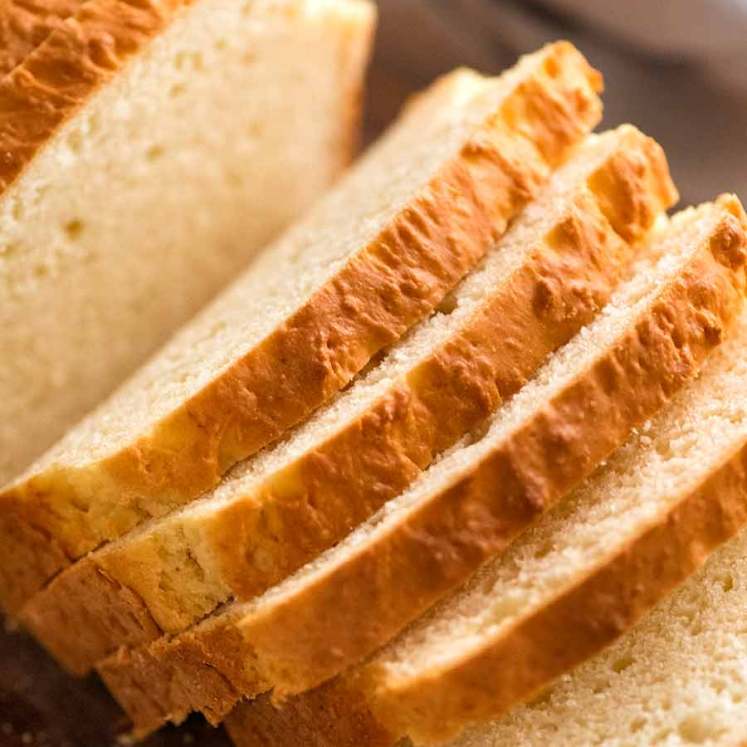
| Flourless Chocolate Brownies (gluten free) Posted: 22 Jul 2022 01:30 AM PDT 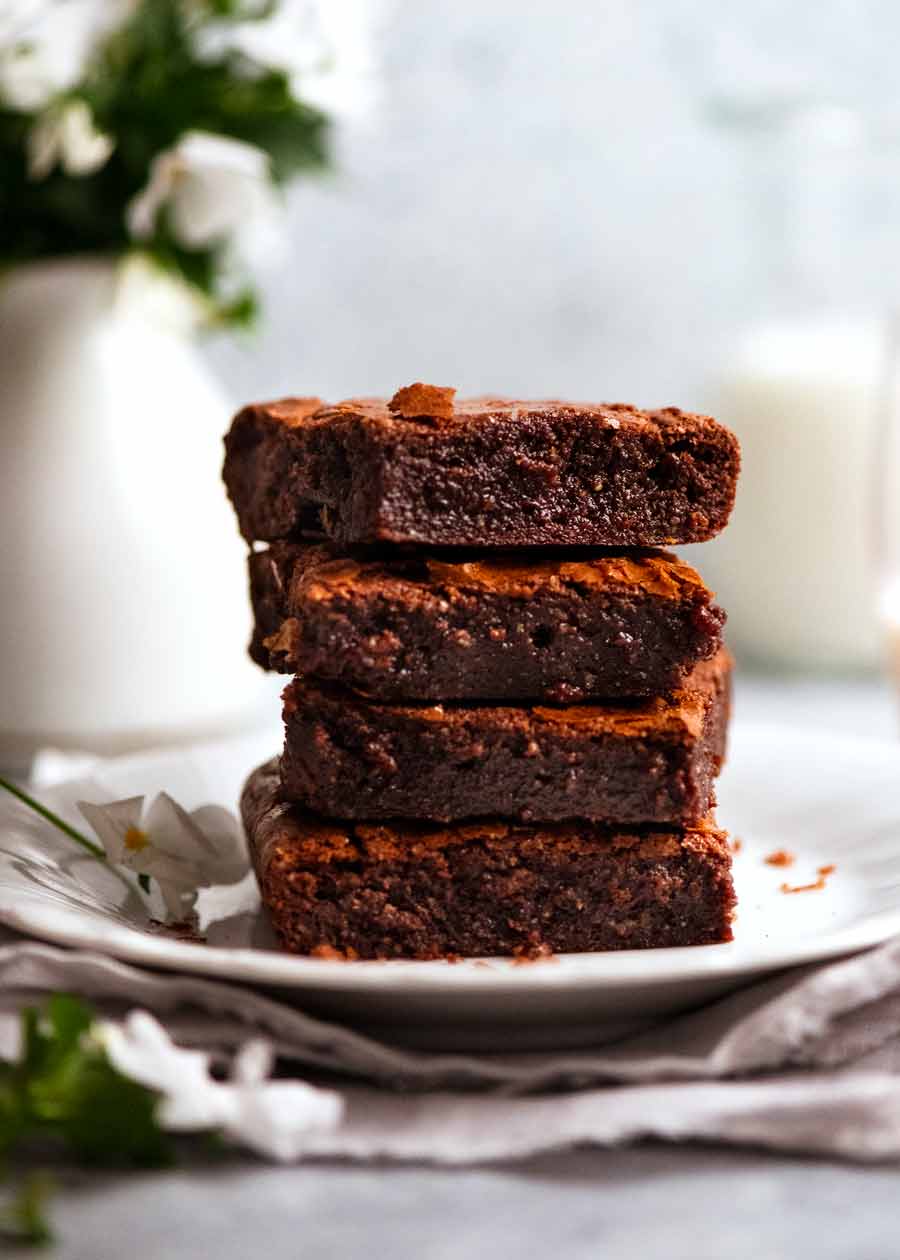 Like my flourless chocolate cake, I make these Flourless Chocolate Brownies even when I'm not after a gluten free dessert because they're that good! Using almond meal instead of flour adds lovely undertones of nuttiness as well as guaranteeing they’ll be fudgy and moist. One bowl, quick, easy and impossible to stuff up! Flourless Chocolate BrowniesI don’t think of these as gluten-free brownies. Rather, I tell people they are flourless chocolate brownies made with almond meal instead of flour, so they happen to be gluten-free. And unlike regular brownies made with flour, these flourless brownies are virtually impossible to overcook to the point that you lose that desirable fudginess that we all know and love about brownies. Win, win! However, please note. If you ask me to choose between these flourless brownies and classic brownies, I’ll plead the fifth. There’s enough space in this world for both!! (A phrase I often use for competing food-love-interests). 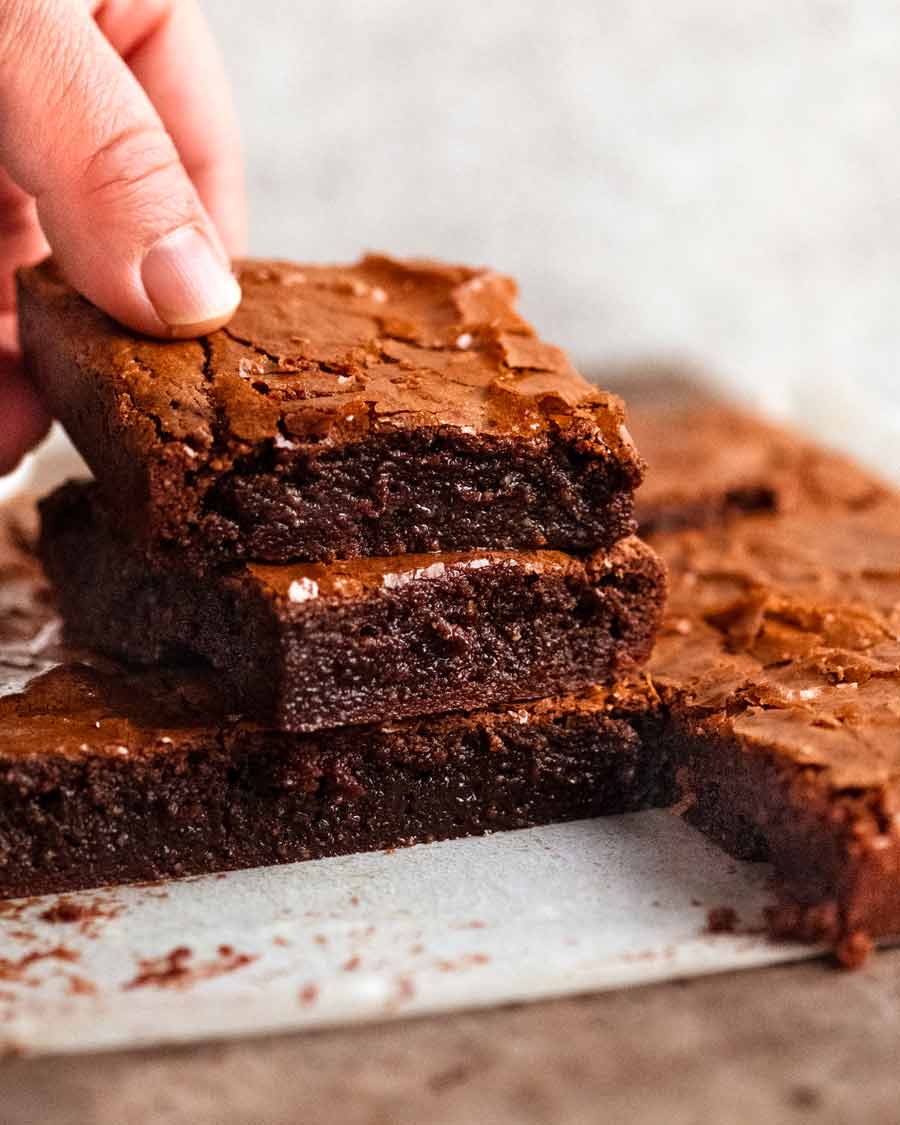 What goes in gluten-free browniesHere’s what you need to make these gluten-free brownies: 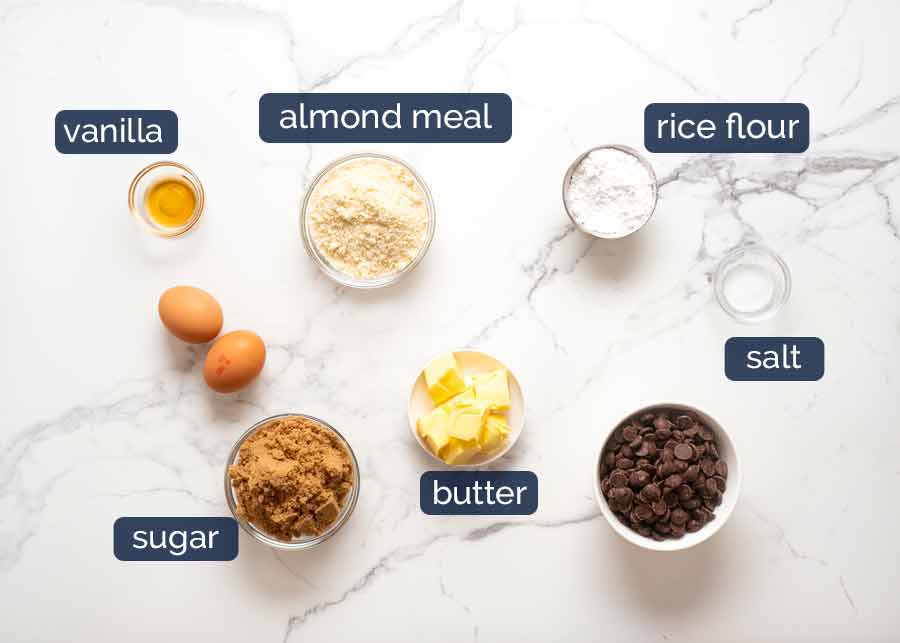
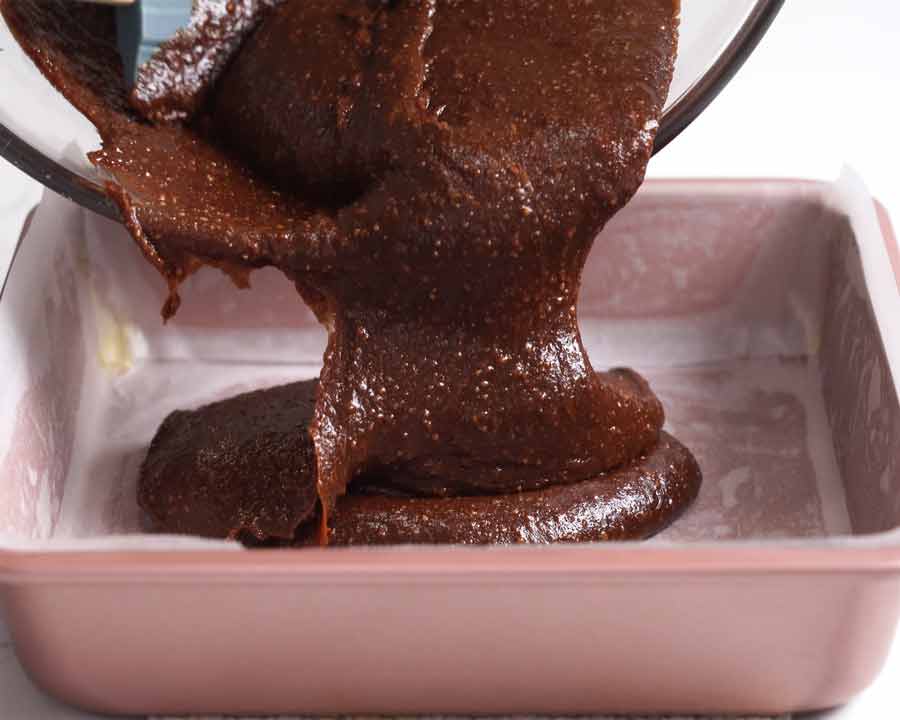 How to make flourless chocolate browniesNice and easy – one bowl and just a wooden spoon! 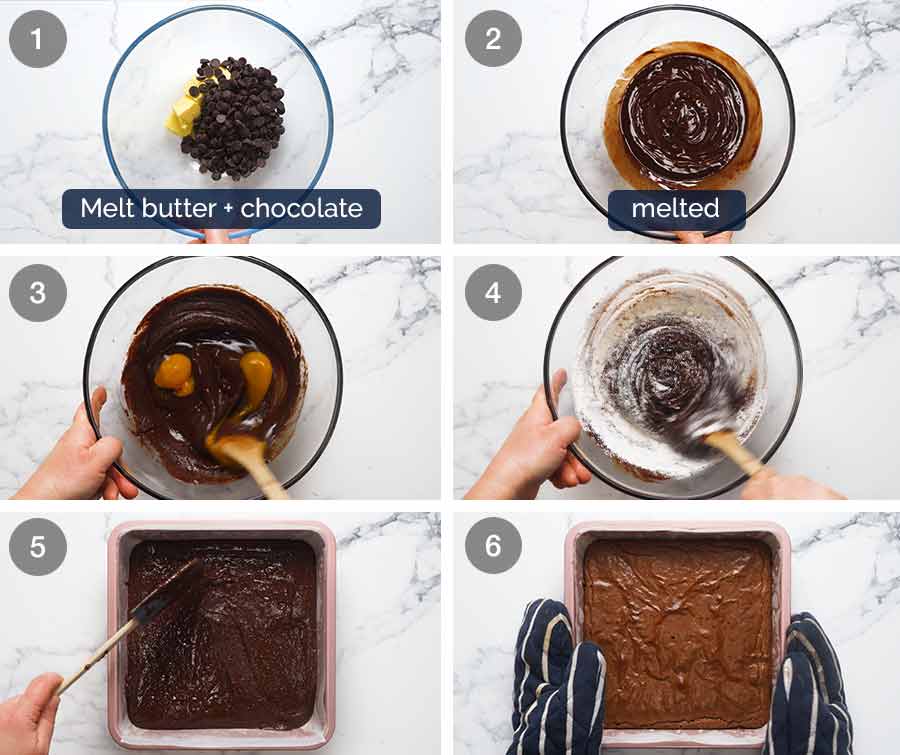
Also, close up proof that even though these are flourless brownies, you’ll get the signature crackly brownie surface that we all know and love: 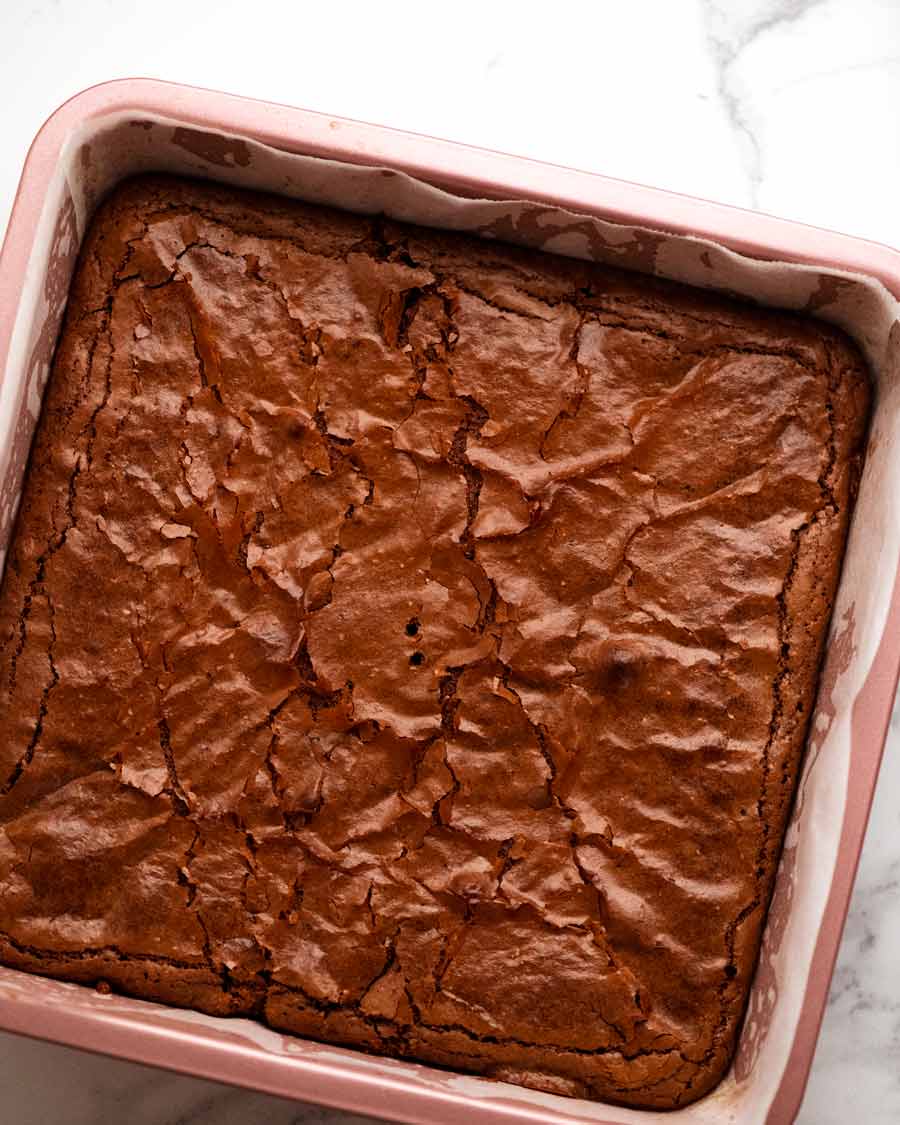 And proof of fudgy insides: 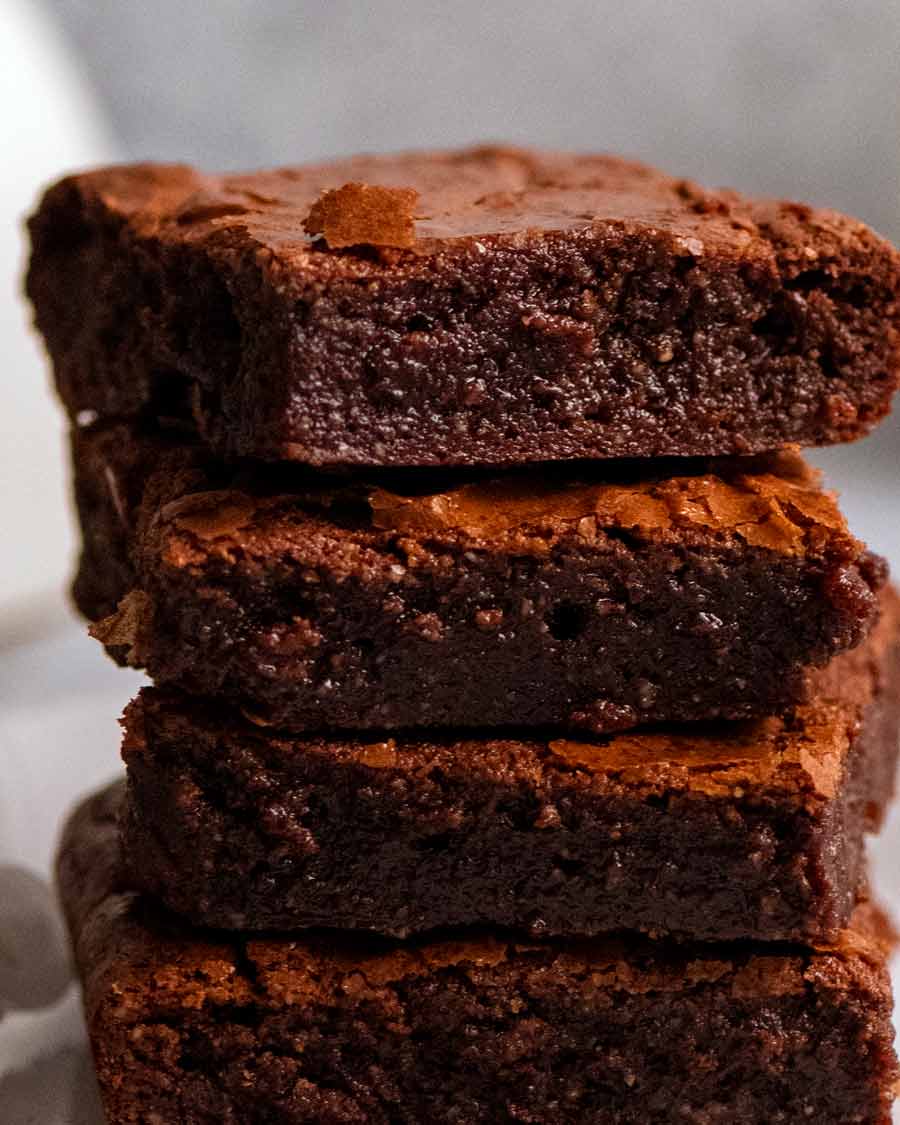 YUM. I see these fudgy beauties in your future. Very near future, in fact. Like – this weekend. Then after you’ve made them, come back and tell me how much you loved them!!! Watch how to make itVideo typo! I use almond meal / ground almonds NOT almond flour in this recipe. I will update it shortly!  Flourless Chocolate Brownies (gluten free)Recipe video above. Like my flourless chocolate cake, I make these Flourless Chocolate Brownies even when I'm not after a gluten free dessert because they're that good! Using almond meal instead of flour adds lovely undertones of nuttiness as well as guaranteeing they'll be fudgy and moist.Very easy, forgiving recipe, hard to stuff up. See note for scaling up. See all my gluten free recipe here. Servings 16 pieces Calories 190cal Ingredients
Instructions
Notes1. Chocolate – Use cooking chocolate chips from the baking section of the supermarket, not eating chocolate. Though actually, Lindt chocolate bars work great, not all eating chocolate does so that’s why I generally don’t recommend it! 2. Almond meal / ground almonds (same thing) – finely blitzed raw, whole almonds in powder form. Find it in the dried fruit and nut section or health food section of grocery stores. Making your own: Blitz whole, raw unsalted almonds until powdered. Almond flour is slightly different but can be used. Brownie texture will probably be slightly more fine (almond flour is made with blanched peeled almonds, no skin). 3. Rice flour – Ground rice, widely available these days at everyday grocery stores. Gives these brownies a bit of much needed structure compared to using just almond meal. Note however that some brands (like McKenzie’s in Australia) are not fully ground into a fine powder and sometimes have a tiny bit of a grit in them. Not a big deal in this recipe, but I prefer using Asian brands as they never seem to have this problem (Asian aisle, Harris Farms in Australia, Asian stores) 4. Cutting – Fudgy brownies are difficult to cut when warm as they are too gooey. Best to cool to room temp before slicing. For best results, refrigerate so it firms up, slice when cold so you get neat squares. Then allow to fully come to room temperature before serving. This way, you get perfect neat slices but the same gooey eating experience! 5. To scale up, use multiple pans. Don’t try to cook a big batch in a larger pan than an 20cm/8″ square pan otherwise the sides will overcook while the middle will be undercooked (as I found out first hand!). 6. Storage – Keeps in an airtight container for 5 days, though if it’s quite warm where you are, best to keep in the fridge and bring to room temp before eating. 7. Nutrition per slice. NutritionCalories: 190cal | Carbohydrates: 20g | Protein: 3g | Fat: 11g | Saturated Fat: 6g | Polyunsaturated Fat: 1g | Monounsaturated Fat: 3g | Trans Fat: 1g | Cholesterol: 33mg | Sodium: 85mg | Potassium: 89mg | Fiber: 1g | Sugar: 14g | Vitamin A: 168IU | Calcium: 30mg | Iron: 1mg Recipe originally published May 2014. Updated with much needed new photos and a video, plus the all important Life of Dozer section! No change to recipe – perfect as is. Life of DozerMassage balls to work knots out of my back regularly go missing around here…. 
The post Flourless Chocolate Brownies (gluten free) appeared first on RecipeTin Eats. |
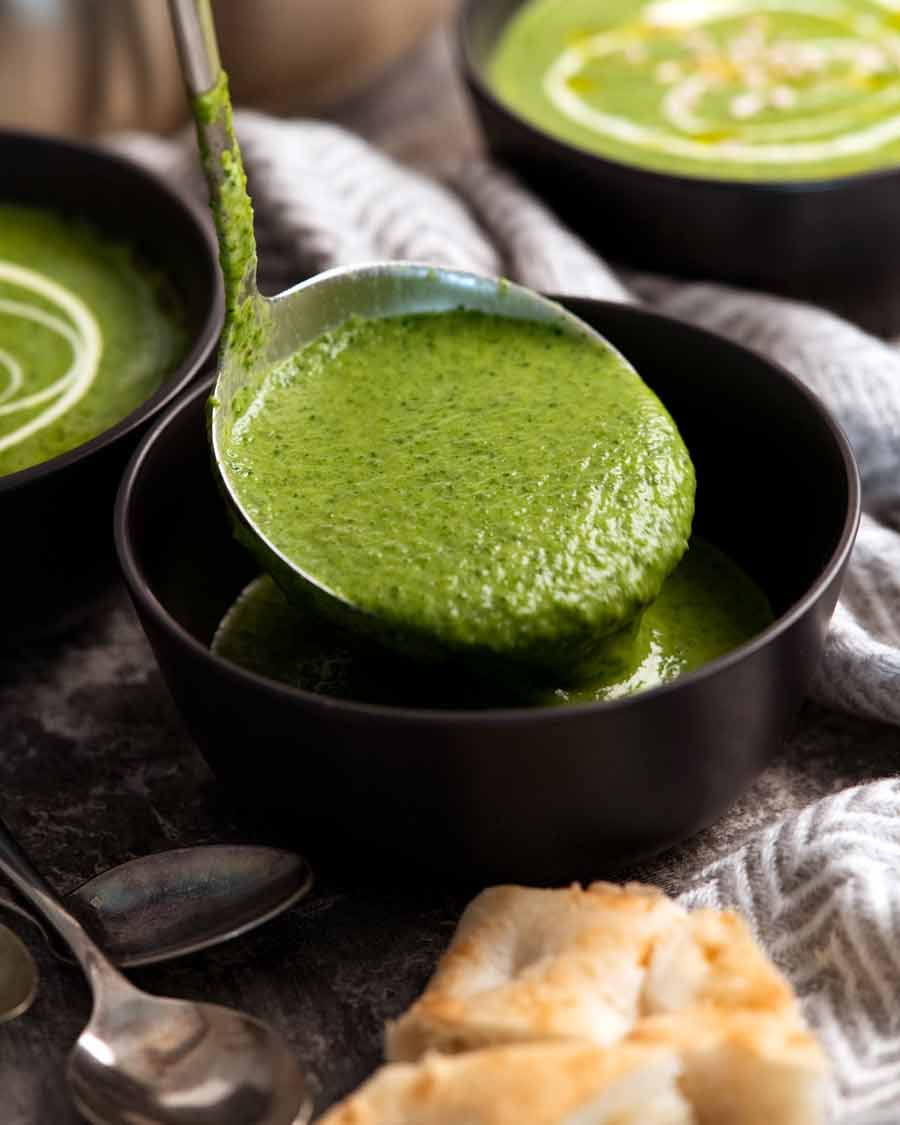
| Immunity-boosting Green Goddess Soup (delish!) Posted: 20 Jul 2022 11:00 PM PDT 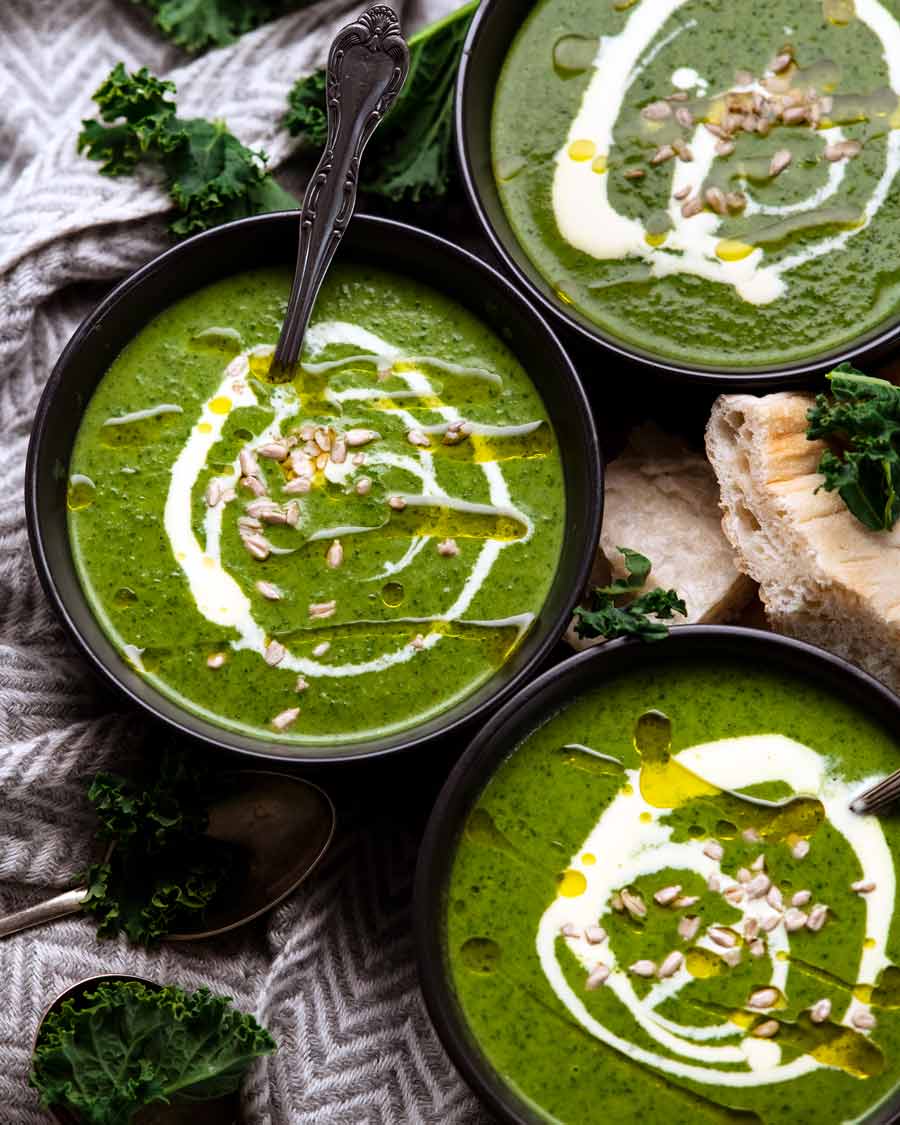 This Green Goddess Soup defies all expectations of what green soups typically are. It doesn’t taste like pureed grass for one. It’s actually delicious. And it’s being shared by me, a self confessed Cheese-Lovin’-Carb-Monster (who ever thought THAT would happen!) Packed with immunity-boosting vegetables, this verdant soup is just what you need to fight off winter blues. Disclaimer: I am not a medical professional and nothing in this post should be interpreted as medical advice. I’m just sharing a recipe that is loaded with good-for-you nutritious vegetables! Immunity-boosting Green Goddess SoupHalf of Sydney is out of action with the flu or COVID right now. So here by popular demand is a big pot of nutrition packed goodness that actually tastes great! I’m not going to lie. The first couple of attempts here were pretty dismal and tasted like a hot green wheatgrass smoothie. I knew it was doing good things to my insides….but it wasn’t fun eating it!!! But with a bit of tinkering, turns out it is possible to make a green soup that’s as delicious as it is good for you. The 3 little things that make all the difference here are:
  What goes in my Green Goddess SoupJust WAIT until you see the enormous pile of green goodness you’re about to cook down! It makes you feel virtuous even just thinking about making this. I've tried various combinations and the vegetables shown below are my favourite for best flavour so it doesn't taste like you're eating a bowl of hot grass. But you can switch out with whatever veg you've got, so don’t get too hung up on copying everything I’ve used. Don't skip the spices. It’s not much in there, but it really makes a difference to the end result! Veg load #1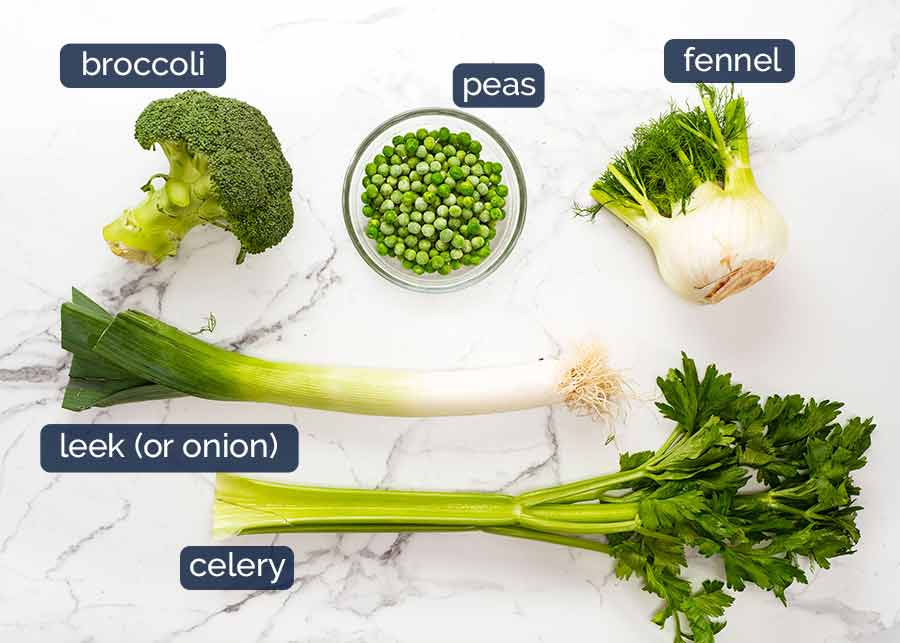 If you don’t have one of the vegetables, just double up on another. This is a highly flexible recipe!
Veg load #2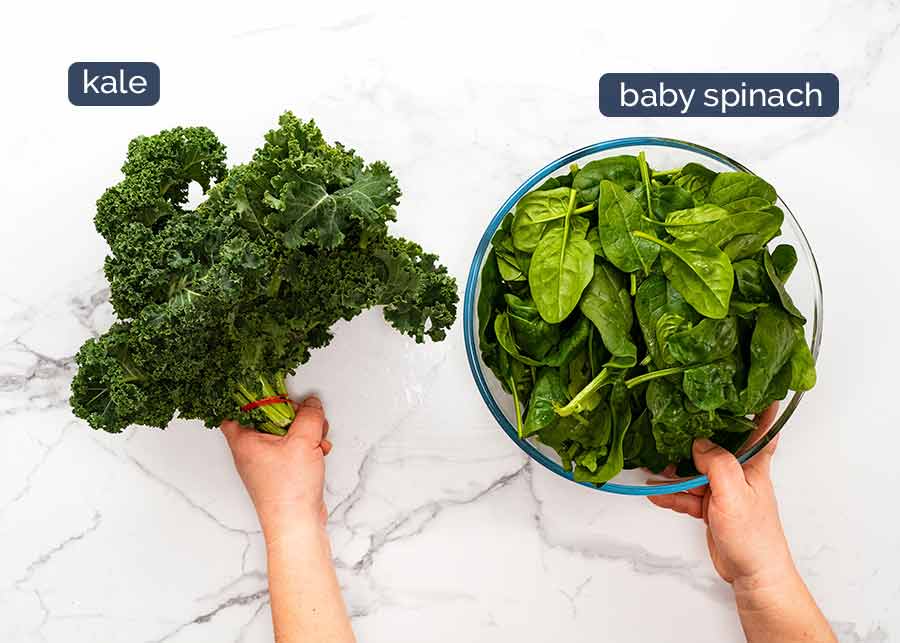
Aromatics and flavourOK, so here are the ingredients that make this soup tasty!! You didn’t seriously think I was just going to ask you to whizz up a pile of green veg, did you?? 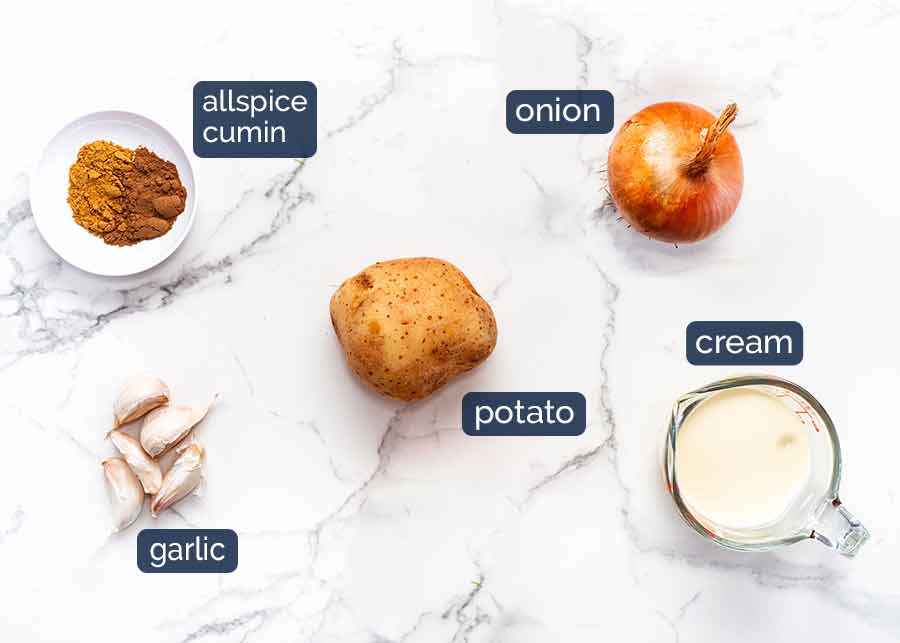
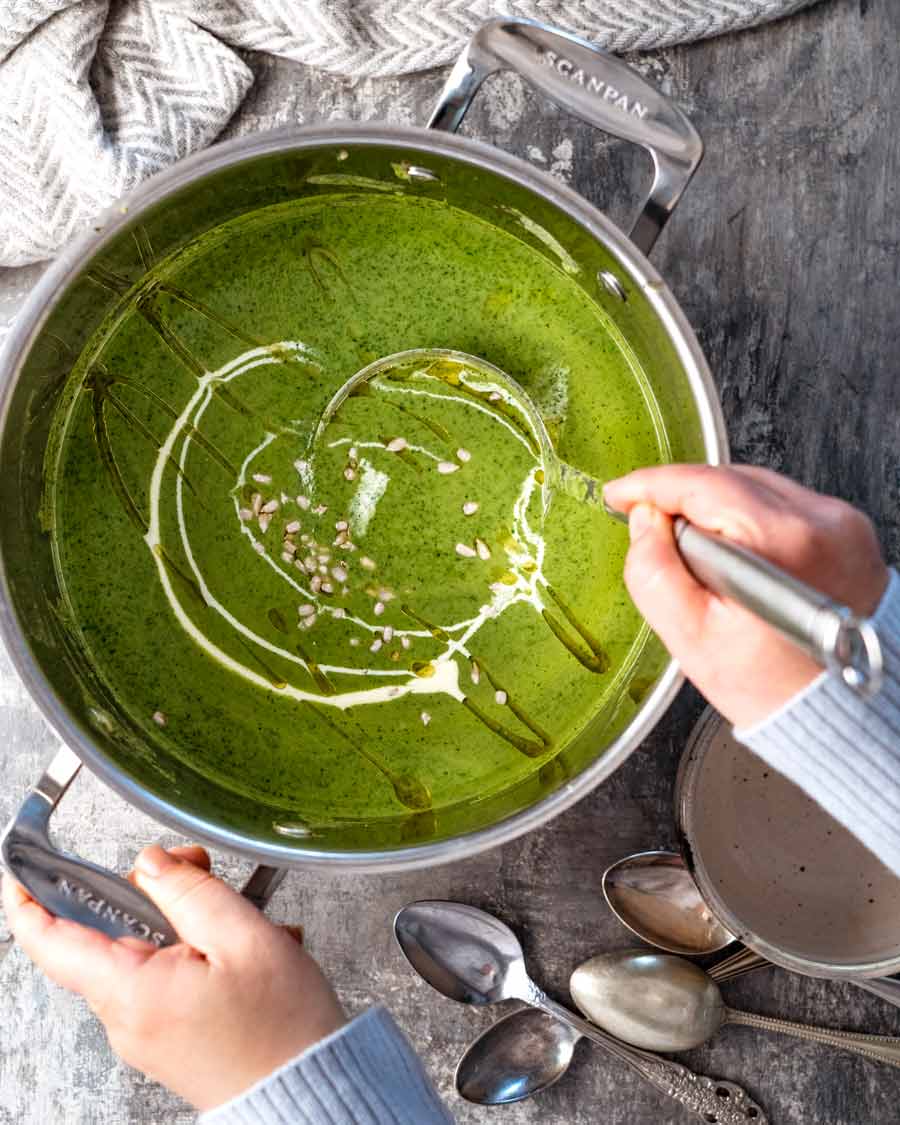
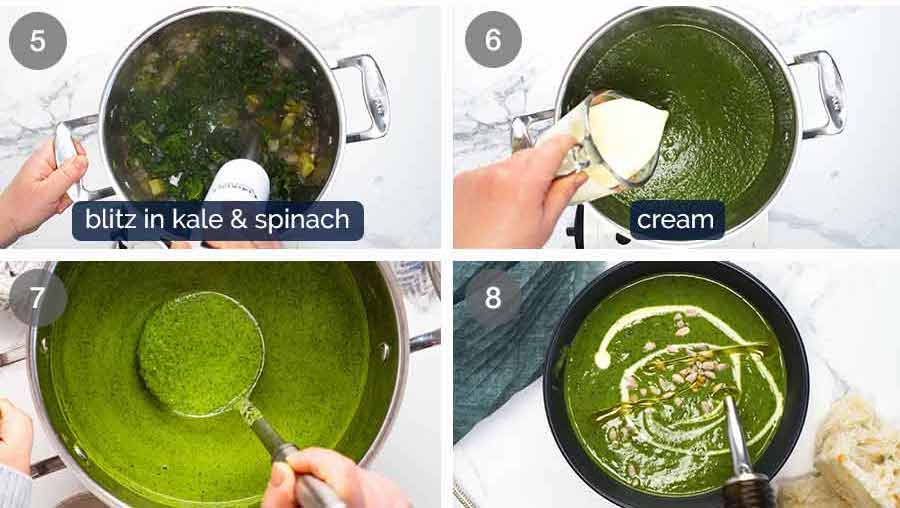
Just add water!Most soups on my website call for stock for the cooking liquid, but this recipe only requires water. This is because we’re essentially making our own homemade vegetable stock as part of this recipe! The considerable volume of flavour base aromatics we use (garlic, onion/leek, celery, fennel) goes a long way to contribute to this. How to make Green Goddess SoupNice and easy – 6 minutes sauté followed by a 8 minute simmer then blitz! 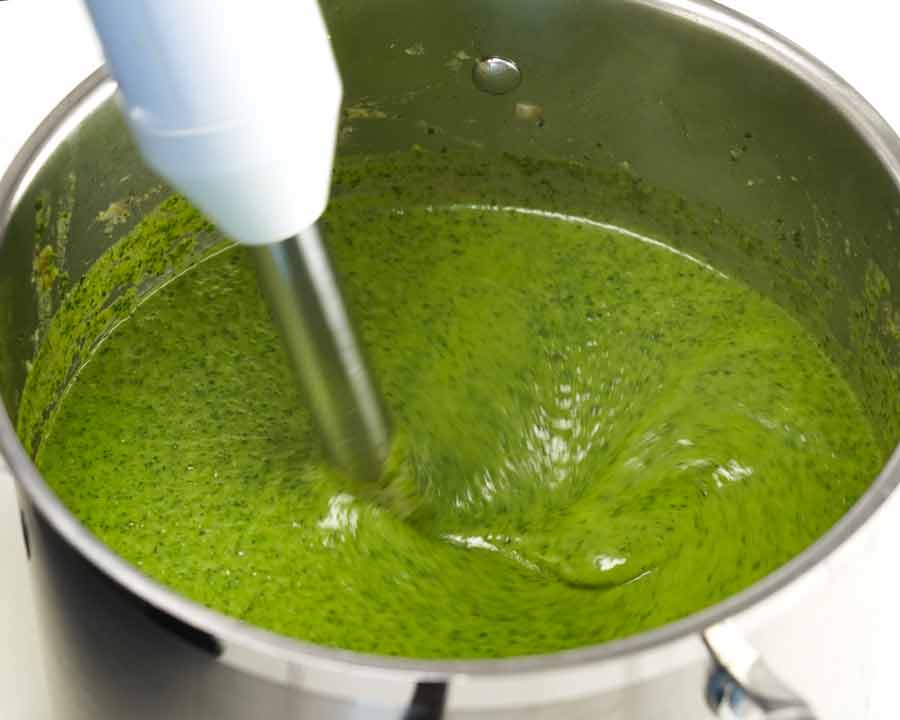 Be sure to use a very big pot. This is a big batch soup! Don’t worry, it keeps perfectly – fridge 5 days or freezer for 3 months (and stays nice and green!). 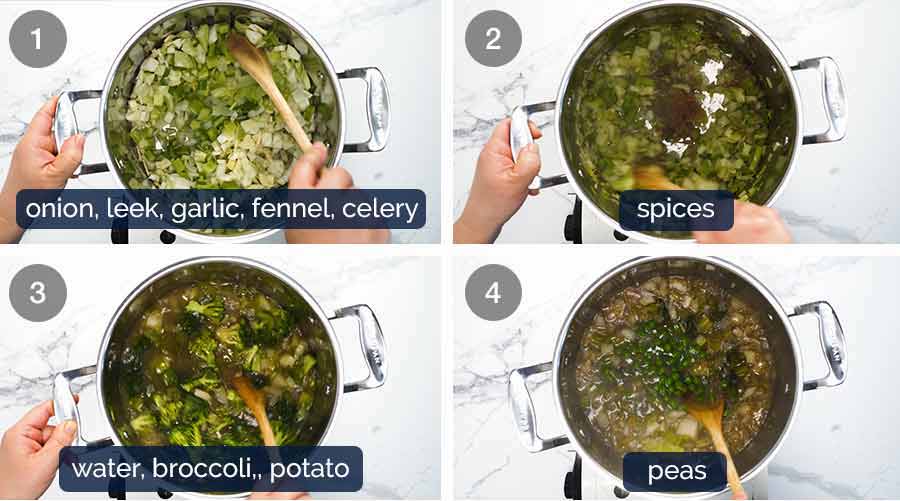
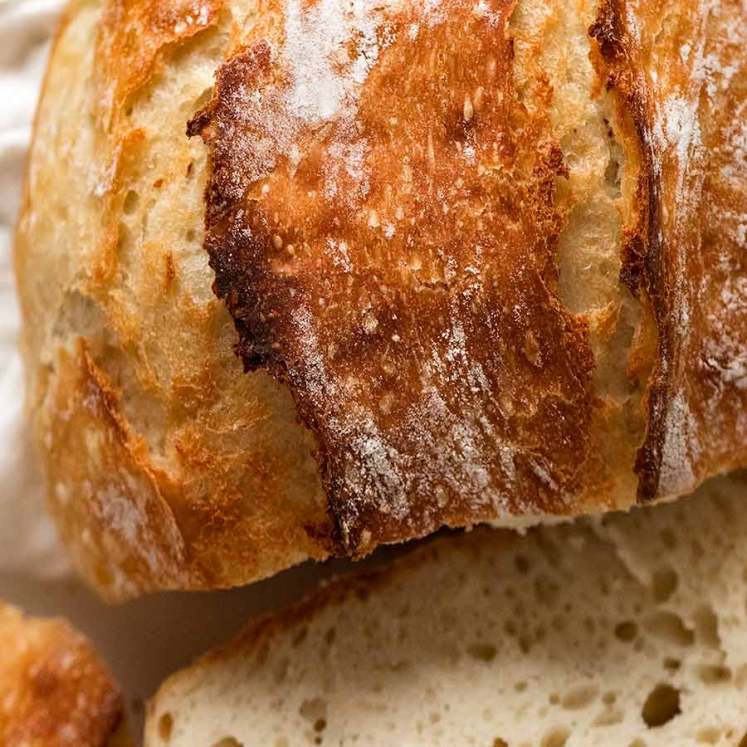
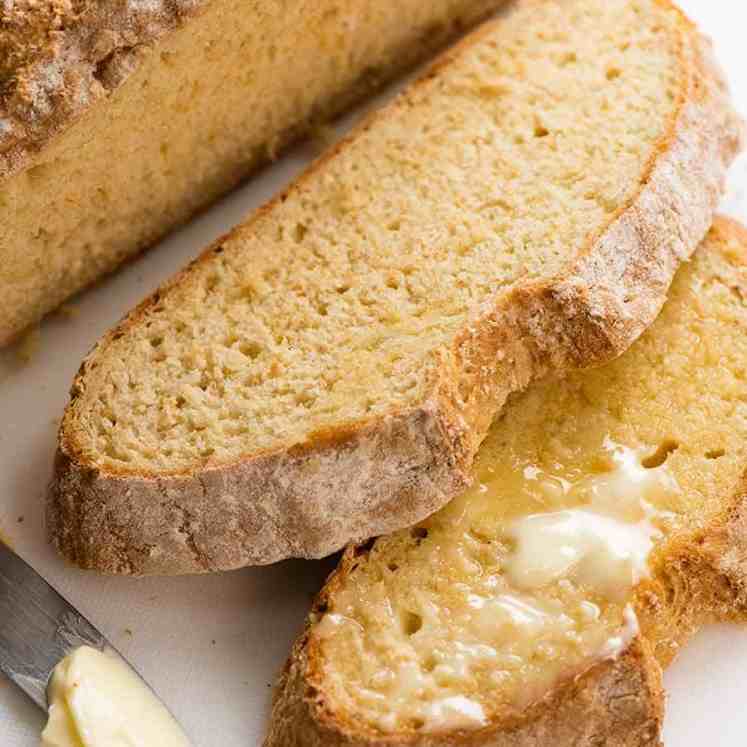
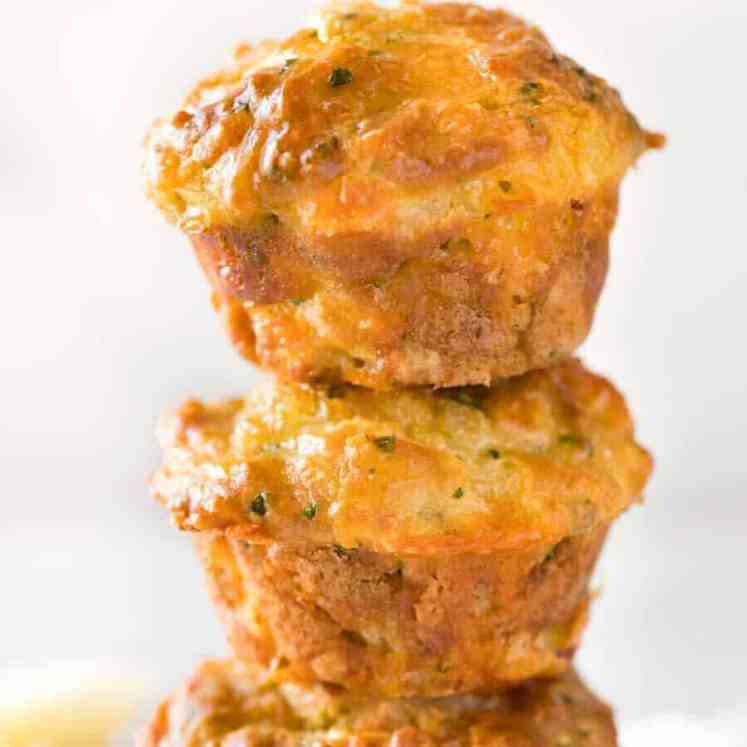
 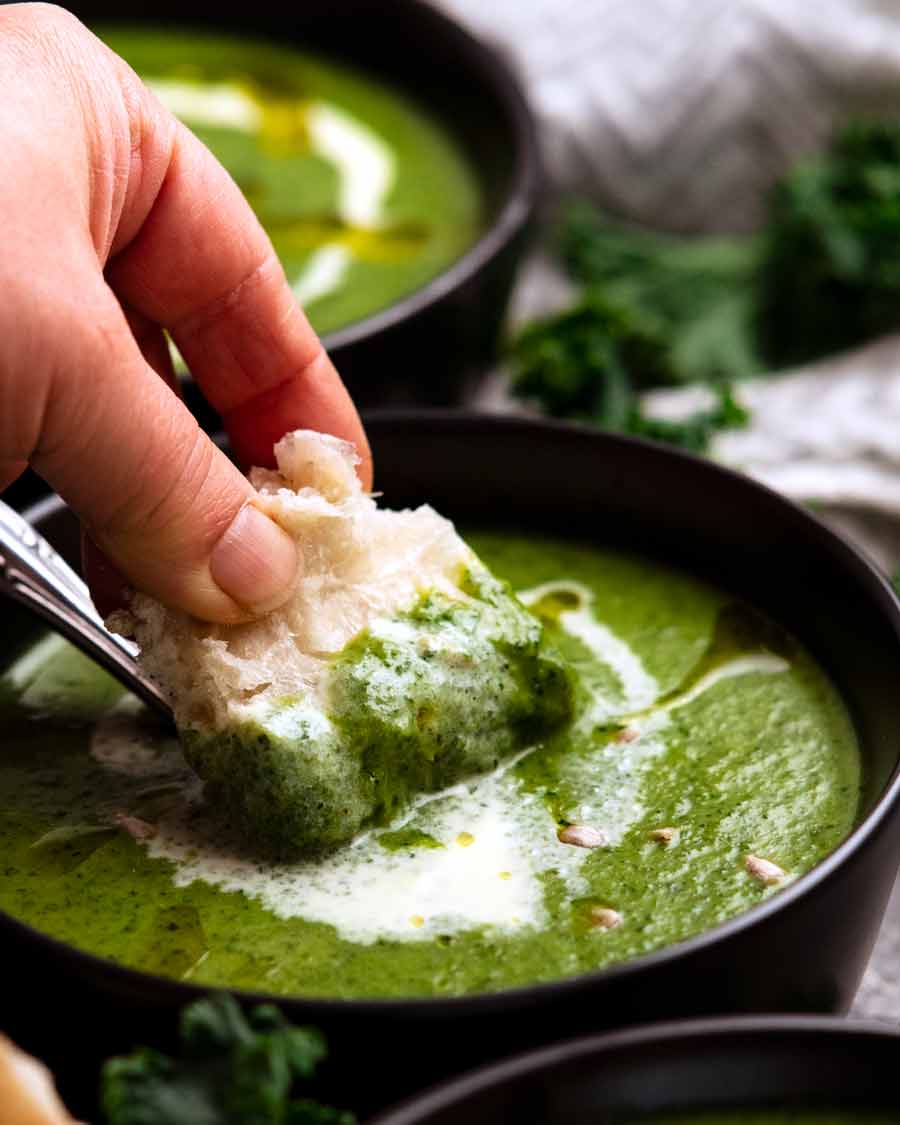 I find this soup filling enough by itself but you know me, I’ll never pass up an opportunity for a hunk of bread for dunking. It’s pictured above with Crusty Artisan Bread, otherwise known as the world’s easiest no-knead bread and one of the most popular recipes on this website. If you haven’t tried it, it’s a must! Here are a few more bread dunking options: Bread dunking optionsBig batch, keeps well – and stays green!I don’t know about you but the last time I attempted a green soup, it went brown when I reheated it. Also, this is a big-batch recipe. Mainly because it was designed around using 1 whole bag of baby spinach, a whole bunch of kale, a whole fennel bulb etc etc. But it scales down perfectly – just use the slider on the recipe card (click on the Servings then slide down). If you try this Green Goddess Soup, I’d love to know what you think! – Nagi x Thanks for the inspiration, Ingrid!I was going to call this soup Ingrid’s Green Goddess Soup (Hacked By Nagi). Because it’s inspired by my cookbook publisher, Ingrid from Pan Macmillan, who kindly sent up her Green Goddess Soup when I was struck down with COVID a couple of months ago. Nourishing and delicious! So I copied it. Watch how to make it Immunity Boosting Green Goddess SoupRecipe video above. A feel-good soup packed full of nutrition created to cure winter colds! While you could switch out the veg with whatever you've got, I've tried various combinations and this is my favourite for best flavour so it doesn't taste like you're eating a bowl of hot grass.Don't skip the spices. Doesn't look like much but it really makes a difference! Servings 8 people Calories 191cal Ingredients
Garnishes
Instructions
Notes1. Onion / leeks – Use either one of each, as shown in the base recipe and recipe video, or use either 2 leeks or 2 onions. Leek has a slightly sweeter, more rounded flavour which I like to use when they’re on special! 2. Fennel adds a great flavour base to this soup so really try not to skip it. For those who are not a fan of the aniseed flavour of fennel, don’t worry, you can’t taste it! 3. Just water is required for this soup. We don't need chicken or other stock for a flavour backing, like I use for most soup recipes. We're essentially making a homemade vegetable stock here! 4. Peas can be substituted with more broccoli, fennel or potato. 5. Kale – Nutrition booster! In case you’re concerned about a strong kale flavour, don’t worry! With everything else going on in the soup, the kale flavour is not really there. Substitute with more baby spinach or English spinach. Or 300 – 400g frozen kale or spinach (thawed, excess water lightly squeezed out). To remove kale leaves, enclose your hand around the base of the stem then run your enclosed fist up the stem to strip the leaves off. To measure, push the kale leaves really tightly into the measuring cup. Jam pack it in! 6. Baby spinach – Substitute with English spinach, or more kale. To measure, jam pack it really tightly into a measuring cup! 7. Cream alternative – To make this vegan, use a vegan cream (available at some grocery stores these days), coconut cream or coconut milk (it will add a touch of coconut flavour which I think would be nice). 8. Sunflower seeds – To toast, preheat a small pan (no oil) over medium high heat then toast the sunflower seeds, stirring or shaking the pan every now and then, until light golden. Do the same with other nuts/seeds of choice (pine nuts, pepitas, almond flakes would be nice). For croutons, use the directions in the Celeriac soup recipe. 9. Nutrition per serving, about 2 1/2 cups per serving (generous meal!). NutritionCalories: 191cal | Carbohydrates: 17g | Protein: 5g | Fat: 13g | Saturated Fat: 6g | Polyunsaturated Fat: 1g | Monounsaturated Fat: 5g | Cholesterol: 25mg | Sodium: 806mg | Potassium: 678mg | Fiber: 6g | Sugar: 5g | Vitamin A: 6824IU | Vitamin C: 83mg | Calcium: 192mg | Iron: 2mg Life of DozerPretty sure he’s never had a cold in his life….  The post Immunity-boosting Green Goddess Soup (delish!) appeared first on RecipeTin Eats. |
| Posted: 20 Jul 2022 10:58 PM PDT 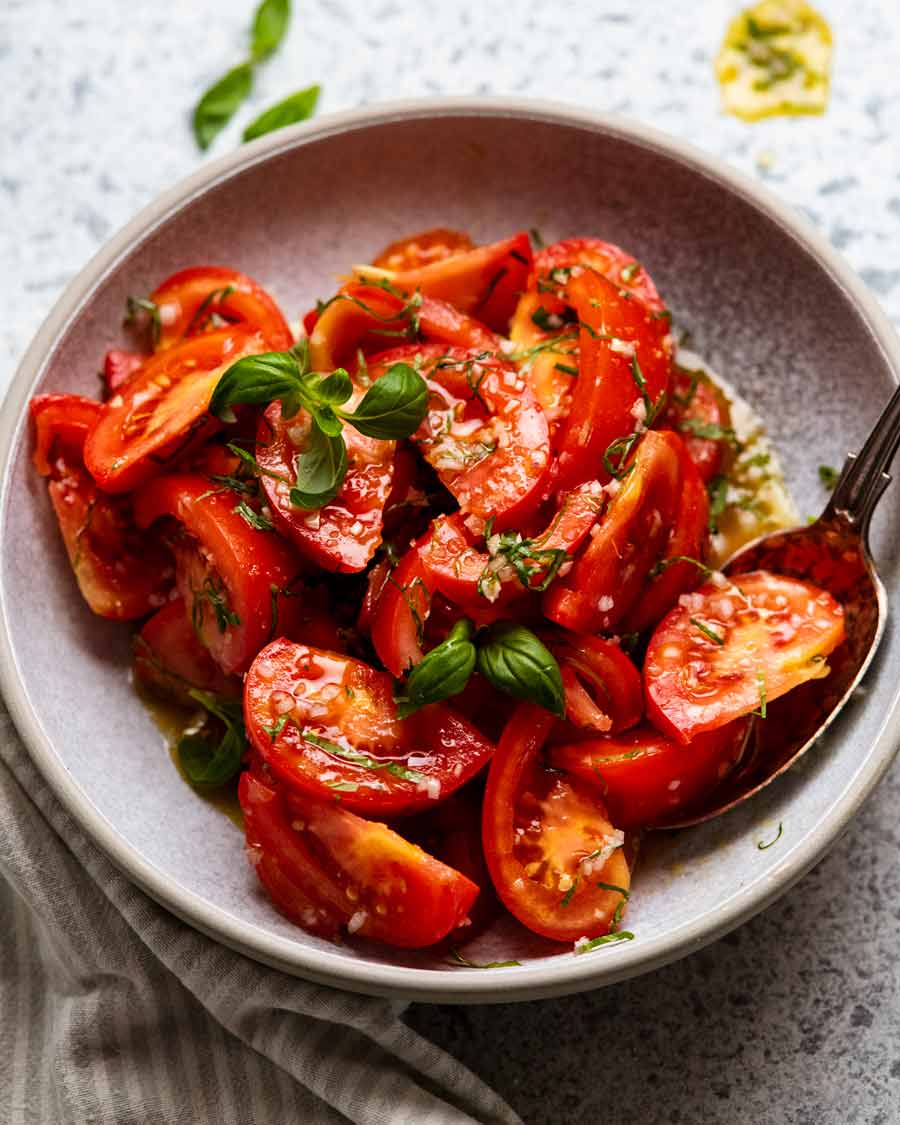 The secret to my best tomato salad lies not in using costly nor an extensive list of ingredients, but in how it’s constructed. Rather than shaking up a dressing, thick wedges of tomato are sprinkled with minced garlic, shallots and salt, drizzled with olive oil and vinegar then gently tossed before finishing with a sprinkle of basil. The result? Flavour that sticks to the tomato rather than sliding off like dressing. Try it. I think you’ll love it! My favourite tomato saladThis is a tomato salad so good, it’s exceptional made even with just-okay winter tomatoes like the ones I used yesterday when re-checking this recipe before publishing it today. So imagine how incredible it is with ripe, juicy, seasonal summer tomatoes!!! (In case you’re wondering why I’m sharing a summer recipe in the middle of Aussie winter, it’s because half the readers of my website are in the northern hemisphere enjoying summer right now. Not jealous at all! Why this tomato salad is betterAs I mentioned in the opening, the thing that makes this tomato salad different is that rather than shaking up a dressing which we pour over the tomatoes, we sprinkle/drizzle thick wedges of tomato with the ingredients we typically put in a dressing (olive oil, garlic, salt, vinegar). Changing up the assembly really does make a difference because you get flavour infused from the garlic, shallots and salt into the tomato in a way you can never achieve if you just pour over a dressing! 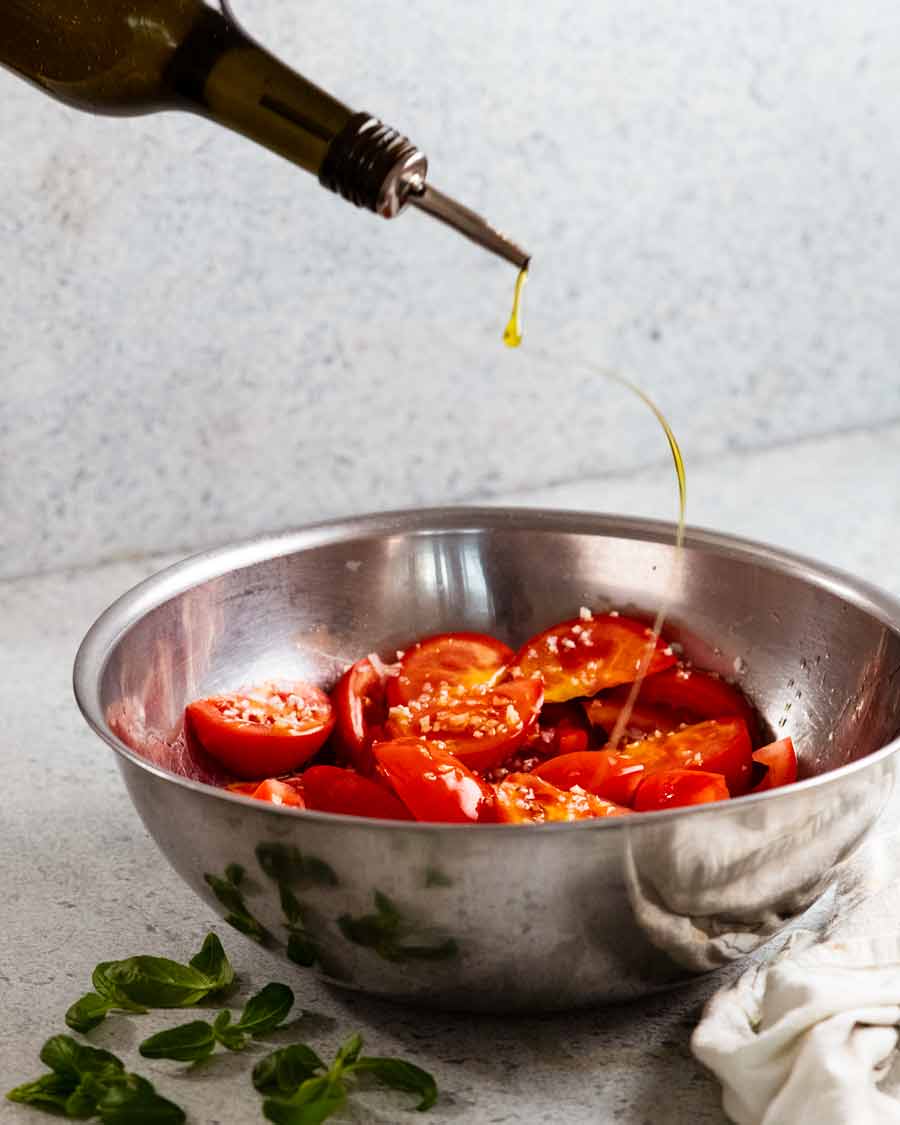 Ingredients in my favourite tomato saladHere’s what you need for this tomato salad: 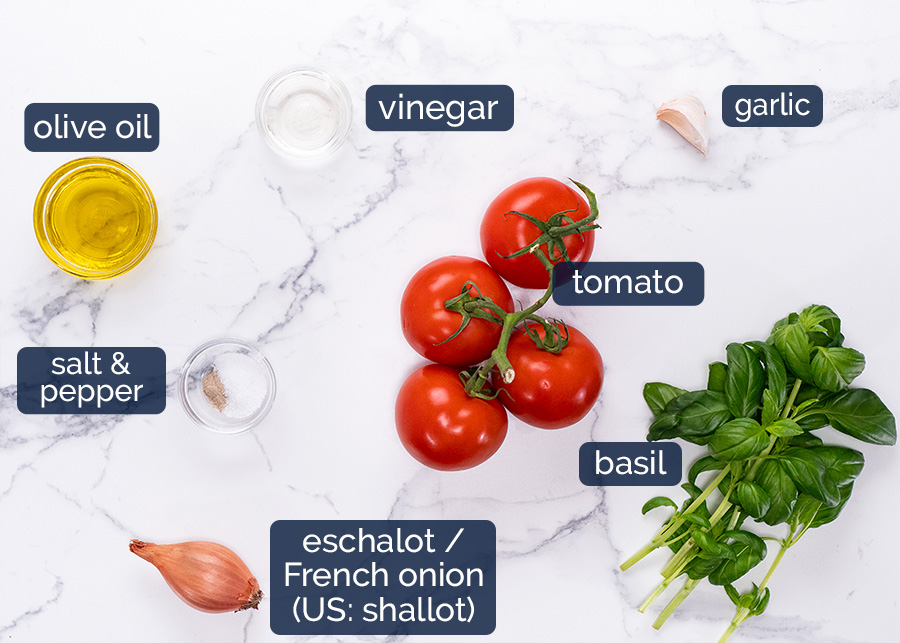
How to make my favourite tomato saladPlace the tomatoes in the bowl then sprinkle/drizzle with all the other ingredients except the basil. Toss to coat, add the basil and toss again. And that’s IT! 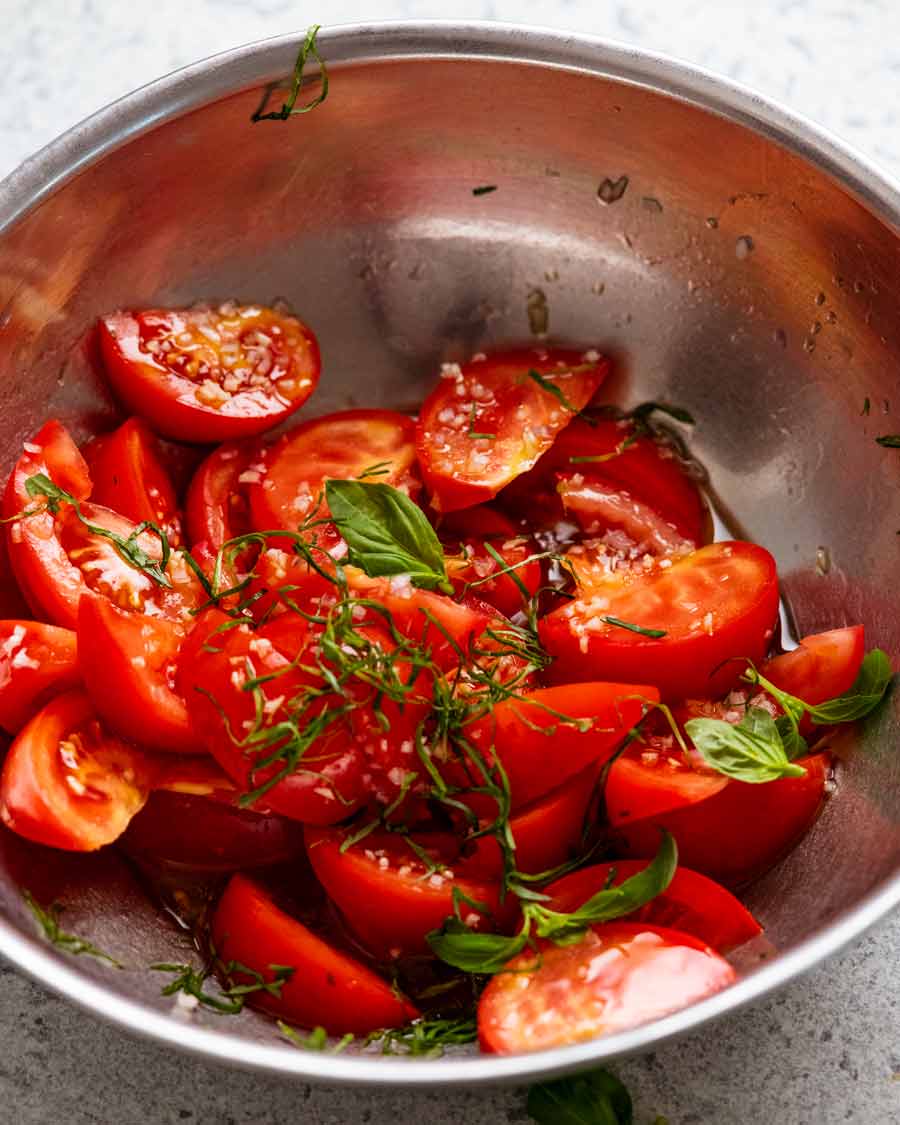 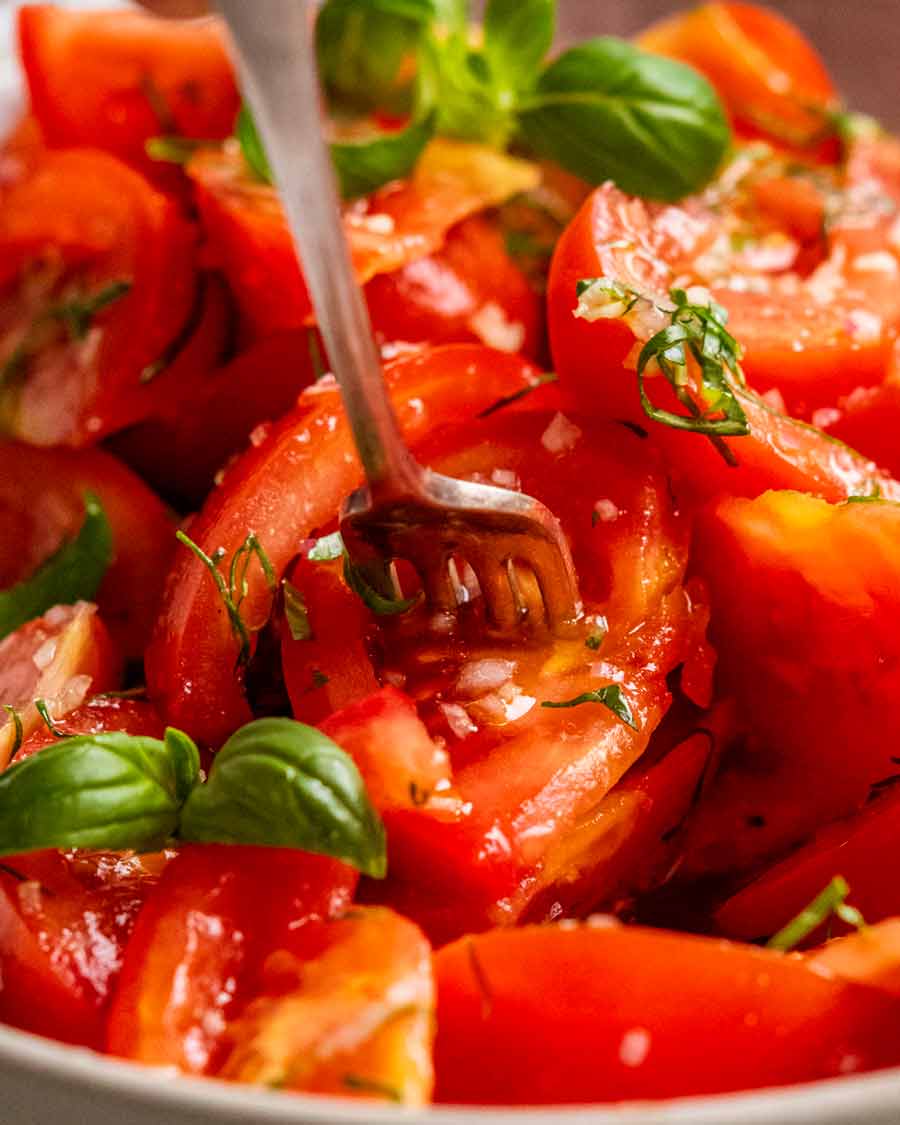 YUM. This is such a good tomato salad recipe. Crusty grilled bread for mopping up the tomato juices that pool at the bottom of the bowl is highly encouraged. Or jam in as much tomato as you can between two thick slices of toasted bread, drizzle with an additional bit of oil. SO GOOD! No video for this recipe because it’s such a quick ‘n easy side salad. I really want to build up my side salads collection but if I try to do a video for all of them it will never happen! So I’m only doing recipe videos for the more involved ones. Love to know what you think if you try this! What do you think about this different way of building a tomato salad?? – Nagi x 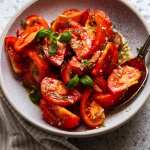 My favourite Tomato SaladA big, juicy tomato salad is a staple everyone should know how to make well! Rather than shaking up a dressing, sprinkle the garlic, eshallots/shallots and salt straight onto the tomato wedges. The flavour sticks better.Use everyday red tomatoes though if you can get them, heirloom tomatoes will add a great splash of colour. Servings 4 Calories 117cal Ingredients
Instructions
Notes1. Tomatoes – Obviously the riper the better! But honestly, I made this yesterday in the middle of Aussie winter with just-okay, greenhouse-grown tomatoes and it was still so, so good. If you’ve got cherry tomatoes or grape tomatoes, try my Cherry Tomato Salad instead (it’s designed for them). 2. Eschallots – also known as French Onions and called “shallots” in the US. More delicate and sweeter than brown onions. Substitute with the white part of green onions, finely minced, or very finely minced red onions. 3. Vinegar – Or apple cider vinegar, sherry vinegar or champagne vinegar. Balsamic vinegar is fine too from a flavour perspective but will stain the tomatoes brown. 4. Basil – worth making even without. I like to add a pinch of dried oregano instead. 5. Nutrition per serving. NutritionCalories: 117cal | Carbohydrates: 5g | Protein: 1g | Fat: 11g | Saturated Fat: 1g | Polyunsaturated Fat: 1g | Monounsaturated Fat: 8g | Sodium: 443mg | Potassium: 294mg | Fiber: 2g | Sugar: 3g | Vitamin A: 1025IU | Vitamin C: 17mg | Calcium: 14mg | Iron: 1mg Life of DozerWondering when this endless rain in Sydney is going to ease…. We all are, Dozer! It’s been 7 months solid of non-stop rain.  The post My favourite Tomato Salad appeared first on RecipeTin Eats. |
 – Nagi x


 )
)| You are subscribed to email updates from RecipeTin Eats. To stop receiving these emails, you may unsubscribe now. | Email delivery powered by Google |
Inbox too full?  Subscribe to the feed version of RecipeTin Eats in a feed reader. Subscribe to the feed version of RecipeTin Eats in a feed reader. | |
| Google, 1600 Amphitheatre Parkway, Mountain View, CA 94043, United States | |


No comments:
Post a Comment